AWS
| Use Cases | Lacework Feature(s) | Data Source |
|---|---|---|
| Cloud Security Posture Management (CSPM) Cloud Infrastructure Entitilement Management (CIEM) | Compliance Dashboard and Reports Cloud Infrastructure Entitilement Management Dashboard Attack Path Analysis and Exposure Polygraph | AWS Cloud Configuration |
| User Entity Behaviour Analytics (UEBA) | Cloud Anomaly Detection Cloud Drift Detection Cloud Audit Polygraph | AWS Cloud Audit Logs |
| Vulnerability Management | Vulnerability Management Dashboard | ECR AWS Agentless Workload Scanning |
| User Entity Behaviour Analytics (UEBA) | Kubernetes Audit Log Dashboard Kubernetes Anomaly Detection Kubernetes Audit Log Polygraph | EKS Audit |
- Cloud Audit and Configuration
- Agentless Workload Scanning
- EKS Audit
- ECR
| Use Cases | Lacework Feature(s) | Data Source |
|---|---|---|
| Cloud Security Posture Management (CSPM) Cloud Infrastructure Entitilement Management (CIEM) | Compliance Dashboard and Reports Cloud Infrastructure Entitilement Management Dashboard Attack Path Analysis and Exposure Polygraph | AWS Cloud Configuration |
| User Entity Behaviour Analytics (UEBA) | Cloud Anomaly Detection Cloud Drift Detection Cloud Audit Polygraph | AWS Cloud Audit Logs |
- Guided Configuration
- Lacework CLI
- Terraform
- Cloudformation
Cloud Audit and Configuration 📎
Guided configuration is a wizard-like interface that takes your input and generates a script that downloads and sets up all necessary Lacework CLI and Terraform components to create the AWS integration non-interactively through AWS CloudShell. You can also choose to run the generated bundle from any host supported by Terraform.
Requirements
The final step of guided configuration is to run the generated bundle from either AWS CloudShell or any Terraform-supported host. Ensure your environment meets the corresponding requirements.
From AWS CloudShell
- AWS Account Admin - The account used to run Terraform must have administrative privileges on every AWS account you intend to integrate with Lacework.
- Lacework Administrator - A Lacework account with administrator privileges.
From Any Supported Host
- AWS Account Admin - The account used to run Terraform must have administrative privileges on every AWS account you intend to integrate with Lacework.
- AWS CLI - The Terraform provider for AWS leverages the configuration from the AWS CLI and it is recommended the AWS CLI is installed and configured with API keys for the account being integrated.
- Linux Tools - The following Linux tools must be installed and present on PATH: curl, Git, and unzip.
- Lacework Administrator - A Lacework account with administrator privileges.
Navigate to Guided Configuration
Follow these steps to integrate using guided configuration.
- Log in to the Lacework Console.
- Go to Settings > Integrations > Cloud accounts.
- Click + Add New.
- Click Amazon Web Services and select Guided configuration.
- Click Next.
- Select an integration type and follow the steps for the corresponding integration type.
Create a CloudTrail+Configuration Integration
Answer the questions about how to configure the integration.
Basic Configuration
- Do you want to enable Configuration integration?
A Configuration integration analyzes your AWS environment's configuration compliance. - Do you want to enable CloudTrail integration?
A CloudTrail integration analyzes CloudTrail activity. - Select the AWS region of your AWS accounts.
- Select an API key.
- Select an existing API key from the list.
- If no API keys exist, click Create New Key, provide a name and description, and click Save. Then select the key to use in the integration.
Advanced Configuration
For optional advanced configuration, click Advanced configuration (optional) and click Configure for the options you want to configure. The following options are available.
Additional CloudTrail options
- Consolidate CloudTrail logs - Select to configure a consolidated CloudTrail.
If you consolidate CloudTrails from multiple AWS accounts into one bucket, Lacework maps the account ID to the account alias for the root account only. Other account IDs are not mapped to account aliases.
- Enable force destroy of the S3 bucket - Select to enable force destroy (required when bucket is not empty).
- Enable SQS encryption - Select to enable server-side encryption on SQS.
- Specify name of CloudTrail integration - A unique name for the integration that displays in the Lacework Console.
- SQS queue name - Name of the SQS queue.
- SQS encryption key ARN - ARN of the KMS encryption key to use for SQS.
CloudTrail bucket options
- Use an existing CloudTrail bucket instead - Enable to use an existing bucket.
- Bucket name - Name of the newly created bucket.
- Enable bucket encryption - Select to enable encryption on the created bucket.
- Bucket SSE key ARN - ARN of the KMS encryption key to use for the bucket.
CloudTrail SNS topic options
- Use an existing SNS topic instead - Enable to use an existing topic.
- SNS topic name - Name of the newly created topic.
- Disable SNS topic encryption - Select to disable encryption on the SNS topic. Default behavior uses encryption.
- SNS topic encryption key ARN - ARN of the KMS encryption key to use for SNS.
Add additional AWS accounts to Lacework
Specify the AWS profile and region. Add AWS accounts as needed.
Configure Lacework integration with an existing IAM role
- Name - IAM role name. Must match IAM role ARN.
- ARN - IAM role ARN.
- External ID - Copy the Lacework-generated external ID. You must use this external ID to replace the current one. Refer to Update Cross-Account IAM Role External ID for how to update the cross-account role's external ID. [END]:#
Single Account Integration
Cloud Audit and Configuration 📎
lacework generate cloud-account aws
Generate and/or execute Terraform code for AWS integration
Synopsis
Use this command to generate Terraform code for deploying Lacework into an AWS environment.
By default, this command interactively prompts for the required information to setup the new cloud account. In interactive mode, this command will:
- Prompt for the required information to setup the integration
- Generate new Terraform code using the inputs
- Optionally, run the generated Terraform code:
- If Terraform is already installed, the version is verified as compatible for use
- If Terraform is not installed, or the version installed is not compatible, a new version will be installed into a temporary location
- Once Terraform is detected or installed, Terraform plan will be executed
- The command will prompt with the outcome of the plan and allow to view more details or continue with Terraform apply
- If confirmed, Terraform apply will be run, completing the setup of the cloud account
This command can also be run in noninteractive mode. See help output for more details on the parameter value(s) required for Terraform code generation.
lacework generate cloud-account aws [flags]
Options
      --agentless                                 enable agentless integration
      --agentless_management_account_id string    AWS management account ID for Agentless integration
      --agentless_monitored_account_ids strings   AWS monitored account IDs for Agentless integrations; may contain account IDs, OUs, or the organization root (e.g. 123456789000,ou-abcd-12345678,r-abcd)
      --agentless_monitored_accounts strings      AWS monitored accounts for Agentless integrations; value format must be <aws profile>:<region>
      --agentless_scanning_accounts strings       AWS scanning accounts for Agentless integrations; value format must be <aws profile>:<region>
      --apply                                     run terraform apply without executing plan or prompting
      --aws_assume_role string                    specify aws assume role
      --aws_organization                          enable organization integration
      --aws_profile string                        specify aws profile
      --aws_region string                         specify aws region
      --aws_subaccount strings                    configure an additional aws account; value format must be <aws profile>:<region>
      --bucket_encryption_enabled                 enable S3 bucket encryption when creating bucket (default true)
      --bucket_name string                        specify bucket name when creating bucket
      --bucket_sse_key_arn string                 specify existing KMS encryption key arn for bucket
      --cloudtrail                                enable cloudtrail integration
      --cloudtrail_name string                    specify name of cloudtrail integration
      --cloudtrail_org_account_mapping string     Org account mapping json string. Example: '{"default_lacework_account":"main", "mapping": [{ "aws_accounts": ["123456789011"], "lacework_account": "sub-account-1"}]}'
      --config                                    enable config integration
      --config_cf_resource_prefix string          specify Cloudformation resource prefix for Config organization integration
      --config_lacework_access_key_id string      specify AWS access key ID for Config organization integration
      --config_lacework_account string            specify lacework account for Config organization integration
      --config_lacework_secret_key string         specify AWS secret key for Config organization integration
      --config_lacework_sub_account string        specify lacework sub-account for Config organization integration
      --config_organization_id string             specify AWS organization ID for Config organization integration
      --config_organization_units strings         specify AWS organization units for Config organization integration
      --consolidated_cloudtrail                   use consolidated trail
      --existing_bucket_arn string                specify existing cloudtrail S3 bucket ARN
      --existing_iam_role_arn string              specify existing iam role arn to use
      --existing_iam_role_externalid string       specify existing iam role external_id to use
      --existing_iam_role_name string             specify existing iam role name to use
      --existing_sns_topic_arn string             specify existing SNS topic arn
  -h, --help                                      help for aws
      --lacework_aws_account_id string            the Lacework AWS root account id
      --output string                             location to write generated content (default is ~/lacework/aws)
      --sns_topic_encryption_enabled              enable encryption on SNS topic when creating one (default true)
      --sns_topic_encryption_key_arn string       specify existing KMS encryption key arn for SNS topic
      --sns_topic_name string                     specify SNS topic name if creating new one
      --sqs_encryption_enabled                    enable encryption on SQS queue when creating (default true)
      --sqs_encryption_key_arn string             specify existing KMS encryption key arn for SQS queue
      --sqs_queue_name string                     specify SQS queue name if creating new one
      --use_s3_bucket_notification                enable S3 bucket notifications
Options inherited from parent commands
  -a, --account string      account subdomain of URL (i.e. <ACCOUNT>.lacework.net)
  -k, --api_key string      access key id
  -s, --api_secret string   secret access key
      --api_token string    access token (replaces the use of api_key and api_secret)
      --debug               turn on debug logging
      --json                switch commands output from human-readable to json format
      --nocache             turn off caching
      --nocolor             turn off colors
      --noninteractive      turn off interactive mode (disable spinners, prompts, etc.)
      --organization        access organization level data sets (org admins only)
  -p, --profile string      switch between profiles configured at ~/.lacework.toml
      --subaccount string   sub-account name inside your organization (org admins only)
SEE ALSO
- lacework generate cloud-account - Generate cloud integration IaC
- lacework generate cloud-account aws controltower - Generate and/or execute Terraform code for ControlTower integration
Cloud Audit Control Tower Integration
Cloud Audit via Control Tower 📎
lacework generate cloud-account aws controltower
Generate and/or execute Terraform code for ControlTower integration
Synopsis
Use this command to generate Terraform code for deploying Lacework with Aws Cloudtrail and ControlTower.
By default, this command interactively prompts for the required information to set up the new cloud account. In interactive mode, this command will:
- Prompt for the required information to set up the integration
- Generate new Terraform code using the inputs
- Optionally, run the generated Terraform code:
- If Terraform is already installed, the version is verified as compatible for use
- If Terraform is not installed, or the version installed is not compatible, a new version will be installed into a temporary location
- Once Terraform is detected or installed, the Terraform plan is executed
- The command prompts you with the outcome of the plan and allows you to view more details or continue with Terraform apply
- If confirmed, Terraform apply runs, completing the setup of the cloud account
This command can also be run in noninteractive mode. See help output for more details on the parameter values required for Terraform code generation.
lacework generate cloud-account aws controltower [flags]
Options
      --apply                            run terraform apply without executing plan or prompting
      --audit_account string             The audit account flag input in the format profile:region
  -h, --help                             help for controltower
      --iam_role_arn string              specify the arn of the existing iam role
      --iam_role_external_id string      specify the external id of the existing iam role
      --iam_role_name string             specify the name of the existing iam role
      --lacework_aws_account_id string   the Lacework AWS root account id
      --log_archive_account string       The log archive account flag input in the format profile:region
      --org_account_mapping string       Org account mapping json string. Example: '{"default_lacework_account":"main", "mapping": [{ "aws_accounts": ["123456789011"], "lacework_account": "sub-account-1"}]}'
      --output string                    location to write generated content
      --prefix string                    specify the prefix that will be used at the beginning of every generated resource
      --s3_bucket_arn string             the S3 Bucket for consolidated CloudTrail
      --sns_topic_arn string             the SNS Topic
      --sqs_queue_name string            specify the name of the sqs queue
Options inherited from parent commands
  -a, --account string                            account subdomain of URL (i.e. <ACCOUNT>.lacework.net)
      --agentless                                 enable agentless integration
      --agentless_management_account_id string    AWS management account ID for Agentless integration
      --agentless_monitored_account_ids strings   AWS monitored account IDs for Agentless integrations; may contain account IDs, OUs, or the organization root (e.g. 123456789000,ou-abcd-12345678,r-abcd)
      --agentless_monitored_accounts strings      AWS monitored accounts for Agentless integrations; value format must be <aws profile>:<region>
      --agentless_scanning_accounts strings       AWS scanning accounts for Agentless integrations; value format must be <aws profile>:<region>
  -k, --api_key string                            access key id
  -s, --api_secret string                         secret access key
      --api_token string                          access token (replaces the use of api_key and api_secret)
      --aws_assume_role string                    specify aws assume role
      --aws_organization                          enable organization integration
      --aws_profile string                        specify aws profile
      --aws_region string                         specify aws region
      --aws_subaccount strings                    configure an additional aws account; value format must be <aws profile>:<region>
      --bucket_encryption_enabled                 enable S3 bucket encryption when creating bucket (default true)
      --bucket_name string                        specify bucket name when creating bucket
      --bucket_sse_key_arn string                 specify existing KMS encryption key arn for bucket
      --cloudtrail                                enable cloudtrail integration
      --cloudtrail_name string                    specify name of cloudtrail integration
      --cloudtrail_org_account_mapping string     Org account mapping json string. Example: '{"default_lacework_account":"main", "mapping": [{ "aws_accounts": ["123456789011"], "lacework_account": "sub-account-1"}]}'
      --config                                    enable config integration
      --config_cf_resource_prefix string          specify Cloudformation resource prefix for Config organization integration
      --config_lacework_access_key_id string      specify AWS access key ID for Config organization integration
      --config_lacework_account string            specify lacework account for Config organization integration
      --config_lacework_secret_key string         specify AWS secret key for Config organization integration
      --config_lacework_sub_account string        specify lacework sub-account for Config organization integration
      --config_organization_id string             specify AWS organization ID for Config organization integration
      --config_organization_units strings         specify AWS organization units for Config organization integration
      --consolidated_cloudtrail                   use consolidated trail
      --debug                                     turn on debug logging
      --existing_bucket_arn string                specify existing cloudtrail S3 bucket ARN
      --existing_iam_role_arn string              specify existing iam role arn to use
      --existing_iam_role_externalid string       specify existing iam role external_id to use
      --existing_iam_role_name string             specify existing iam role name to use
      --existing_sns_topic_arn string             specify existing SNS topic arn
      --json                                      switch commands output from human-readable to json format
      --nocache                                   turn off caching
      --nocolor                                   turn off colors
      --noninteractive                            turn off interactive mode (disable spinners, prompts, etc.)
      --organization                              access organization level data sets (org admins only)
  -p, --profile string                            switch between profiles configured at ~/.lacework.toml
      --sns_topic_encryption_enabled              enable encryption on SNS topic when creating one (default true)
      --sns_topic_encryption_key_arn string       specify existing KMS encryption key arn for SNS topic
      --sns_topic_name string                     specify SNS topic name if creating new one
      --sqs_encryption_enabled                    enable encryption on SQS queue when creating (default true)
      --sqs_encryption_key_arn string             specify existing KMS encryption key arn for SQS queue
      --subaccount string                         sub-account name inside your organization (org admins only)
      --use_s3_bucket_notification                enable S3 bucket notifications
SEE ALSO
- lacework generate cloud-account aws - Generate and/or execute Terraform code for AWS integration
Cloud Audit and Configuration 📎
Overview
This topic describes how to integrate with AWS by running Lacework Terraform modules from any host supported by Terraform.
If you are new to the Lacework Terraform provider, or Lacework Terraform modules, read Terraform for Lacework Overview to learn the basics on how to configure the provider.
Lacework Terraform modules for AWS do not support GovCloud integration yet.
Resources Provisioned by Lacework Terraform Modules
To integrate AWS with Lacework, Lacework Terraform modules provision the following resources in the designated AWS account:
- IAM Cross-Account Role - A cross-account role is required to give access to Lacework access for assessments of cloud resource configurations and for analysis of CloudTrail events. The cross-account role is given the following policies:
- SecurityAudit - AWS-managed policy to provide read-only access to cloud resource configurations.
- Lacework Custom Audit Policy - A custom policy that extends SecurityAudit to enable read-only access to additional configuration resources.
- Lacework Custom IAM Policy - A custom policy that provides Lacework read-only access to ingest CloudTrail logs.
- CloudTrail - Lacework can create a new trail or use an existing CloudTrail.
- S3 Bucket - An S3 bucket is required for all CloudTrail integrations. Lacework can use an existing bucket or create a new bucket in the designated account.
- SNS Topic - An SNS topic is required for all CloudTrail integrations. Terraform can use an existing SNS topic or create one if an SNS topic has not been added to an existing CloudTrail.
- SQS Queue - An SQS queue is required for all CloudTrail integrations and monitored by Lacework.
Requirements
- AWS Account Admin - The account used to run Terraform must have administrative privileges on every AWS account you intend to integrate with Lacework.
- AWS CLI - The Terraform provider for AWS leverages the configuration from the AWS CLI and it is recommended the AWS CLI is installed and configured with API keys for the account being integrated.
- Lacework Administrator - A Lacework account with administrator privileges.
- Lacework CLI - The Terraform Provider for Lacework leverages the configuration from the Lacework CLI.
- Terraform -
~> 0.14,~> 0.15,~> 1.0,~> 1.1.
Module Inputs Reference
For an up-to-date guide on all available configuration inputs, refer to the Terraform Registry documentation:
- AWS CloudTrail Module Inputs
- AWS Config Module Inputs
- AWS IAM Role Module Inputs
- AWS CloudTrail for Control Tower Module Inputs
Module Dependencies
Lacework Terraform modules for AWS have the following dependencies that are installed when running terraform init:
For detailed information on these dependencies, see Lacework on the Terraform Registry.
Install and Configure the Lacework CLI
To configure accounts, the Terraform provider for Lacework leverages the Lacework CLI configuration to authenticate with the Lacework API server. Lacework provides a shell script to install the Lacework CLI in your system.
Follow these instructions to install and configure the Lacework CLI before continuing.
Install the AWS CLI
For details on how to install the AWS CLI, see Configuring your AWS CLI.
Single Account Integration
Cloud Audit and Configuration (New Cloudtrail) 📎
Scenario 2 - Deploy New CloudTrail and Add Configuration Assessment
This scenario creates a new CloudTrail in an AWS account along with a cross-account IAM role to provide Lacework access to monitor CloudTrail, AWS resource configurations, and integrate the AWS account into Lacework.
Run the Lacework CLI
-
Run the following CLI command:
lacework generate cloud-account aws       \
  --config --cloudtrail --noninteractive  \
  --aws_region AWSRegion
The Terraform files are created in the
~/lacework/awsdirectory. -
Navigate to the
~/lacework/awsdirectory. -
Run
terraform planand review the changes that will be applied. -
Once satisfied with the changes that will be applied, run
terraform applyto execute Terraform.
If creating the main.tf file manually, you can use Terraform inputs to customize Lacework Terraform modules. See the documentation on the Terraform Registry for the complete list of inputs for each module.
Validate the Configuration
To confirm that the Cloud Account integrations are working, use the Lacework CLI or log in to the Lacework Console.
To validate the integration using the CLI, run the lacework cloud-account list command. You should see two integrations: AwsCfg for the Configuration integration, and AwsCtSqs for the CloudTrail integration.
To validate the integration using the Lacework Console, log in to your account and go to Settings > Integrations > Cloud Accounts. [END]:#
Cloud Audit and Configuration (Existing Cloudtrail) 📎
Scenario 3 - Integrate Existing CloudTrail and Add Configuration Assessment
In this scenario, Terraform configures a cross-account IAM role to provide Lacework access to monitor an existing CloudTrail. That same cross-account role also provides Lacework permissions to audit AWS resource configurations and integrate the AWS account into Lacework. An SQS queue is created for Lacework, and you can optionally deploy an SNS topic for that SQS queue if one does not already exist.
About SNS Topics
AWS CloudTrail provides an option to create an SNS topic, which is required to integrate AWS environments with Lacework. The Lacework Terraform module for CloudTrail creates a new SNS topic by default. The SNS topic must be created in the same region as the existing CloudTrail, and it must be manually attached to the CloudTrail by logging in to the AWS console, navigating to CloudTrail, and then selecting the new SNS topic.
Run the Lacework CLI
The command must be run in the account that owns the S3 bucket used with the CloudTrail.
-
Run the following CLI command:
lacework generate cloud-account aws       \
  --config --cloudtrail --noninteractive  \
  --aws_region AWSRegion                  \
  --existing_bucket_arn BucketARN
The Terraform files are created in the
~/lacework/awsdirectory. -
Navigate to the
~/lacework/awsdirectory. -
Run
terraform planand review the changes that will be applied. -
Once satisfied with the changes that will be applied, run
terraform applyto execute Terraform.
If you have an SNS topic configured on the existing CloudTrail, specify it using the --existing_sns_topic_arn YourExistingTopicARN flag.
If you do not have an existing SNS topic configured on the existing CloudTrail, then the Terraform module automatically creates one, but you must manually attach the SNS topic to the existing CloudTrail.
If creating the main.tf file manually, you can use Terraform inputs to customize Lacework Terraform modules. See the documentation on the Terraform Registry for the complete list of inputs for each module.
Validate the Configuration
To confirm that the Cloud Account integrations are working, use the Lacework CLI or log in to the Lacework Console.
To validate the integration using the CLI, run the lacework cloud-account list command. You should see two integrations: AwsCfg for the Configuration integration, and AwsCtSqs for the CloudTrail integration.
To validate the integration using the Lacework Console, log in to your account and go to Settings > Integrations > Cloud Accounts.
Cloud Audit (S3 Bucket Notification) 📎
Scenario 8 - Integrate Existing CloudTrail Using S3 Bucket Notifications
In this scenario, Terraform configures a cross-account IAM role to provide Lacework access to an existing CloudTrail with Lacework and uses S3 Bucket notifications rather than CloudTrail SNS notifications. An SQS queue is created for Lacework, and you can optionally deploy an SNS topic for that SQS queue if one does not already exist.
- If your existing S3 bucket is already sending messages to your existing SQS queue, the new S3 to SQS notification setup (for Lacework) is not possible because both notifications require the same suffix (not allowed by AWS). In this case, you can move to an SNS fanout.
* Terraform must be configured to run using the account that owns the S3 bucket used with the CloudTrail.
Run the Lacework CLI
-
Run the following CLI command:
lacework generate cloud-account aws  \
  --cloudtrail --noninteractive      \
  --aws_region AWSRegion             \
  --existing_bucket_arn BucketARN    \
  --use_s3_bucket_notification
The Terraform files are created in the
~/lacework/awsdirectory. -
Navigate to the
~/lacework/awsdirectory. -
Run
terraform planand review the changes that will be applied. -
Once satisfied with the changes that will be applied, run
terraform applyto execute Terraform.
If creating the main.tf file manually, you can use Terraform inputs to customize Lacework Terraform modules. See the documentation on the Terraform Registry for the complete list of inputs for each module.
Validate the Configuration
To confirm that the Cloud Account integrations are working, use the Lacework CLI or log in to the Lacework Console.
To validate the integration using the CLI, run the lacework cloud-account list command. You should see AwsCtSqs for the CloudTrail integration.
To validate the integration using the Lacework Console, log in to your account and go to Settings > Integrations > Cloud Accounts.
Cloud Config Multiple Accounts Integration
Cloud Config Multi Account Integration 📎
Scenario 7 - Configure Multiple AWS Accounts
This scenario configures multiple AWS accounts for cloud resource configuration compliance only. You must have a corresponding AWS credentials file with the respective profiles listed in the example. For example, if your credentials file includes a profile named development, then use that name in the --aws_subaccount flag in the command.
Run the Lacework CLI
-
Run the following CLI command:
lacework generate cloud-account aws --config         \
  --noninteractive --aws_region RegionOfMainAccount  \
  --aws_subaccount SubAccount1:RegionOfSubAccount1   \
  --aws_subaccount SubAccount2:RegionOfSubAccount2   \
  --aws_subaccount SubAccount3:RegionOfSubAccount3
The Terraform files are created in the
~/lacework/awsdirectory. -
Navigate to the
~/lacework/awsdirectory. -
Run
terraform planand review the changes that will be applied. -
Once satisfied with the changes that will be applied, run
terraform applyto execute Terraform.
If creating the main.tf file manually, you can use Terraform inputs to customize Lacework Terraform modules. See the documentation on the Terraform Registry for the complete list of inputs for each module.
Validate the Configuration
To confirm that the Cloud Account integrations are working, use the Lacework CLI or log in to the Lacework Console.
To validate the integration using the CLI, run the lacework cloud-account list command. You should see as many AwsCfg integrations as --aws_subaccount flags you provided plus the main account.
To validate the integration using the Lacework Console, log in to your account and go to Settings > Integrations > Cloud Accounts.
Cloud Audit Control Tower Integration
Cloud Audit Control Tower Integration 📎
Scenario 6 - AWS Organizations Using AWS Control Tower
The Terraform solution for Control Tower supports CloudTrail only. To use Terraform to create a Configuration integration for multiple accounts, see Scenario 7 - Configure Multiple AWS Accounts. To use Control Tower to create a Configuration integration, see AWS Control Tower Integration Using CloudFormation.
Lacework supports the integration of consolidated CloudTrail for AWS Organizations using AWS Control Tower (or similar deployments) that split the S3 bucket for the consolidated CloudTrail and the subscribed SNS topic.
This scenario uses an existing consolidated CloudTrail in an S3 bucket, deploys a cross-account IAM role to the log_archive account to give Lacework access to that S3 bucket, deploys an SQS queue for the existing SNS topic in the audit account and finally, integrates the AWS accounts into Lacework.
terraform {
  required_providers {
    lacework = {
      source = "lacework/lacework"
      version = "~> 1.0"
    }
  }
}

provider "lacework" {}

provider "aws" {
  alias   = "log_archive_account"
  region  = "YourAWSRegion"
  profile = "[profile name for log_archive account in ~/.aws/credentials]"
}

provider "aws" {
  alias   = "audit_account"
  region  = "YourAWSRegion"
  profile = "[profile name for audit account in ~/.aws/credentials]"
}

module "cloudtrail-controltower" {
  source  = "lacework/cloudtrail-controltower/aws"
  version = "~> 0.1"

  providers = {
    aws.audit       = aws.audit_account
    aws.log_archive = aws.log_archive_account
  }

  # The only two required variables are the SNS topic ARN and the S3 Bucket ARN where the CloudTrail logs are stored
  # SNS Topic ARN is usually in the form: arn:aws:sns:[control_tower_region]:[aws_audit_account_id]:aws-controltower-AllConfigNotifications
  sns_topic_arn   = "arn:aws:sns:[control_tower_region]:[aws_audit_account_id]:aws-controltower-AllConfigNotifications"

  # S3 Bucket ARN is usually in the form: arn:aws:s3:::aws-controltower-logs-[log_archive_account_id]-[control_tower_region]
  s3_bucket_arn = "arn:aws:s3:::aws-controltower-logs-[log_archive_account_id]-[control_tower_region]"

  # If encryption is being used
  # KMS key ARN is usually in the form: arn:aws:kms:[aws_region]:[aws_account]:key/[value]
  # kms_key_arn = "arn:aws:kms:[aws_region]:[aws_account]:key/[value]"

  # All other fields are documented at: https://github.com/lacework/terraform-aws-cloudtrail-controltower
}
- For information on organization level CloudTrail deployments, see AWS documentation.
* For information on AWS Organizations, see AWS Organizations documentation.
* For information on AWS Control Tower, see AWS Control Tower documentation.
- Ensure the Lacework is CLI installed and configured to the Lacework account you plan to integrate.
- Ensure you have your multiple account credentials in your ~/.aws/credentials file.
- Open an editor of your choice (such as Vim) and create a new file named
main.tf. - Copy the code snippet above, and paste it into the
main.tffile. - Validate the provider/module versions and the configuration as covered in the provider documentation.
- Update the AWS provider
profile,region,sns_topic_arn, ands3_bucket_arn. - (Optional) If you have an IAM role in your
log_archiveaccount that you want to use, first setuse_existing_iam_role = true, then specify the account using the inputiam_role_nameandiam_role_arn. If you do not have an existing IAM role configured in yourlog_archiveaccount, the Terraform module automatically creates one. This IAM role MUST be in thelog_archiveaccount, not theauditaccount. - Open a Terminal and change directories to the directory that contains the
main.tffile (~/lacework/aws) and runterraform initto initialize the project and download the required modules. - Run
terraform planto validate the configuration and review pending changes. - After you review the pending changes, run
terraform applyto execute the changes.
You can use Terraform inputs to customize Lacework Terraform modules. See the documentation on the Terraform Registry for the complete list of inputs for each module.
Validate the Configuration
After Terraform finishes applying changes, use the Lacework CLI or log in to the Lacework Console to confirm the integration is working.
To validate the integration using the CLI, open a Terminal and run lacework cloud-account list. You should see AwsCtSqs for the CloudTrail integration.
To validate the integration using the Lacework Console, log in to your account and go to Settings > Integrations > Cloud Accounts.
Single Account Integration
Cloud Audit and Configuration 📎
Overview
Lacework integrates with AWS to analyze CloudTrail for monitoring cloud account security, and for cloud resource configuration compliance.
AWS CloudFormation gives you an easy way to model a collection of related AWS and third-party resources, provision them quickly and consistently, and manage them throughout their lifecycles, by treating infrastructure as code. A CloudFormation template describes your resources and their dependencies so you can launch and configure them together as a stack. You can use a template to create, update, and delete an entire stack as a single unit, as often as you need to, instead of managing resources individually. You can manage and provision stacks across multiple AWS accounts and AWS regions.
For details about AWS CloudFormation, see AWS CloudFormation.
This document describes how to integrate Lacework with AWS CloudFormation with one of the following configurations:
- Configuration to analyze AWS configuration compliance
- CloudTrail+Configuration to analyze CloudTrail activity for monitoring cloud account security and AWS configuration compliance
If you use AWS Organizations, see AWS Organizations and StackSets about how you can use the CloudFormation template to automatically add or remove new AWS accounts in Lacework.
AWS Configuration Compliance with CloudFormation
The procedures in this section configure an integration to analyze AWS configuration compliance only.
During initial Lacework account setup, you can add a single AWS account to Lacework. Later you can add additional accounts from the Lacework Console using a CloudFormation template that launches the AWS console. However, integrating multiple AWS accounts using the AWS console is not efficient because each integration requires you to log in to each account with administrative privileges and ensure there are no resource conflicts when creating the CloudFormation stack. Instead, you can integrate multiple AWS accounts using Terraform.
During integration, Lacework creates an IAM role with the least privileges. To grant Lacework permission to create this role, you must log in to your AWS account as a user with administrator credentials [arn:aws:iam::aws:policy/AdministratorAccess]. You cannot complete the integration without the required credentials.
AWS Configuration
You can either Run the CloudFormation Template or Download the CloudFormation Template.
- Run CloudFormation Template - For the initial setup, Lacework recommends using this option, which requires fewer steps and less user interaction. For this option, disable your browser pop-up blocker.
- Download CloudFormation Template - This option requires more user interaction, but may be useful if you have multiple accounts with distributed ownership. Follow the steps for the option you choose.
Run CloudFormation Download CloudFormation
- Log in to the Lacework Console.
- Go to Settings > Integrations > Cloud account.
- Click + Add New.
- Click Amazon Web Services and select CloudFormation.
- Click Next.
- Click Run CloudFormation Template. If you are already logged in to your AWS account, this redirects you to the Create stack page. The template populates the Amazon S3 template URL for you.
- No changes are required. Click Next.
- Review the Specify stack details page. Resource name prefix is populated with the account name of the first account configured to use Lacework for AWS Configuration. When adding accounts, you can keep this prefix or enter a different prefix to ensure account uniqueness. Click Next.
- No changes are required on the Configure stack options page. Click Next.
- Verify the information on the Review page and click Submit.
- Log in to the Lacework Console.
- Go to Settings > Integrations > Cloud account.
- Click + Add New.
- Click Amazon Web Services and select CloudFormation.
- Click Next.
- Click Download CloudFormation Template.
- Log in to your AWS account.
- Select the CloudFormation service and click Create stack. The Create stack page displays.
- For Template source, click Upload a template file.
- Upload the Lacework template and click Next.
- On the Specify stack details page enter a Stack name.
- Enter a Resource name prefix such as an account name. Click Next.
- No changes are required on the Configure stack options page. Click Next.
- Verify the information on the Review page and click Submit.
CloudFormation Page
After clicking Submit, you are redirected back to the CloudFormation page. If you do not see your new stack in the table, refresh the page. Select your stack to see the event log as it is being created. When the stack is CREATE-COMPLETE, integration for a single account is complete.
AWS CloudTrail and Configuration Compliance with CloudFormation
The procedures in this section configure an integration that analyzes CloudTrail activity for monitoring cloud account security and AWS configuration compliance.
Account setup configures Lacework for CloudTrail analysis and Security Audit. After completion, a single CloudFormation stack is added to your account. If you have multiple accounts and you forward CloudTrail logs to a single S3 bucket, CloudTrail integration completes after the account setup. If you use multiple buckets, you can use the Lacework Console to add accounts after the account setup.
To analyze CloudTrail activity for monitoring cloud account security, Lacework requires that accounts be integrated individually. You can use the Lacework Console to add accounts after account setup.
During the account setup, the option to integrate with AWS follows the option to add users.
During integration, Lacework creates the least privilege IAM role. To grant Lacework permission to create this role, you must log in to your AWS account as a user with administrator credentials [arn:aws:iam::aws:policy/AdministratorAccess]. You cannot complete the integration without the required credentials.
- AWS S3 object-level APIs are excluded from CloudTrail analysis. This means that AWS CloudTrail data events are not analyzed. CloudTrail management events, however, are analyzed.
- For consolidated CloudTrails, Lacework maps the account ID to the account alias for the root account only. Other account IDs are not mapped to their account aliases.
- If you consolidate CloudTrails from multiple AWS accounts into one bucket, Lacework maps the account ID to the account alias for the root account only. Other account IDs are not mapped to account aliases.
AWS CloudTrail and Configuration
You can either Run the CloudFormation Template or Download the CloudFormation Template.
- Run CloudFormation Template - For the initial setup, Lacework recommends using this option, which requires fewer steps and less user interaction. For this option, disable your browser pop-up blocker.
- Download CloudFormation Template - This option requires more user interaction, but may be useful if you have multiple accounts with distributed ownership. Follow the steps for the option you choose.
Run CloudFormation Download CloudFormation
- Log in to the Lacework Console.
- Go to Settings > Integrations > Cloud account.
- Click + Add New.
- Click Amazon Web Services and select CloudFormation.
- Click Next.
- Click Run CloudFormation Template. If you are already logged in to your AWS account, this redirects you to the Create stack page. The template populates the Amazon S3 template URL for you.
- No changes are required. Click Next.
- On the Specify stack details page, you can either create a new trail and S3 bucket or use an existing trail.
- Create a new trail and S3 bucket
- Resource name prefix is populated with your account name. It doesn't need to change unless:
- You are creating a stack for each account, in which case it must be unique for each account as the S3 bucket namespace is global, or
- You are creating multiple stacks, in which case it must be unique to avoid resource collision
- Set Create a new trail? to Yes.
- If you want a specific S3 bucket path for your logs, add a Log file prefix.
- Leave Bucket name and Topic ARN empty.
- Click Next.
- Use an existing trail
- Resource name prefix is populated with your account name.
- Set Create a new trail? to No.
- Leave Log file prefix empty; it is not applicable.
- Enter the Bucket name (not ARN) associated with your existing trail.
- Enter the SNS Topic ARN of your existing trail. If the trail does not already have an SNS topic, create one.
- Click Next.
- Click Next.
- No changes are required on the Configure stack options page. Click Next.
- Verify the information on the Review page and click Submit.
- Log in to the Lacework Console.
- Go to Settings > Integrations > Cloud account.
- Click + Add New.
- Click Amazon Web Services and select CloudFormation.
- Click Next.
- Click Download CloudFormation Template.
- Log in to your AWS account.
- Select the CloudFormation service and click Create stack. The Create stack page displays.
- For Template source, click Upload a template file.
- Upload the Lacework template and click Next.
- On the Specify stack details page enter a Stack name.
- You can either create a new trail and S3 bucket or use an existing trail.
- Create a new trail and S3 bucket
- Resource name prefix is populated with your account name. It doesn't need to change unless:
- You are creating a stack for each account, in which case it must be unique for each account as the S3 bucket namespace is global, or
- You are creating multiple stacks, in which case it must be unique to avoid resource collision
- Set Create a new trail? to Yes.
- If you want a specific S3 bucket path for your logs, add a Log file prefix.
- Leave Bucket name and Topic ARN empty.
- Click Next.
- Use an existing trail
- Resource name prefix is populated with your account name.
- Set Create a new trail? to No.
- Leave Log file prefix empty; it is not applicable.
- Enter the Bucket name (not ARN) associated with your existing trail.
- Enter the SNS Topic ARN of your existing trail. If the trail does not already have an SNS topic, create one.
- Click Next.
- No changes are required on the Configure stack options page. Click Next.
- Verify the information on the Review page and click Submit.
If you are integrating an existing trail, you may be using server-side encryption.
- For Server-Side Encryption with Amazon S3-Managed Keys (SSE-S3), key management is local to S3, so no changes are required.
- For Server-Side Encryption with AWS KMS-Managed Keys (SSE-KMS), key management requires access to the AWS KMS service, so you must give the Lacework-created role the required permission. Refer to Integration with S3 Buckets Using SSE-KMS for instructions on how to update the inline policy associated with the Lacework-created role. If you are manually integrating Lacework, you must grant this same permission.
For more information on Selecting a Stack Template, refer to the AWS Documentation library.
CloudFormation Page
After clicking Submit, you are redirected back to the CloudFormation page. If you do not see your new stack in the table, refresh the page. Select your stack to see the event log as it is being created. When the stack is CREATE-COMPLETE, integration of both CloudTrail and Config for a single account is complete. If you consolidate CloudTrail logs in one S3 bucket, no additional CloudTrail configuration is required.
AWS Organizations and StackSets
If AWS Control Tower is not available, but you use AWS Organizations, you can deploy the Lacework CloudFormation template using StackSets. Using a stack set lets you automatically add or remove new AWS accounts in Lacework.
Use this Lacework CloudFormation template as a stack set.
For details about working with StackSets, refer to the AWS documentation.
Control Tower Integration
Cloud Audit and Configuration via Control Tower Integration 📎
Overview
With Lacework and AWS Control Tower, enrolling a new AWS account now means security best practices and monitoring are automatically applied consistently across your organization. Account administrators can automatically add Lacework's security auditing and monitoring to AWS accounts seamlessly. All the required Lacework and AWS account configurations that allow access to AWS configuration and CloudTrail logs are managed for you by Lacework’s AWS Control Tower integration.
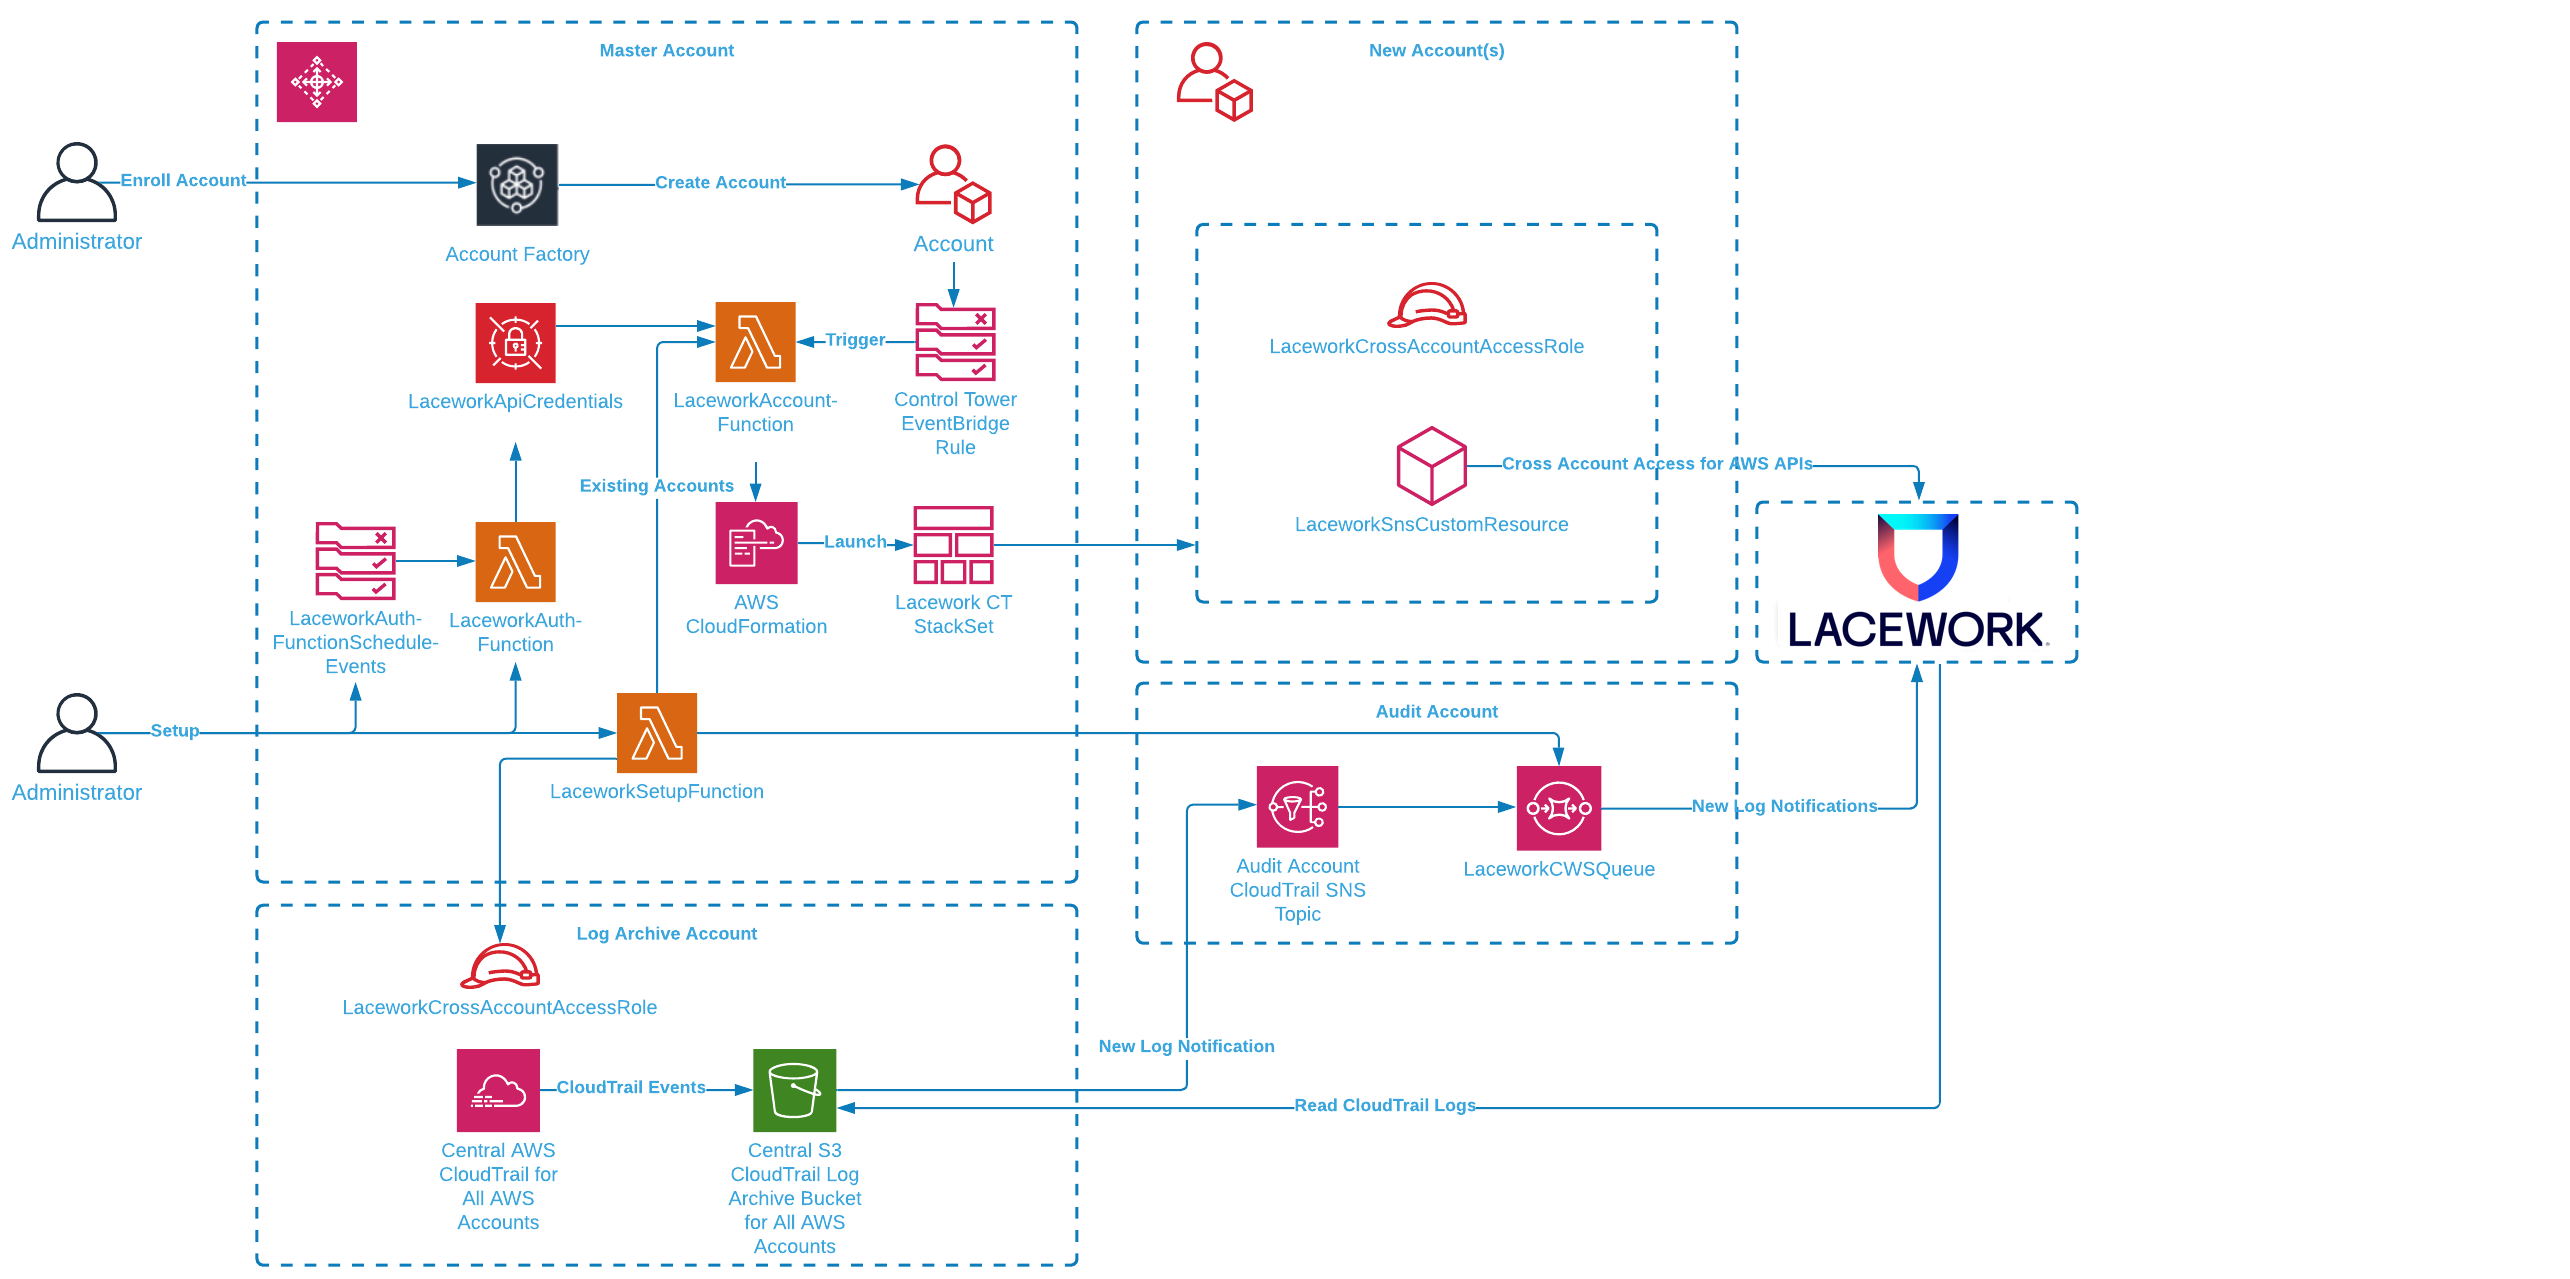
How It Works
The Lacework AWS Control Tower integration audits and monitors AWS accounts in your AWS Control Tower Landing Zone. Your Landing Zone is your multi-account environment for which you can apply your governance, auditing and monitoring. On initial setup, the Lacework AWS Control Tower integration creates a new cross-account role in the Log Archive account and a new SQS queue is set up in the Audit account. The SQS queue lets Lacework receive notifications of new audit logs in S3 from the centralized CloudTrail that collects activity from all accounts. Lacework processes these logs for behavior analysis for all AWS accounts.
For new AWS accounts in your organization, AWS Control Tower Account Factory enables easy onboarding of new and existing AWS accounts which triggers the Lacework integration through a new account lifecycle event. A Lambda function launches a stack instance that creates a new cross-account role and allows Lacework to monitor the account via AWS APIs. The combination of CloudTrail log analysis and AWS API access lets Lacework check your cloud activity and AWS configuration to detect security misconfigurations and anomalous behavior.
The current solution only works for Landing Zone 3.0+. If you are using Landing Zone 2.X, contact your Lacework Customer Success Manager for further assistance.
Prerequisites
You need the following prerequisites to implement the Lacework AWS Control Tower integration.
- AWS Control Tower with a Landing Zone. For information about setting up an AWS Control Tower landing zone, see Getting Started with AWS Control Tower in the AWS Control Tower User Guide.
- Administrator privileges in the AWS Control Tower management account.
- A Lacework Cloud Security Platform SaaS account.
Deployment Scenarios
If you want to include your AWS Management Account in a Configuration integration, this needs to be performed as a separate integration due to AWS Control Tower limitations.
Without Lacework Organization
If the Lacework organization feature is not enabled, all AWS accounts go under the main Lacework account by default. Leave the Single Sub-Account Configuration and Organization Configuration sections blank in the CloudFormation stack parameters.
Single Lacework Sub-Account with Lacework Organization
If the Lacework organization feature is enabled, you can specify a Lacework Sub-Account for which all AWS accounts are added. This is specified in the Single Sub-Account Configuration section in the Lacework Sub-Account Name field (see below) in the CloudFormation stack parameters.
This scenario only works with the Configuration integration type.
AWS Organizational Units (OUs) to Lacework Sub-Account Mapping with Lacework Organization
- The Lacework organization feature must be enabled.
- When naming the OUs, ensure to not include spaces in the names (hyphens are allowed).
- ❌ Dev Infra
- ✅ Dev-Infra
The below tabs describe what happens during the deployment for Configuration and CloudTrail.
Configuration CloudTrail
When creating or deleting AWS OUs, ensure that you use the recommended AWS Control Tower methods. Updating AWS accounts outside of AWS Control Tower may cause issues. You must also re-run the Lacework Control Tower integration for those changes to ensure that Lacework monitors each AWS account in the correct Lacework sub-account.
Below is an example of using Lacework Control Tower integration:
Example
- (1st level)
- OU=Tech
- AWSAccount 1 (techaws)
- OU=IT
- AWSAccount 2 (itcloud)
- OU=Marketing (it has sublevels)
- OU=prod
- AWSAccount 3 (marketingprodUS)
- AWSAccount 4 (marketingprodEU)
- OU=dev
- AWSAccount 5 (marketingdev1)
- AWSAccount 6 (marketingdev2)
If you create Lacework sub-accounts named Tech and Marketing, and want to use Lacework Control Tower integration, specify the following comma-separated arguments to the CloudFormation template in the Organization Configuration (Optional) field as Tech,Marketing.
As a result, we’ll integrate AWS Configuration settings as follows:
- LW subAccount Tech
- AWSAccount 1 (techaws)
- LW subAccount Marketing
- AWSAccount 3 (marketingprodUS)
- AWSAccount 4 (marketingprodEU)
- AWSAccount 5 (marketingdev1)
- AWSAccount 6 (marketingdev2)
AWSAccount 2 (itcloud).Below is an example of using Lacework Control Tower integration:
Example
- (1st level)
- OU=Tech
- AWSAccount 1 (techaws)
- OU=IT
- AWSAccount 2 (itcloud)
- OU=Marketing (it has sublevels)
- OU=prod
- AWSAccount 3 (marketingprodUS)
- AWSAccount 4 (marketingprodEU)
- OU=dev
- AWSAccount 5 (marketingdev1)
- AWSAccount 6 (marketingdev2)
After the Control Tower CFT deployment is done, perform an organizational CloudTrail integration with the following mappings:
{
    "defaultLaceworkAccountAws": "lw_account_1",
    "integration_mappings": {
      "Tech": {
        "aws_accounts": [
          "1"
        ]
      },
      "Marketing": {
        "aws_accounts": [
          "3",
          "4",
          "5",
          "6"
        ]
      }
    }
  }
Any AWS accounts that are not included in the mapping send their CloudTrail logs to the default Lacework sub-account.
If you consolidate CloudTrails from multiple AWS accounts into one bucket, Lacework maps the account ID to the account alias for the root account only. Other account IDs are not mapped to account aliases.
To upload a mapping file, see AWS CloudTrail Integration for Organizations for more information.
Installing the Lacework AWS Control Tower Integration
1. Generate a Lacework API Access Key
- In your console, go to Settings > Configuration > API keys.
- Click on the + Add New button in the upper right to create a new API key.
- Provide a name and description and click Save.
- Click the download button to download the API keys file.
- Copy the keyId and secret from this file.
2. Log in to your AWS Control Tower Management Account
- Log in to AWS Control Tower management account.
- Select the AWS region where your AWS Control Tower is deployed.
3. Deploy the Lacework AWS Control Tower Integration with CloudFormation
Click the following Launch Stack button to go to your CloudFormation console and launch the AWS Control Integration template.

For most deployments, you need only Basic Configuration parameters.
Specify the following Basic Configuration parameters:
Enter a Stack name for the stack.
Enter Your Lacework URL.
Enter your Lacework Access Key ID and Secret Key that you copied from your previous API keys file.
For Capability Type, the recommendation is to use CloudTrail+Config for the best capabilities.
Choose whether you want to Monitor Existing Accounts. This sets up monitoring of ACTIVE existing AWS accounts.
Enter the name of your Existing AWS Control Tower CloudTrail Name.
If your CloudTrail S3 logs are encrypted, specify the KMS Key Identifier ARN. Ensure that you update the KMS key policy to allow access to the Log account cross-account role used by Lacework. Add the following to the key policy.
"Sid": "Allow Lacework to decrypt logs",
"Effect": "Allow",
"Principal": {
"AWS": [
"arn:aws:iam::<log-archive-account-id>:role/<lacework-account-name>-laceworkcwssarole"
]
},
"Action": [
"kms:Decrypt"
],
"Resource": "*"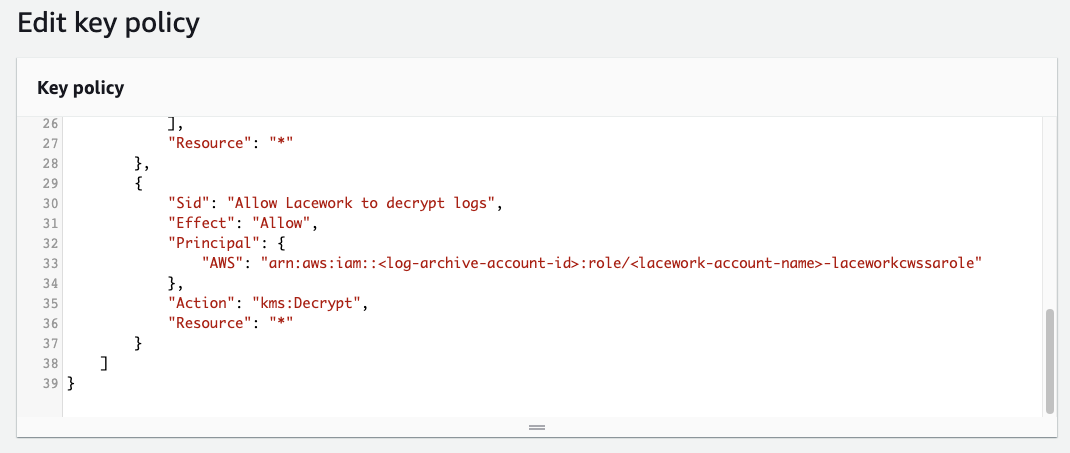
Update the Control Tower Log Account Name and Audit Account Name if necessary.
If using AWS organization units to Lacework sub-account mapping, specify a comma-separated list of organization names in the Organization Configuration section in the AWS Organizations to Lacework Sub-Account Names field. AWS accounts are added to the appropriate Lacework sub-accounts based on this AWS OU-to-Lacework sub-account name mapping. AWS OU names and Lacework sub-account names must match. AWS accounts not in the specified organization units are not added to Lacework.
If using a single Lacework sub-account for all AWS accounts, specify a Lacework sub-account for which all AWS accounts will be added. This is specified in the Single Sub-Account Configuration section in the Lacework Sub-Account Name field.
Click Next through to your stack Review.
Accept the AWS CloudFormation terms and click Create stack.
4. CloudFormation Progress
- Monitor the progress of the CloudFormation deployment. It takes several minutes for the stack to create the resources that enable the Lacework AWS Control Tower integration.
- When successfully completed, the stack shows
CREATE_COMPLETE.
5. Validate the Lacework AWS Control Tower Integration
- Log in to your Lacework Cloud Security Platform console.
- Go to Settings > Integration > Cloud Accounts.
- You should see a list of AWS accounts that are now being monitored by Lacework. The Cloud Account column values correspond to the AWS Account IDs.
Once the Control Tower CloudFormation deployment finishes, follow the steps in AWS CloudTrail Integration for Organizations and upload a mapping file. Any AWS accounts that are not included in the mapping send their CloudTrail logs to the default Lacework sub-account.
Remove the Lacework AWS Control Tower Integration
To remove the Lacework AWS Control Tower integration, simply delete the main stack. All CloudFormation stacksets, stack instances, and Lambda functions will be deleted.
Lacework will no longer monitor your AWS cloud environment.
Troubleshooting
The following sections provide guidance for resolving issues with deploying the Lacework AWS Control Tower integration.
Common Issues
Ensure the Existing AWS Control Tower CloudTrail Name is correct. You can verify this on your AWS CloudTrail Dashboard.
Ensure that your Log Archive and Audit account names are correct and these accounts are
ACTIVE.If you are using the Lacework organization feature to manage your accounts, specify the correct sub-account name, API key ID, and secret key.
If Lacework returns an S3 access error for the CloudTrail account and a KMS key is used, ensure you update the KMS key policy to allow access to the Log account cross-account role used by Lacework.
"Sid": "Allow Lacework to decrypt logs",
"Effect": "Allow",
"Principal": {
    "AWS": [
        "arn:aws:iam::<log-archive-account-id>:role/<lacework-account-name>-laceworkcwssarole"
    ]
},
"Action": [
    "kms:Decrypt"
],
"Resource": "*"
AWS Management Account is not Monitored for Configuration Compliance
Due to AWS Control Tower limitations, the AWS Management account is not included when setting up a Configuration integration with Lacework.
If you want to monitor your AWS Management account for configuration compliance, you will need to integrate it separately outside of Control Tower (for example: AWS Console, Terraform, Cloudformation).
Events and Logs
CloudFormation Events
You can monitor the CloudFormation events for the Lacework AWS Control Tower integration stack. Events may reveal issues with resource creation. The Lacework AWS Control Tower integration stack launches a main stack and three stacksets:
Main Deployment Stack:
- control-tower-integration.template.yml - Main stack that deploys all resources: IAM roles, access token credentials, IAM roles, SQS queues, Lambda functions and the stacksets below.
Centralized CloudTrail Cloud Account in Lacework: (Applied once during initial deployment)
- lacework-aws-ct-audit.template.yml -> Lacework-Control-Tower-CloudTrail-Audit-Account-Lacework account - Creates a stack instance in the Audit account.
- lacework-aws-ct-log.template.yml -> Lacework-Control-Tower-CloudTrail-Log-Account-Lacework account - Creates a stack instance in the Log account.
Config Cloud Account in Lacework: (Applied for each AWS account)
- lacework-aws-cfg-member.template.yml -> Lacework-Control-Tower-Config-Member-Lacework account - Creates a stack instance in each AWS account.
Examining these stacksets for operation results, stack instance results and parameters may also provide debug information.
Lambda Function CloudWatch Logs
Two main Lambda functions are used to manage accounts. LaceworkSetupFunction manages the initial deployment of the integration. LaceworkAccountFunction manages setting up existing and new accounts. Both Lambda functions provide extensive debug messages that can be seen in their respective CloudWatch log streams.
FAQs
Can I individually choose which accounts are added to Lacework within AWS Control Tower?
How does Lacework integrate with AWS Control Tower's CloudTrail?
| Use Cases | Lacework Feature(s) | Data Source |
|---|---|---|
| Vulnerability Management | Vulnerability Management Dashboard | Agentless Workload Scanning |
- Terraform
- Cloudformation
Cloud Audit and Configuration 📎
lacework generate
Generate code to onboard your account
Synopsis
Generate code to onboard your account and deploy Lacework into various cloud environments.
This command creates Infrastructure as Code (IaC) in the form of Terraform HCL, with the option of running Terraform and deploying Lacework into AWS, Azure, or GCP.
Options
-h, --help help for generate
Options inherited from parent commands
  -a, --account string      account subdomain of URL (i.e. <ACCOUNT>.lacework.net)
  -k, --api_key string      access key id
  -s, --api_secret string   secret access key
      --api_token string    access token (replaces the use of api_key and api_secret)
      --debug               turn on debug logging
      --json                switch commands output from human-readable to json format
      --nocache             turn off caching
      --nocolor             turn off colors
      --noninteractive      turn off interactive mode (disable spinners, prompts, etc.)
      --organization        access organization level data sets (org admins only)
  -p, --profile string      switch between profiles configured at ~/.lacework.toml
      --subaccount string   sub-account name inside your organization (org admins only)
SEE ALSO
- lacework - A tool to manage the Lacework cloud security platform.
- lacework generate cloud-account - Generate cloud integration IaC
- lacework generate k8s - Generate Kubernetes integration IaC
Single Account Integration
Agentless Workload Scanning 📎
Overview
This article describes how to integrate your AWS single account with Lacework's Agentless Workload Scanning.
See Lacework Terraform Module for Agentless Workload Scanning on AWS for all available Terraform integration options and additional deployment examples.
AWS Single Account Integration
Custom tags can be applied to add resources using default_tags within the AWS provider. If custom tags are used then those tags will be applied to any resources created by the scanner.
Use the example below for your
versions.tffile:terraform {
required_version = ">= 0.15"
required_providers {
lacework = {
source = "lacework/lacework"
version = "~> 1.0"
}
}
}Use the example below for your
main.tffile:noteIn this example, two regions have been configured:
us-east-1andus-west-2(with an alias ofusw2). You can configure as many regions as you want for your environment.# Set your Lacework profile here. With the Lacework CLI, use
# `lacework configure list` to get a list of available profiles.
provider "lacework" {
profile = "lw_agentless"
}
provider "aws" {
region = "us-east-1"
}
provider "aws" {
alias = "usw2"
region = "us-west-2"
}
// This module will create AWS account "global" resources such as IAM roles, an S3 bucket, and a Secret Manager secret.
// This will also create a new Cloud Account Integration within the Lacework console.
module "lacework_aws_agentless_scanning_global" {
source = "lacework/agentless-scanning/aws"
version = "~> 0.6"
global = true
lacework_integration_name = "sidekick_from_terraform"
}
// The following modules should be included per-region where scanning will occur.
// This creates an ECS cluster, a VPC and VPC IG for that cluster, and an EventBridge trigger in this region.
// The trigger will start a periodic Task to snapshot and analyze EC2 volumes in this region.
// Create regional resources in our first region
module "lacework_aws_agentless_scanning_region" {
source = "lacework/agentless-scanning/aws"
version = "~> 0.6"
regional = true
global_module_reference = module.lacework_aws_agentless_scanning_global
}
// Create regional resources in our second region
module "lacework_aws_agentless_scanning_region_usw2" {
source = "lacework/agentless-scanning/aws"
version = "~> 0.6"
providers = {
aws = aws.usw2
}
regional = true
global_module_reference = module.lacework_aws_agentless_scanning_global
// In this example the default VPC CIDR block is customized for this region.
vpc_cidr_block = "10.10.34.0/24"
}Run
terraform initto initialize the working directory (containing the Terraform files).Run
terraform planand review the changes that will be applied.Once satisfied with the changes that will be applied, run
terraform applyto execute Terraform.
Verify your Agentless Workload Scanning Integration
In the Lacework console, the status of the integration at Settings > Integrations > Cloud accounts will display as Success if all resources are installed correctly. If the periodic scanning encounters an error, the status will display the error details.
Remove an Agentless Workload Scanning Integration
Start in the Lacework console.
- In Settings > Integrations > Cloud accounts, find the integration that you would like to remove.
- Toggle the integration State to disabled, or Delete the integration using the actions menu on the right.
Using Terraform, run terraform destroy for the Agentless module.
Next Steps
- View scanning results in the Lacework Console.
- Read FAQs on Agentless Workload Scanning.
Organization Deployment
Agentless Workload Scanning for AWS Organization 📎
Overview
This article describes how to integrate your AWS organization with Lacework's Agentless Workload Scanning.
AWS Organization Integration
Choose from two options when deploying an AWS organization integration:
- Option 1: Automatic Snapshot Role Integration
- Use this option if you want to automatically integrate any new AWS accounts that are added into the AWS Organization (post integration).
- Option 2: Standard Integration
- Use this option if you want to manually integrate any new AWS accounts that are added into the AWS Organization (post integration).
See Lacework Terraform Module for Agentless Workload Scanning on AWS for all available Terraform integration options and additional deployment examples.
Option 1: Automatic Snapshot Role Integration
For AWS Organization integrations using the automatic snapshot role, add Terraform modules to two AWS accounts:
- Scanning / Security account - Scanning infrastructure will only be installed on this account. This includes a new VPC, Internet Gateway and ECS Cluster per region.
- Management account for the AWS Organization - A role is installed so that accounts and organizational units (OUs) are enumerated during each scan.
- Additionally, a CloudFormation StackSet is deployed to the management account that will automatically deploy a snapshot role to the root, or specified Organizational Units (OUs), within the AWS Organization. This snapshot role is used to integrate new AWS accounts that are added to the AWS Organization (post integration).
Custom tags can be applied to add resources using default_tags within the AWS provider. If custom tags are used then those tags will be applied to any resources created by the scanner.
Use the example below for your
versions.tffile:terraform {
required_version = ">= 0.15.0"
required_providers {
lacework = {
source = "lacework/lacework"
version = "~> 1.0"
}
}
}The Scanning account is the AWS account where the scanning infrastructure will be installed. A Scanning account is created for each region. This can be a Security account or Audit account.
In this example, two regions have been configured:
us-west-1andus-west-2. You can configure as many regions as you want for your environment. You must also provide the AWS Organization Management account for the AWS Organization and set of organizational units (OUs) that you want to scan.# Set your Lacework profile here. With the Lacework CLI, use
# `lacework configure list` to get a list of available profiles.
provider "lacework" {
profile = "lw_agentless"
}
provider "aws" {
profile = "scanning-account"
alias = "scanning-account-usw1"
region = "us-west-1"
}
provider "aws" {
profile = "scanning-account"
alias = "scanning-account-usw2"
region = "us-west-2"
}
// Create global resources, includes lacework cloud integration
module "lacework_aws_agentless_scanning_global" {
source = "lacework/agentless-scanning/aws"
version = "~> 0.6"
providers = {
aws = aws.scanning-account-usw1
}
global = true
organization = {
monitored_accounts = ["ou-abcd-12345678"]
management_account = "0001234567890"
}
lacework_integration_name = "agentless_org_from_terraform"
}
// Create regional resources in our first region
module "lacework_aws_agentless_scanning_region_usw1" {
source = "lacework/agentless-scanning/aws"
version = "~> 0.6"
providers = {
aws = aws.scanning-account-usw1
}
regional = true
global_module_reference = module.lacework_aws_agentless_scanning_global
}
// Create regional resources in our second region
module "lacework_aws_agentless_scanning_region_usw2" {
source = "lacework/agentless-scanning/aws"
version = "~> 0.6"
providers = {
aws = aws.scanning-account-usw2
}
regional = true
global_module_reference = module.lacework_aws_agentless_scanning_global
}Use the example below for the AWS Organization Management account:
provider "aws" {
  profile = "management-account"
  alias   = "management-account-usw1"
  region  = "us-west-1"
}

// Create the required role for the management account.
module "lacework_aws_agentless_management_scanning_role" {
  source  = "lacework/agentless-scanning/aws"
  version = "~> 0.6"

  providers = {
    aws = aws.management-account-usw1
  }

  snapshot_role           = true
  global_module_reference = module.lacework_aws_agentless_scanning_global
}

resource "aws_cloudformation_stack_set" "snapshot_role" {
  provider = aws.management-account-usw1

  auto_deployment {
    enabled                          = true
    retain_stacks_on_account_removal = false
  }

  capabilities     = ["CAPABILITY_NAMED_IAM"]
  description      = "Lacework AWS Agentless Workload Scanning Organization Roles"
  name             = "lacework-agentless-scanning-stackset"
  permission_model = "SERVICE_MANAGED"
  parameters = {
    ExternalId         = module.lacework_aws_agentless_scanning_global.external_id
    ECSTaskRoleArn     = module.lacework_aws_agentless_scanning_global.agentless_scan_ecs_task_role_arn
    ResourceNamePrefix = module.lacework_aws_agentless_scanning_global.prefix
    ResourceNameSuffix = module.lacework_aws_agentless_scanning_global.suffix
  }

  template_url = "https://agentless-workload-scanner.s3.amazonaws.com/cloudformation-lacework/latest/snapshot-role.json"

  # Prevent update loop, as per https://github.com/hashicorp/terraform-provider-aws/issues/23464
  lifecycle {
    ignore_changes = [
      administration_role_arn
    ]
  }
}

resource "aws_cloudformation_stack_set_instance" "snapshot_role" {
  provider = aws.management-account-usw1

  deployment_targets {
    organizational_unit_ids = ["ou-abcd-12345678"]
  }

  region         = "us-west-1"
  stack_set_name = aws_cloudformation_stack_set.snapshot_role.name
}
Run
terraform initto initialize the working directory (containing the Terraform files).Run
terraform planand review the changes that will be applied.Once satisfied with the changes that will be applied, run
terraform applyto execute Terraform.
Option 2: Standard Integration
For standard AWS Organization integrations, add Terraform modules to three AWS accounts:
- Scanning / Security account - Scanning infrastructure will only be installed on this account. This includes a new VPC, Internet Gateway and ECS Cluster per region.
- Monitored account(s) - A role is installed that will create snapshots and access snapshot data.
- Management account for the AWS Organization - A role is installed so that accounts and organizational units (OUs) are enumerated during each scan.
Custom tags can be applied to add resources using default_tags within the AWS provider. If custom tags are used then those tags will be applied to any resources created by the scanner.
Use the example below for your
versions.tffile:terraform {
required_version = ">= 0.15"
required_providers {
lacework = {
source = "lacework/lacework"
version = "~> 1.0"
}
}
}Here the Scanning account is the AWS account where the scanning infrastructure will be installed. A Scanning account is created for each region. This can be a Security account or Audit account.
In this example, two regions have been configured:
us-west-1andus-west-2. You can configure as many regions as you want for your environment.You must also provide the AWS Organization Management account for the AWS Organization and set of organizational units (OUs) that you want to scan.
noteYou must update and rerun this Terraform module if you want to integrate any new AWS Accounts that have been added to the AWS Organization.
# Set your Lacework profile here. With the Lacework CLI, use
# `lacework configure list` to get a list of available profiles.
provider "lacework" {
  profile = "lw_agentless"
}

provider "aws" {
  profile = "scanning-account"
  alias   = "scanning-account-usw1"
  region  = "us-west-1"
}

provider "aws" {
  profile = "scanning-account"
  alias   = "scanning-account-usw2"
  region  = "us-west-2"
}

// Create global resources, includes lacework cloud integration
module "lacework_aws_agentless_scanning_global" {
  source  = "lacework/agentless-scanning/aws"
  version = "~> 0.6"

  providers = {
    aws = aws.scanning-account-usw1
  }

  global       = true
  organization = {
    // This list may contain account IDs, OUs, or the organization root.
    monitored_accounts = ["1234567890", "ou-abcd"]
    // This account ID must be the AWS organizations "management account".
    // This wil be used to enumerate the accounts and OUs in the list of monitored accounts.
    // This account must also have the snapshot_role installed.
    management_account = "0001234567890"
  }

  lacework_integration_name = "agentless_org_from_terraform"
}

// Create regional resources in our first region
module "lacework_aws_agentless_scanning_region_usw1" {
  source  = "lacework/agentless-scanning/aws"
  version = "~> 0.6"

  providers = {
    aws = aws.scanning-account-usw1
  }

  regional                = true
  global_module_reference = module.lacework_aws_agentless_scanning_global
}

// Create regional resources in our second region
module "lacework_aws_agentless_scanning_region_usw2" {
  source  = "lacework/agentless-scanning/aws"
  version = "~> 0.6"

  providers = {
    aws = aws.scanning-account-usw2
  }

  regional                = true
  global_module_reference = module.lacework_aws_agentless_scanning_global
  // In this example the default VPC CIDR block is customized for this region.
  vpc_cidr_block          = "10.10.34.0/24"
}
Use the example below to add the Scanning role to each AWS account that should be scanned or monitored:
In this example a "Monitored account" is any AWS account that should be scanned by the scanner. The scanner will assume a role in each of these accounts to take snapshots and access snapshot data. If new AWS Accounts are added to the AWS Organization after integration, add this role for those new accounts that you want to monitor.
provider "aws" {
  profile = "monitored-account"
  alias   = "monitored-account-usw1"
  region  = "us-west-1"
}

// Create the required role for the monitored account.
module "lacework_aws_agentless_monitored_scanning_role" {
  source  = "lacework/agentless-scanning/aws"
  version = "~> 0.6"

  providers = {
    aws = aws.monitored-account-usw1
  }

  snapshot_role           = true
  global_module_reference = module.lacework_aws_agentless_scanning_global
}
Use the example below for the AWS Organization Management account:
In this example the following Terraform code is the same as what is used on each Monitored account. This installs the same role into the Management account.
provider "aws" {
  profile = "management-account"
  alias   = "management-account-usw1"
  region  = "us-west-1"
}

// Create the required role for the management account.
module "lacework_aws_agentless_management_scanning_role" {
  source  = "lacework/agentless-scanning/aws"
  version = "~> 0.6"

  providers = {
    aws = aws.management-account-usw1
  }

  snapshot_role           = true
  global_module_reference = module.lacework_aws_agentless_scanning_global
}
Run
terraform initto initialize the working directory (containing the Terraform files).Run
terraform planand review the changes that will be applied.Once satisfied with the changes that will be applied, run
terraform applyto execute Terraform.
Verify your Agentless Workload Scanning Integration
In the Lacework console, the status of the integration at Settings > Integrations > Cloud accounts will display as Success if all resources are installed correctly. If the periodic scanning encounters an error, the status will display the error details.
Remove an Agentless Workload Scanning Integration
Start in the Lacework console.
- In Settings > Integrations > Cloud accounts, find the integration that you would like to remove.
- Toggle the integration State to disabled, or Delete the integration using the actions menu on the right.
Using Terraform, run terraform destroy for the Agentless module.
Next Steps
- View scanning results in the Lacework Console.
- Read FAQs on Agentless Workload Scanning.
Single Account Integration
Agentless Workload Scanning 📎
Overview
This article describes how to integrate your AWS single account with Lacework's Agentless Workload Scanning. The high-level steps are summarized below:
- Configure your integration in the Lacework Console.
- Choose and execute your CloudFormation integration method.
- Update the Default Security Group and Network ACL Rules for Least Privilege Access.
- Verify your Agentless Workload Scanning Integration.
Configure the Integration in Lacework Console
- Log in to the Lacework Console.
- Select Settings > Integrations > Cloud accounts.
- Click Add New.
- Click Amazon Web Services and select CloudFormation.
- Click Next.
- Click the Choose integration type dropdown and select Agentless Workload Scanning (Single account).
- Fill in the settings as described in Configuration Settings.
- Click Save.
- Once the integration is created, the Status displays as Pending.
Choose a CloudFormation integration method to continue the integration.
Configuration Settings
| Setting | Description | Example |
|---|---|---|
| Name | The name for the integration (as it will be displayed in the Lacework Console). | myAgentlessIntegration |
| Scanning AWS Account ID | The AWS Account ID where the scanning resources will be created. | 123456789012 |
| Limit Scanned Workloads | Use an LQL key and value to constrain the Agentless Workload Scanning to specific resources. If left blank, Lacework will scan all resources available to the account or organization. See Limit Scanned Workloads for further guidance. | |
| Scan Frequency (hours) | How often your images, containers, and hosts are scanned for vulnerabilities (in hours). The maximum scan frequency is 24 hours. | 24 |
| Scan containers | Untick the checkbox if you don't want to scan containers for vulnerabilities. | |
| Scan host vulnerabilities | Untick the checkbox if you don't want to scan hosts for vulnerabilities. | |
| Scan secondary volumes | Tick the checkbox if you want to scan additional volumes on hosts (other than root). | |
| Scan stopped instances | Tick the checkbox if you want to scan stopped instances in your environment. |
Once created, you can view all the Agentless Workload Scanning integration details in the Lacework Console.
Choose a CloudFormation Integration Method
Choose one of the following options to integrate with an AWS account using CloudFormation:
- Option 1: Run CloudFormation script
- For the initial setup, Lacework recommends this method as it requires fewer steps and less user interaction.
- Option 2: Download CloudFormation script
- This method requires more user interaction, but may be useful if you have multiple accounts with distributed ownership.
Option 1: Run CloudFormation Script
For this option, disable your browser pop-up blocker, otherwise you may not be redirected to the AWS user portal during the initial steps.
In the Lacework Console, go to Settings > Integrations > Cloud accounts, and select the integration that you have just created. This displays the details of the integration.
Under Install using CloudFormation, click Run CloudFormation Template.
This redirects you to the AWS Create stack > Specify Template page in a new tab. The Lacework script populates the Amazon S3 URL in Specify template for you.
Review the page and click Next.
On the Specify stack details page, enter a Stack name (for example: Lacework-AWS-Agentless-Config).
Check that the Regions list contains the appropriate regions for your account.
- A VPC and Internet Gateway will be created in each region, please verify resource quotes have not been reached using the Service Quotas tool.
- Regional STS must be enabled in each region selected.
infoLacework checks your account and populates the Regions list automatically. If the check happens to fail, all regions will be listed by default.
For Is there an available VPC and VPC Internet Gateway in each selected Region?
- See Access and Resource Requirements for guidance on how to check if the required VPC resources can be created.
- Select Yes once you have completed the quotas check.
Review the page and click Next.
On Configure stack options, review the page and click Next (no changes are required).
- If you would like to add custom Tags, use the option here. These tags will be propagated to all resources created by the agentless scanner.
On the Review page, check the acknowledgements in the Capabilities section:
- I acknowledge that AWS CloudFormation might create IAM resources with custom names.
- I acknowledge that AWS CloudFormation might require the following capability:
CAPABILITY_AUTO_EXPAND
Click Create stack.
You are then redirected to the CloudFormation > Stacks page. Select your stack to see the event log as it is being created. If you do not see your new stack in the table, refresh the page.
When the Status of the stack reaches CREATE_COMPLETE, the Agentless Workload Scanning integration for this AWS account is complete.
Option 2: Download CloudFormation Script
In the Lacework Console, go to Settings > Integrations > Cloud accounts, and select the integration that you have just created. This displays the details of the integration.
Under Install using CloudFormation, click Download CloudFormation Template.
When prompted, choose a suitable location to save the JSON file on your local machine.
Log in to your AWS account.
Select the CloudFormation service and click Create stack > With new resources (standard).
Under Specify template, select Upload a template file. Click Choose file and upload the CloudFormation script that was downloaded earlier.
Click Next.
On the Specify stack details page, enter a Stack name (for example: Lacework-AWS-Agentless-Config).
Check that the Regions list contains the appropriate regions for your account.
- A VPC and Internet Gateway will be created in each region, please verify resource quotes have not been reached using the Service Quotas tool.
- Regional STS must be enabled in each region selected.
infoLacework checks your account and populates the Regions list automatically. If the check happens to fail, all regions will be listed by default.
For Is there an available VPC and VPC Internet Gateway in each selected Region?
- See Access and Resource Requirements for guidance on how to check if the required VPC resources can be created.
- Select Yes once you have completed the quotas check.
Review the page and click Next.
On Configure stack options, review the page and click Next (no changes are required).
- If you would like to add custom Tags, use the option here. These tags will be propagated to all resources created by the agentless scanner.
On the Review page, check the acknowledgements in the Capabilities section:
- I acknowledge that AWS CloudFormation might create IAM resources with custom names.
- I acknowledge that AWS CloudFormation might require the following capability:
CAPABILITY_AUTO_EXPAND
Click Create stack.
You are then redirected to the CloudFormation > Stacks page. Select your stack to see the event log as it is being created. If you do not see your new stack in the table, refresh the page.
Update the Default Security Group and Network ACL Rules for Least Privilege Access
Due to AWS limitations with CloudFormation, the VPCs created for each region during Agentless deployment are assigned default security groups and default network ACLs.
To set up least privilege access rules instead of the default rules, see Alerts Triggering for lacework-global-87 and lacework-global-145 after Deployment.
Verify your Agentless Workload Scanning Integration
Verify CloudFormation StackSet Instances Completed
These steps will verify that CloudFormation installed a StackSet for each Region selected in the Stack Regions. Note that it is possible that the CloudFormation Stack completed successfully but one or more regional StackSet Instances failed.
- In the AWS Console open the CloudFormation page. Make sure you have selected the AWS region where the Agentless Scanning template was installed.
- On the left-hand side menu click StackSets.
- Click on the link for the StackSet matching the name of the CloudFormation Stack created above.
- Click on the Stack Instances tab.
- Review each Instance and check that the Detailed Status is "Success", if there is an error then the Status Reason will provided a detailed error message.
Verify Lacework Integration Completed
In the Lacework console, the status of the integration at Settings > Integrations > Cloud accounts will update from Pending to Success if all resources are installed correctly.
You may need to refresh the page when returning from the AWS Console after completing the integration steps.
If the periodic scanning encounters an error, the status will display the error details.
Remove an Agentless Workload Scanning Integration
Follow these steps if you want to remove your single account integration.
Start in the Lacework console.
- In Settings > Integrations > Cloud accounts, find the integration that you would like to remove.
- Note the name of the integration, this will be used to locate the CloudFormation Stack later.
- Toggle the integration State to disabled, or Delete the integration using the actions menu on the right.
Once complete, remove the integration within AWS using the AWS Console.
- Log in to your AWS account.
- Select the CloudFormation service and find the Stack with the associated name from the integration.
- Click the Delete button then Delete stack to confirm deleting.
Next Steps
- View scanning results in the Lacework Console.
- Read FAQs on Agentless Workload Scanning.
Organziation Deployment
Agentless Workload AWS Organization Scanning 📎
Overview
This article describes how to integrate your AWS organization with Lacework's Agentless Workload Scanning. The high-level steps are summarized below:
- Configure your integration in the Lacework Console.
- Set Up Scanning Account (Step 1 for CloudFormation).
- Integrate Scanning Account with your Organization (Step 2 for CloudFormation).
- Update the Default Security Group and Network ACL Rules for Least Privilege Access.
- Verify your Agentless Workload Scanning Integration.
Configure the Integration in Lacework Console
- Log in to the Lacework Console.
- Select Settings > Integrations > Cloud accounts.
- Click Add New.
- Click Amazon Web Services and select CloudFormation.
- Click Next.
- Click the Choose integration type dropdown and select Agentless Workload Scanning (Organization).
- Fill in the settings as described in Configuration Settings.
- Click Save.
- Once the integration is created, the Status displays as Pending.
Proceed to Step 1: Set Up Scanning Account to continue the integration.
Configuration Settings
| Setting | Description | Example |
|---|---|---|
| Name | The name for the integration (as it will be displayed in the Lacework Console). | myAgentlessIntegration |
| Scanning AWS Account ID | The AWS Account ID where the scanning resources will be created. | 123456789012 |
| Limit Scanned Workloads | Use an LQL key and value to constrain the Agentless Workload Scanning to specific resources. If left blank, Lacework will scan all resources available to the account or organization. See Limit Scanned Workloads for further guidance. | |
| Scan Frequency (hours) | How often your images, containers, and hosts are scanned for vulnerabilities (in hours). The maximum scan frequency is 24 hours. | 24 |
| Scan containers | Untick the checkbox if you don't want to scan containers for vulnerabilities. | |
| Scan host vulnerabilities | Untick the checkbox if you don't want to scan hosts for vulnerabilities. | |
| Scan secondary volumes | Tick the checkbox if you want to scan additional volumes on hosts (other than root). | |
| Scan stopped instances | Tick the checkbox if you want to scan stopped instances in your environment. |
Once created, you can view all the Agentless Workload Scanning integration details in the Lacework Console.
Step 1: Set Up Scanning Account
Choose one of the following options to set up a scanning account for your AWS Organization integration using CloudFormation:
- Option 1: Run CloudFormation script
- For the initial setup, Lacework recommends this method as it requires fewer steps and less user interaction.
- Option 2: Download CloudFormation script
- This method requires more user interaction, but may be useful if you have multiple organizations with distributed ownership.
Option 1: Run CloudFormation Script
For this option, disable your browser pop-up blocker, otherwise you may not be redirected to the AWS user portal during the initial steps.
In the Lacework Console, go to Settings > Integrations > Cloud accounts, and select the integration that you have just created. This displays the details of the integration.
Under Install using CloudFormation > Step 1: Set up AWS Scanning Account, click Run CloudFormation Template.
This redirects you to the AWS Create stack > Specify Template page in a new tab. The Lacework script populates the Amazon S3 URL in Specify template for you.
Review the page and click Next.
On the Specify stack details page, enter a Stack name (for example: Lacework-AWS-Agentless-ScanAccount).
Check that the Regions list contains the appropriate regions for your account.
- A VPC and Internet Gateway will be created in each region, please verify resource quotes have not been reached using the Service Quotas tool.
- Regional STS must be enabled in each region selected.
infoLacework checks your account and populates the Regions list automatically. If the check happens to fail, all regions will be listed by default.
For Is there an available VPC and VPC Internet Gateway in each selected Region?
- See Access and Resource Requirements for guidance on how to check if the required VPC resources can be created.
- Select Yes once you have completed the quotas check.
Review the page and click Next.
On Configure stack options, review the page and click Next (no changes are required).
- If you would like to add custom Tags, use the option here. These tags will be propagated to all resources created by the agentless scanner.
On the Review page, check the acknowledgements in the Capabilities section:
- I acknowledge that AWS CloudFormation might create IAM resources with custom names.
- I acknowledge that AWS CloudFormation might require the following capability:
CAPABILITY_AUTO_EXPAND
Click Create stack.
You are then redirected to the CloudFormation > Stacks page. Select your stack to see the event log as it is being created. If you do not see your new stack in the table, refresh the page.
Up to three stacks are created for the purposes of the scanning account, the descriptions for each are as follows:
- Lacework AWS Agentless Workload Scanning Organization Integration - Scanning Resources
- Lacework AWS Agentless Workload Scanning Integration - Global
- Lacework AWS Agentless Workload Scanning Integration - Regional
When the Status of each of these stacks reaches CREATE_COMPLETE, the first part of the integration is complete.
Note down the following key values from the first stack that was created (and named by you). They can be found on the Outputs tab when viewing the stack:
- CrossAccountRoleArn
- ECSTaskRoleArn
- ExternalId
- S3BucketArn
These are entered during the stack deployment in step 2.
Proceed to Step 2: Integrate Scanning Account with your Organization to continue the integration.
Option 2: Download CloudFormation Script
In the Lacework Console, go to Settings > Integrations > Cloud accounts, and select the integration that you have just created. This displays the details of the integration.
Under Install using CloudFormation > Step 1: Set up AWS Scanning Account, click Download CloudFormation Template.
When prompted, choose a suitable location to save the JSON file on your local machine.
Log in to your AWS account.
Select the CloudFormation service and click Create stack > With new resources (standard).
Under Specify template, select Upload a template file. Click Choose file and upload the CloudFormation script that was downloaded earlier.
Click Next.
On the Specify stack details page, enter a Stack name (for example: Lacework-AWS-Agentless-ScanAccount).
Check that the Regions list contains the appropriate regions for your account.
- A VPC and Internet Gateway will be created in each region, please verify resource quotes have not been reached using the Service Quotas tool.
- Regional STS must be enabled in each region selected.
infoLacework checks your account and populates the Regions list automatically. If the check happens to fail, all regions will be listed by default.
For Is there an available VPC and VPC Internet Gateway in each selected Region?
- See Access and Resource Requirements for guidance on how to check if the required VPC resources can be created.
- Select Yes once you have completed the quotas check.
Review the page and click Next.
On Configure stack options, review the page and click Next (no changes are required).
- If you would like to add custom Tags, use the option here. These tags will be propagated to all resources created by the agentless scanner.
On the Review page, check the acknowledgements in the Capabilities section:
- I acknowledge that AWS CloudFormation might create IAM resources with custom names.
- I acknowledge that AWS CloudFormation might require the following capability:
CAPABILITY_AUTO_EXPAND
Click Create stack.
You are then redirected to the CloudFormation > Stacks page. Select your stack to see the event log as it is being created. If you do not see your new stack in the table, refresh the page.
Up to three stacks are created for the purposes of the scanning account, the descriptions for each are as follows:
- Lacework AWS Agentless Workload Scanning Organization Integration - Scanning Resources
- Lacework AWS Agentless Workload Scanning Integration - Global
- Lacework AWS Agentless Workload Scanning Integration - Regional
When the Status of each of these stacks reaches CREATE_COMPLETE, the first part of the integration is complete.
Note down the following key values from the first stack that was created (and named by you). They can be found on the Outputs tab when viewing the stack:
- CrossAccountRoleArn
- ECSTaskRoleArn
- ExternalId
- S3BucketArn
These are entered during the stack deployment in step 2.
Proceed to Step 2: Integrate Scanning Account with your Organization to continue the integration.
Step 2: Integrate Scanning Account with your Organization
Choose one of the following options to integrate the scanning account with your AWS Organization using CloudFormation:
- Option 1: Run CloudFormation script
- For the initial setup, Lacework recommends this method as it requires fewer steps and less user interaction.
- Option 2: Download CloudFormation script
- This method requires more user interaction, but may be useful if you have multiple organizations with distributed ownership.
Option 1: Run CloudFormation Script
For this option, disable your browser pop-up blocker, otherwise you may not be redirected to the AWS user portal during the initial steps.
In the Lacework Console, go to Settings > Integrations > Cloud accounts, and select the agentless integration that you have just set up a scanning account for. This displays the details of the integration.
Under Install using CloudFormation > Step 2: Integrate AWS Scanning Account with your AWS Organization, click Run CloudFormation Template.
This redirects you to the AWS Create stack > Specify Template page in a new tab. The Lacework script populates the Amazon S3 URL in Specify template for you.
Review the page and click Next.
On the Specify stack details page, enter a Stack name (for example: Lacework-AWS-Agentless-OrgIntegration).
For the following named fields, enter the equivalent key values obtained from the scanning account stack (Outputs tab) created in Step 1.
- CrossAccountRoleArn
- ECSTaskRoleArn
- ExternalId
- S3BucketArn
For Monitored Account Deployment, select one of the following options:
- SERVICE_MANAGED (Organizational Units) - Select this option if you want to monitor the whole organization from the Root or specific Organizational Units (OUs).
- SELF_MANAGED (Account IDs) - Select this option if you only want to monitor one or more specific accounts within the organization.
infoSee AWS Organizations terminology and concepts for further guidance on AWS Organizational structure.
For Monitored Account IDs, there are a number of options available:
Enter the AWS Organization Root ID if you want to monitor the whole organization. Ensure SERVICE_MANAGED (Organizational Units) has been selected in the Monitored Account Deployment dropdown.
Enter one or more Organization unit (OU) IDs if you want to monitor specific OUs. Ensure SERVICE_MANAGED (Organizational Units) has been selected in the Monitored Account Deployment dropdown.
Enter the Account IDs that you want to monitor specific accounts within the organization. Ensure SELF_MANAGED (Account IDs) has been selected in the Monitored Account Deployment dropdown.
For Is there an available VPC and VPC Internet Gateway in each selected Region?
- See Access and Resource Requirements for guidance on how to check if the required VPC resources can be created.
- Select Yes once you have completed the quotas check.
Review the page and click Next.
On Configure stack options, review the page and click Next (no changes are required).
- If you would like to add custom Tags, use the option here. These tags will be propagated to all resources created by the agentless scanner.
On the Review page, check the acknowledgements in the Capabilities section:
- I acknowledge that AWS CloudFormation might create IAM resources with custom names.
- I acknowledge that AWS CloudFormation might require the following capability:
CAPABILITY_AUTO_EXPAND
Click Create stack.
You are then redirected to the CloudFormation > Stacks page. Select your stack to see the event log as it is being created. If you do not see your new stack in the table, refresh the page.
When the Status of the stack reaches CREATE_COMPLETE, the Agentless Workload Scanning integration for this AWS Organization is complete.
Option 2: Download CloudFormation Script
In the Lacework Console, go to Settings > Integrations > Cloud accounts, and select the agentless integration that you have just set up a scanning account for. This displays the details of the integration.
Under Install using CloudFormation > Step 2: Integrate AWS Scanning Account with your AWS Organization, click Download CloudFormation Template.
When prompted, choose a suitable location to save the JSON file on your local machine.
Log in to your AWS account.
Select the CloudFormation service and click Create stack > With new resources (standard).
Under Specify template, select Upload a template file. Click Choose file and upload the CloudFormation script that was downloaded earlier.
Click Next.
On the Specify stack details page, enter a Stack name (for example: Lacework-AWS-Agentless-OrgIntegration).
For the following named fields, enter the equivalent key values obtained from the scanning account stack (Outputs tab) created in Step 1.
- CrossAccountRoleArn
- ECSTaskRoleArn
- ExternalId
- S3BucketArn
For Monitored Account Deployment, select one of the following options:
- SERVICE_MANAGED (Organizational Units) - Select this option if you want to monitor the whole organization from the Root or specific Organizational Units (OUs).
- SELF_MANAGED (Account IDs) - Select this option if you only want to monitor one or more specific accounts within the organization.
infoSee AWS Organizations terminology and concepts for further guidance on AWS Organizational structure.
For Monitored Account IDs, there are a number of options available:
Enter the AWS Organization Root ID if you want to monitor the whole organization. Ensure SERVICE_MANAGED (Organizational Units) has been selected in the Monitored Account Deployment dropdown.
Enter one or more Organization unit (OU) IDs if you want to monitor specific OUs. Ensure SERVICE_MANAGED (Organizational Units) has been selected in the Monitored Account Deployment dropdown.
Enter the Account IDs that you want to monitor specific accounts within the organization. Ensure SELF_MANAGED (Account IDs) has been selected in the Monitored Account Deployment dropdown.
For Is there an available VPC and VPC Internet Gateway in each selected Region?
- See Access and Resource Requirements for guidance on how to check if the required VPC resources can be created.
- Select Yes once you have completed the quotas check.
Review the page and click Next.
On Configure stack options, review the page and click Next (no changes are required).
- If you would like to add custom Tags, use the option here. These tags will be propagated to all resources created by the agentless scanner.
On the Review page, check the acknowledgements in the Capabilities section:
- I acknowledge that AWS CloudFormation might create IAM resources with custom names.
- I acknowledge that AWS CloudFormation might require the following capability:
CAPABILITY_AUTO_EXPAND
Click Create stack.
You are then redirected to the CloudFormation > Stacks page. Select your stack to see the event log as it is being created. If you do not see your new stack in the table, refresh the page.
When the Status of the stack reaches CREATE_COMPLETE, the Agentless Workload Scanning integration for this AWS Organization is complete.
Update the Default Security Group and Network ACL Rules for Least Privilege Access
Due to AWS limitations with CloudFormation, the VPCs created for each region during Agentless deployment are assigned default security groups and default network ACLs.
To set up least privilege access rules instead of the default rules, see Alerts Triggering for lacework-global-87 and lacework-global-145 after Deployment.
Verify your Agentless Workload Scanning Integration
Verify CloudFormation StackSet Instances Completed
These steps will verify that CloudFormation installed a StackSet for each Region selected in the Stack Regions. Note that it is possible that the CloudFormation Stack completed successfully but one or more regional StackSet Instances failed.
- In the AWS Console open the CloudFormation page. Make sure you have selected the AWS region where the Agentless Scanning template was installed.
- On the left-hand side menu click StackSets.
- Click on the link for the StackSet matching the name of the CloudFormation Stack created above.
- Click on the Stack Instances tab.
- Review each Instance and check that the Detailed Status is "Success", if there is an error then the Status Reason will provided a detailed error message.
Verify Lacework Integration Completed
In the Lacework console, the status of the integration at Settings > Integrations > Cloud accounts will update from Pending to Success if all resources are installed correctly.
You may need to refresh the page when returning from the AWS Console after completing the integration steps.
If the periodic scanning encounters an error, the status will display the error details.
Remove an Agentless Workload Scanning Integration
Follow these steps if you want to remove your organization integration.
Start in the Lacework console.
- In Settings > Integrations > Cloud accounts, find the integration that you would like to remove.
- Note the name of the integration, this will be used to locate the CloudFormation Stack later.
- Toggle the integration State to disabled, or Delete the integration using the actions menu on the right.
Once complete, remove the integration within AWS using the AWS Console.
- Log in to your AWS account.
- Select the CloudFormation service and find the Stacks with the associated names from the integration.
- Click the Delete button then Delete stack to confirm deleting.
Next Steps
- View scanning results in the Lacework Console.
- Read FAQs on Agentless Workload Scanning.
| Use Cases | Lacework Feature(s) | Data Source |
|---|---|---|
| User Entity Behaviour Analytics (UEBA) | Kubernetes Audit Log Dashboard Kubernetes Anomaly Detection Kubernetes Audit Log Polygraph | EKS Audit |
- Guided Configuration
- Lacework CLI
- Terraform
- Cloudformation
EKS Audit 📎
Guided configuration is a wizard-like interface that takes your input and generates a script that downloads and sets up all necessary Lacework CLI and Terraform components to create the AWS integration non-interactively through AWS CloudShell. You can also choose to run the generated bundle from any host supported by Terraform.
Requirements
The final step of guided configuration is to run the generated bundle from either AWS CloudShell or any Terraform-supported host. Ensure your environment meets the corresponding requirements.
From AWS CloudShell
- AWS Account Admin - The account used to run Terraform must have administrative privileges on every AWS account you intend to integrate with Lacework.
- Lacework Administrator - A Lacework account with administrator privileges.
From Any Supported Host
- AWS Account Admin - The account used to run Terraform must have administrative privileges on every AWS account you intend to integrate with Lacework.
- AWS CLI - The Terraform provider for AWS leverages the configuration from the AWS CLI and it is recommended the AWS CLI is installed and configured with API keys for the account being integrated.
- Linux Tools - The following Linux tools must be installed and present on PATH: curl, Git, and unzip.
- Lacework Administrator - A Lacework account with administrator privileges.
Navigate to Guided Configuration
Follow these steps to integrate using guided configuration.
- Log in to the Lacework Console.
- Go to Settings > Integrations > Cloud accounts.
- Click + Add New.
- Click Amazon Web Services and select Guided configuration.
- Click Next.
- Select an integration type and follow the steps for the corresponding integration type.
Create an EKS Audit Log Integration
Answer the questions about how to configure the integration.
Basic Configuration
- AWS region
Select your AWS region. - Comma separated list of EKS clusters
Enter a comma separated list of the EKS clusters you want to integrate. - Select an API key.
- Select an existing API key from the list.
- If no API keys exist, click Create New Key, provide a name and description, and click Save. Then select the key to use in the integration.
Advanced Configuration
For optional advanced configuration, click Advanced configuration (optional) and click Configure for the options you want to configure. The following options are available.
Bucket settings
- Enable S3 bucket versioning? - Select to enable S3 bucket versioning.
- Should MFA object deletion be required for the new bucket? - Select to require MFA object deletion (requires bucket versioning).
- Should force destroy be enabled for the new bucket? - Select to enable force destroy of the S3 bucket (required when bucket is not empty).
- Enable encryption for the new bucket? - Select to enable encryption on the S3 bucket.
- Specify the Bucket SSE algorithm - Encryption algorithm to use for S3 bucket server-side encryption.
- Specify the existing SSE KMS key ARN - Existing KMS encryption key ARN for bucket. Required when the bucket SSE algorithm is KMS and using an existing KMS key.
- Specify the bucket lifecycle expiration (days) - Lifetime in number of days of the bucket objects (default is 180).
Existing cross account IAM role
- Specify an existing cross-account IAM role ARN - IAM role ARN to use for cross-account access.
- Cross-account IAM role external ID - Copy the Lacework-generated external ID. You must use this external ID to replace the current one. Refer to Update Cross-Account IAM Role External ID for how to update the cross-account role's external ID.
Firehose settings
- Specify an existing Firehose IAM role ARN - IAM role to use for the Kinesis Firehose.
- Enable encryption on Firehose? - Select to enable encryption on Firehose.
- Specify existing KMS encryption key ARN for Firehose - ARN of an existing KMS encryption key to use for the Kinesis Firehose.
CloudWatch settings
- Specify an existing CloudWatch IAM role ARN - IAM role ARN to use for the CloudWatch filter.
SNS settings
- Enable encryption on SNS topic? - Select to enable encryption on the topic.
- Specify existing KMS encryption key ARN for SNS topic - ARN of an existing KMS encryption key to use for the SNS topic.
Integration settings
- Specify an integration name - A unique name for the integration that displays in the Lacework Console.
Generate CLI Bundle
After providing basic configuration information and any desired advanced configuration information, generate the CLI bundle.
- Click Generate CLI bundle. This generates a CLI bundle specifically for you based on the information entered. You will copy and paste this into the AWS CloudShell to create the integration.
- Ensure your environment meets all prerequisites.
- Click Copy download bundle command to clipboard.
- As an account with administrator access, go to the AWS CloudShell.
- Paste the command and press enter.
EKS Audit setup using the Lacework CLI 📎
lacework generate k8s eks
Generate and/or execute Terraform code for EKS integration
Synopsis
Use this command to generate Terraform code for deploying Lacework into an EKS environment.
By default, this command interactively prompts for the required information to set up the new cloud account. In interactive mode, this command will:
- Prompt for the required information to set up the integration
- Generate new Terraform code using the inputs
- Optionally, run the generated Terraform code:
- If Terraform is already installed, the version is verified as compatible for use
- If Terraform is not installed, or the version installed is not compatible, a new version will be installed into a temporary location
- Once Terraform is detected or installed, the Terraform plan is executed
- The command prompts you with the outcome of the plan and allows you to view more details or continue with Terraform apply
- If confirmed, Terraform apply runs, completing the setup of the cloud account
This command can also be run in noninteractive mode. See help output for more details on the parameter values required for Terraform code generation.
lacework generate k8s eks [flags]
Options
      --apply                                     run terraform apply without executing plan or prompting
      --aws_profile string                        specify aws profile
      --bucket_lifecycle_exp_days int             specify the s3 bucket lifecycle expiration days
      --bucket_sse_algorithm string               specify the encryption algorithm to use for S3 bucket server-side encryption
      --bucket_sse_key_arn string                 specify the kms key arn to be used for s3. (required when bucket_sse_algorithm is aws:kms & using an existing kms key)
      --custom_filter_pattern string              specify a custom cloudwatch log filter pattern
      --enable_bucket_versioning                  enable s3 bucket versioning (default true)
      --enable_encryption_s3                      enable encryption on s3 bucket (default true)
      --enable_firehose_encryption                enable firehose encryption (default true)
      --enable_kms_key_rotation                   enable automatic kms key rotation (default true)
      --enable_mfa_delete_s3                      enable mfa delete on s3 bucket. Requires bucket versioning.
      --enable_sns_topic_encryption               enable encryption on the sns topic (default true)
      --existing_bucket_arn string                specify existing s3 bucket arn for the audit log
      --existing_ca_iam_role_arn string           specify existing cross account iam role arn to use
      --existing_ca_iam_role_external_id string   specify existing cross account iam role external_id to use
      --existing_cw_iam_role_arn string           specify existing cloudwatch iam role arn to use
      --existing_firehose_iam_role_arn string     specify existing firehose iam role arn to use
      --firehose_encryption_key_arn string        specify the kms key arn to be used with the Firehose
  -h, --help                                      help for eks
      --integration_name string                   specify the name of the eks audit integration
      --kms_key_deletion_days int                 specify the kms waiting period before deletion, in number of days
      --lacework_aws_account_id string            the Lacework AWS root account id
      --output string                             location to write generated content
      --prefix string                             specify the prefix that will be used at the beginning of every generated resource
      --region_clusters stringToString            configure eks clusters per aws region. To configure multiple regions pass the flag multiple times. Example format:  --region_clusters <region>="cluster,list" (default [])
      --sns_topic_encryption_key_arn string       specify the kms key arn to be used with the sns topic
      --use_existing_bucket                       use existing supplied s3 bucket (default false)
Options inherited from parent commands
  -a, --account string      account subdomain of URL (i.e. <ACCOUNT>.lacework.net)
  -k, --api_key string      access key id
  -s, --api_secret string   secret access key
      --api_token string    access token (replaces the use of api_key and api_secret)
      --debug               turn on debug logging
      --json                switch commands output from human-readable to json format
      --nocache             turn off caching
      --nocolor             turn off colors
      --noninteractive      turn off interactive mode (disable spinners, prompts, etc.)
      --organization        access organization level data sets (org admins only)
  -p, --profile string      switch between profiles configured at ~/.lacework.toml
      --subaccount string   sub-account name inside your organization (org admins only)
SEE ALSO
- lacework generate k8s - Generate Kubernetes integration IaC
EKS Audit setup using Terraform 📎
To integrate with Amazon EKS, Lacework recommends using guided configuration. The guided interface takes your input and generates a script that downloads and sets up all necessary Lacework CLI and Terraform components to create the integration non-interactively.
To use guided configuration:
- In the Lacework Console go to Settings > Integrations > Cloud accounts.
- Click + Add New.
- Click Amazon Web Services and select Guided configuration.
Alternatively, follow the steps in this topic to use the Lacework CLI to generate Terraform code. Or you can create the main.tf file manually and run Terraform from any supported host.
Overview
Lacework integrates with AWS to analyze EKS Audit Logs for monitoring EKS cluster security and configuration compliance. This topic describes how to integrate with AWS by running Lacework Terraform modules from any host supported by Terraform.
If you are new to the Lacework Terraform provider, or Lacework Terraform modules, read Terraform for Lacework Overview to learn the basics on how to configure the provider and more.
Resources Provisioned by Lacework Terraform Modules
To integrate AWS with Lacework, Lacework Terraform modules provision the following resources in the designated AWS account:
- IAM Cross-Account Role - A cross-account role is required to give access to Lacework access for assessments of cloud resource configurations and for analysis of CloudTrail events. The cross-account role will be given the following policy:
- Lacework Custom IAM Policy - A custom policy that provides Lacework read-only access to ingest EKS Audit Logs.
- SNS Topic - An SNS topic is required for all EKS Audit Log integrations. Terraform will create a new topic in the designated account.
- S3 Bucket - An S3 bucket is required for all EKS Audit Log integrations. Lacework will create a new bucket in the designated account.
- S3 Bucket Notification - A S3 Bucket notification is required for all EKS Audit Log integrations. This notifies the SNS topic when a new object has been created in the bucket.
- S3 Bucket Lifecycle rule - An S3 Bucket Lifecycle rule to specify the log number of days the logs are retained. Defaults to 180 days.
- S3 Bucket versioning - A resource for controlling versioning on an S3 bucket.
- Kinesis Firehose - A Kinesis Firehose is required for all EKS Audit Log integrations. Lacework will create a new Firehose in the designated account.
- IAM Lacework Firehose Role - A firehose role is required to assume the AWS firehose service role.
- Lacework Firehose IAM Policy - A firehose policy is required to allow the firehose to manage the contents of the S3 bucket.
- IAM Lacework CloudWatch Role - A CloudWatch role is required to assume the logs role for each region integrated.
- Lacework CloudWatch IAM Policy - A CloudWatch policy is required to allow the firehose to access the CloudWatch logs.
- CloudWatch Subscription Filter(s) - CloudWatch subscription filter(s) are required for each EKS cluster in order to notify when logs have been added to the CloudWatch Log group.
Requirements
- AWS Account Admin - The account used to run Terraform must have administrative privileges on every AWS account you intend to integrate with Lacework.
- AWS CLI - The Terraform provider for AWS leverages the configuration from the AWS CLI and it is recommended the AWS CLI is installed and configured with API keys for the account being integrated.
- Lacework Administrator - A Lacework account with administrator privileges.
- Lacework CLI - Lacework leverages the configuration from the Lacework CLI. Installing and configuring the Lacework CLI is recommended.
- Terraform -
~> 0.15,~> 1.0,~> 1.1.
Module Inputs Reference
For an up-to-date guide on all available configuration inputs, refer to the Terraform Registry documentation:
Module Dependencies
Lacework Terraform modules for AWS have the following dependencies that are installed when running terraform init:
For detailed information on these dependencies, visit Lacework on the Terraform Registry.
Install and Configure the Lacework CLI
To configure accounts, the Terraform provider for Lacework leverages the Lacework CLI configuration to authenticate with the Lacework API server. Lacework provides a shell script to install the Lacework CLI in your system.
Install and configure the Lacework CLI before continuing.
Deployment Scenarios
- Integrate EKS cluster(s) Audit Logs in a single region - This deployment scenario configures a new Lacework EKS Audit Log integration for clusters in a single AWS region.
- Integrate EKS cluster(s) Audit Logs across multiple regions - This deployment scenario configures a new Lacework EKS Audit Log integration for clusters across multiple AWS regions.
Prerequisite
Audit logging must be enabled on the clusters that you want to integrate. You can do this via the AWS CLI using the following command:
aws eks --region <region> update-cluster-config --name <cluster_name> \
--logging '{"clusterLogging":[{"types":["audit"],"enabled":true}]}'
Scenario 1 - Integrate EKS Clusters Audit Logs in a Single Region
This scenario creates a new Lacework EKS Audit Log integration with a cross-account IAM role to provide Lacework access. This example targets clusters in a single AWS region.
Run the Lacework CLI
Run the following Lacework CLI command:
lacework generate k8s eks                      \
  --region_clusters YourRegion="cluster,list"  \
  --noninteractive
The Terraform files are created in the
~/lacework/aws_eks_auditdirectory.Navigate to the
~/lacework/aws_eks_auditdirectory.Run
terraform planand review the changes that will be applied.Once satisfied with the changes that will be applied, run
terraform applyto execute Terraform.
If creating the main.tf file manually, you can use Terraform inputs to customize Lacework Terraform modules. See the documentation on the Terraform Registry for the complete list of inputs for each module.
Validate the Configuration
To confirm that the Cloud Account integration is working, use the Lacework CLI or log in to the Lacework Console.
To validate the integration using the CLI, run the lacework cloud-account list command. EKS cloud account integrations are listed as AwsEksAudit.
To validate the integration using the Lacework Console, log in to your account and go to Settings > Integrations > Cloud accounts.
Scenario 2 - Integrate EKS Clusters Audit Logs Across Multiple Regions
This scenario creates a new Lacework EKS Audit Log integration with a cross-account IAM role to provide Lacework access. This example targets clusters across multiple AWS regions.
Run the Lacework CLI
Run the following Lacework CLI command:
lacework generate k8s eks                                           \
  --region_clusters YourRegion="cluster,list"                       \
  --region_clusters YourRegion2="cluster,list"                      \
  --existing_ca_iam_role_arn CrossAccountIAMRoleARN                 \
  --existing_ca_iam_role_external_id CrossAccountIAMRoleExternalID  \
  --noninteractive
The Terraform files are created in the
~/lacework/aws_eks_auditdirectory.Navigate to the
~/lacework/aws_eks_auditdirectory.Run
terraform planand review the changes that will be applied.Once satisfied with the changes that will be applied, run
terraform applyto execute Terraform.
If creating the main.tf file manually, you can use Terraform inputs to customize Lacework Terraform modules. See the documentation on the Terraform Registry for the complete list of inputs for each module.
Validate the Configuration
To confirm that the Cloud Account integration is working, use the Lacework CLI or log in to the Lacework Console.
To validate the integration using the CLI, run the lacework cloud-account list command. EKS cloud account integrations are listed as AwsEksAudit.
To validate the integration using the Lacework Console, log in to your account and go to Settings > Integrations > Cloud accounts.
AWS Security Token Service Limitations
The Lacework AWS module will fail due to limitations of STS. See AWS STS documentation for more information. Customers using aws-vault, for example, must pass the --no-session flag. For more information, see aws-vault documentation.
EKS Audit setup using CloudFormation 📎
Overview
To complete the integration, you must complete the following steps:
- Create an integration in the Lacework Console.
- Instrument each EKS cluster for the EKS integration created in Step 1.
- Enable EKS logs on the clusters you want to integrate
- Integrate EKS clusters
Prerequisites
You must enable audit logging on the clusters that you want to integrate. You can do this via the AWS CLI using the following command:
aws eks --region <region> update-cluster-config --name <cluster_name> \
--logging '{"clusterLogging":[{"types":["audit"],"enabled":true}]}'
Create an Integration in the Lacework Console
Completing the steps in this section runs the first of two CloudFormation templates. You will run the second when you instrument EKS clusters.
To create the integration, you can either Run the CloudFormation template or Download the CloudFormation template. If you have multiple accounts with distributed ownership, you may want to use the Download option.
Follow the steps for your chosen option.
Run CloudFormation Download CloudFormation
- Log in to the Lacework Console.
- Go to Settings > Integrations > Cloud account.
- Click + Add New.
- Click Amazon Web Services and select CloudFormation.
- Click Next.
- Select EKS Audit Log.
- Click Run CloudFormation Template. If you are already logged in to your AWS account, this redirects you to the Create stack page.
- Review the Create stack page and click Next. The template populates the Amazon S3 URL for you.
- Review the Specify stack details page and click Next. The template populates ResourceNamePrefix.
- On the Configure stack options page, click Next.
- Verify the information on the Review page and click Submit.
- Log in to the Lacework Console.
- Go to Settings > Integrations > Cloud account.
- Click + Add New.
- Click Amazon Web Services and select CloudFormation.
- Click Next.
- Select EKS Audit Log.
- Click Download CloudFormation Template.
- Log in to your AWS account.
- Select the CloudFormation service and click Create stack.
- For Template source, click Upload a template file.
- Upload the Lacework template and click Next.
- On the Specify stack details page, provide the Stack name. The template populates ResourceNamePrefix. When finished, click Next.
- On the Configure stack options page, click Next.
- Verify the information on the Review page and click Submit.
Instrument EKS Clusters
Enable EKS Logs
Ensure audit logging is enabled on the clusters that you want to integrate. The CloudFormation template does not currently support this action.
For more information, go to Amazon EKS control plane logging.
Integrate EKS Clusters
Completing the steps in this section instruments each EKS cluster in the EKS integration you just created by running the second of two CloudFormation templates. You ran the first when you created the integration.
To instrument EKS clusters, you can either Run the CloudFormation template or Download the CloudFormation template. If you have multiple accounts with distributed ownership, you may want to use the Download option.
Follow the steps for your chosen option.
Run CloudFormation Download CloudFormation
- In the Lacework Console, go to Settings > Integrations > Cloud accounts.
- Click the EKS Audit Log integration.
- Click Run CloudFormation Template. If you are already logged in to your AWS account, this redirects you to the Create stack page.
- Review the Create stack page and click Next. The template populates theAmazon S3 URL for you.
- On the Specify stack details page, provide the EKSClusterName. The template populates the FirehoseARN. If desired, update the ResourceNamePrefix. When finished, click Next.
- On the Configure stack options page, click Next.
- Verify the information on the Review page and click Submit.
- In the Lacework Console, go to Settings > Integrations > Cloud accounts.
- Click the EKS Audit Log integration.
- Click Download CloudFormation Template.
- Log in to your AWS account if you are not already logged in.
- Select the CloudFormation service and click Create stack.
- For Template source, click Upload a template file.
- Upload the Lacework CloudFormation template and click Next.
- On the Specify stack details page, provide the EKSClusterName. The template populates the FirehoseARN. If desired, update the ResourceNamePrefix. When finished, click Next.
- On the Configure stack options page, click Next.
- Verify the information on the Review page and click Submit.
Verify the Integration is Set Up
To verify logs are flowing from the CloudWatch log group to the S3 bucket, look for objects created in the S3 bucket under the prefix eks_audit_logs/<aws-account-id>/.
To verify SNS notifications for the creation of S3 objects:
- Create an email subscription on the SNS topic and ensure you confirm the subscription by clicking the link sent to your inbox. Every time a log is written, you should receive an email with the key details.
- Logs are created every 5 minutes.
| Use Cases | Lacework Feature(s) | Data Source |
|---|---|---|
| Vulnerability Management | Vulnerability Management Dashboard | ECR |
- Lacework Console
- Terraform
ECR setup using the Lacework Console 📎
Navigate to ECR Integration
- Log in to the Lacework Console with an account with admin permissions.
- Navigate to Settings > Integrations > Container registries.
- Click + Add New.
- Click Amazon Container Registry (ECR) and select AWS IAM Role.
- Click Next.
- Follow the steps in the next section.
Integrate Using IAM Role-Based Authentication (Recommended)
To use this authentication type, you must create a cross-account role that has the Lacework account (434813966438) defined as a trusted entity and you must use the external ID generated by Lacework in the Lacework Console. The role must be attached to the AmazonEC2ContainerRegistryReadOnly managed policy for the Amazon Elastic Container Registry. For more information, see AmazonEC2ContainerRegistryReadOnly.
AWS IAM role-based integrations are supported for AWS standard accounts only; IAM role-based integrations are not supported for AWS GovCloud accounts. As stated in AWS Identity and Access Management documentation: You cannot create a role to delegate access between an AWS GovCloud (US) account and a standard AWS account.
- Configure the registry and complete any optional settings.
- For External ID, copy the Lacework-generated external ID. You must use this external ID to replace the temporary one that you provided during cross-account role creation.
Refer to Update Cross-Account IAM Role External ID for how to update the cross-account role's external ID. - Click Save. The integration status displays Integration Successful only after its first assessment completes.
- Verify that assessments have started by viewing the table in Vulnerabilities > Containers.
After an image is assessed, Lacework reports its results in the table. Select Last 24 hours above the table to view the assessment results.
Configure Registry {#configure-registry-iam-role}
| Setting Name | Description |
|---|---|
| Name | Specify a unique name for the container registry in the Lacework Console. |
| External ID | Copy the Lacework-generated external ID. You must use this external ID to replace the temporary one that you provided during cross-account role creation. Refer to Update Cross-Account IAM Role External ID for how to update the cross-account role's external ID. |
| Role ARN | Specify the ARN of the cross-account role that Lacework uses to access your AWS resources. |
| Registry Domain | Specify the URL of your Amazon Elastic Container Registry (ECR) in the following format: YourAWSAccount.dkr.ecr.YourRegion.amazonaws.com, where YourAWSAccount is the AWS account number for the AWS IAM user that has a role with permissions to access the ECR and YourRegion is your AWS region such as us-west-2. Note: Do not prefix the URL with https://. |
Optional Settings {#optional-settings-iam-role}
| Setting Name | Description |
|---|---|
| Limit Image Tags | If you do not want to assess all images in this registry, specify text from an image tag so that only images with matching tag text will be assessed. To change which images you want to assess, update this field so the change is captured during the next polling period. You can input multiple tags. If you specify tag and label limits, they function as an AND. Single wildcards are also supported and can be used to match multiple image tags (for example: abc* or *xyz). |
| Limit Image Labels | If you do not want to assess all images in this registry, specify key pairs so that only images with matching label key pairs will be assessed. To change which images you want to assess, update this field so the change is captured during the next polling period. Supported field input: key:value. If you specify tag and label limits, they function as an AND. |
| Limit Repositories | If you do not want to discover/assess all repositories in this registry, specify a comma-separated list of repositories to discover/assess (without spaces recommended). To change which repositories you want to assess, update this field so the change is captured during the next polling period. Note: Do not include the registry in the repository name(s). |
| Images per Repo | Select the maximum number of newest container images to discover/assess per repository. |
| Non-OS Package Support | This feature is enabled by default. Select No if you want to disable scanning of language libraries. |
| [END]:# |
Integrate Using Key ID Access Key-Based Authentication
To use this authentication type, the AWS IAM user you specify must have a role with permissions to access the Amazon Container Registry and be attached to the AmazonEC2ContainerRegistryReadOnly managed policy. For more information, see AmazonEC2ContainerRegistryReadOnly. The AmazonEC2ContainerRegistryReadOnly managed policy applies to all regions. If you want to narrow the policy to a single region, create a custom policy and scope it to your region. For more information, see Control access to AWS regions using IAM policies. The specified AWS IAM user does not need an AWS Console login to be enabled.
AWS key ID access key-based integrations are supported for AWS standard and AWS GovCloud accounts.
- Click Amazon Container Registry (ECR) and select AWS Key ID Access Key.
- Click Next.
- Configure the registry and complete any optional settings.
- Click Save. The integration status displays Integration Successful only after its first assessment completes.
- Verify that assessments have started by viewing the table in Vulnerabilities > Containers.
After an image is assessed, Lacework reports its results in the table. Select Last 24 hours above the table to view the assessment results.
Configure Registry {#configure-registry-key-id}
| Setting Name | Description |
|---|---|
| Name | Specify a unique name for the container registry in the Lacework Console. |
| Access Key ID | Specify an AWS access key ID for an AWS IAM user. |
| Secret Access Key | Specify the AWS secret key for the specified AWS access key. |
| Registry Domain | Specify the URL of your Amazon Elastic Container Registry (ECR) in the following format: YourAWSAccount.dkr.ecr.YourRegion.amazonaws.com, where YourAWSAccount is the AWS account number for the AWS IAM user that has a role with permissions to access the ECR and YourRegion is your AWS region such as us-west-2. Note: Do not prefix the URL with https://. |
Optional Settings {#optional-settings-key-id}
| Setting Name | Description |
|---|---|
| Limit Image Tags | If you do not want to assess all images in this registry, specify text from an image tag so that only images with matching tag text will be assessed. To change which images you want to assess, update this field so the change is captured during the next polling period. You can input multiple tags. If you specify tag and label limits, they function as an AND. Single wildcards are also supported and can be used to match multiple image tags (for example: abc* or *xyz). |
| Limit Image Labels | If you do not want to assess all images in this registry, specify key pairs so that only images with matching label key pairs will be assessed. To change which images you want to assess, update this field so the change is captured during the next polling period. Supported field input: key:value. If you specify tag and label limits, they function as an AND. |
| Limit Repositories | If you do not want to discover/assess all repositories in this registry, specify a comma-separated list of repositories to discover/assess (without spaces recommended). To change which repositories you want to assess, update this field so the change is captured during the next polling period. Note: Do not include the registry in the repository name(s). |
| Images per Repo | Select the maximum number of newest container images to discover/assess per repository. |
| Non-OS Package Support | This feature is enabled by default. Select No if you want to disable scanning of language libraries. |
| [END]:# |
Assessing Retagged ECR images
Assessing a retagged ECR image is not supported because ECR does not consider it a new image and therefore does not create a new entry.
To assess a retagged image, use on-demand assessment through the Lacework API:
POST /api/v2/Vulnerabilities/Containers/scan
For more information, see Vulnerabilities in the Lacework API (v2) documentation.
You can still find a retagged image using imageId in the Lacework Dashboard because the image ID does not change for a retagged image.
ECR setup using Terraform 📎
Create an IAM Role and ECR Integration Using Terraform
For organizations using Terraform to manage their environments, Lacework maintains the Lacework Terraform Provider that enables integrating supported container registries with Lacework using automation.
If you are new to the Lacework Terraform Provider, or Lacework Terraform Modules, read the Terraform for Lacework Overview to learn the basics on how to configure the provider and more.
The example below creates a new IAM Role with the AmazonEC2ContainerRegistryReadOnly managed policy for the Amazon Elastic Container Registry (ECR) of the account configured inside the Terraform AWS provider and integrates it with your Lacework account.
terraform {
  required_providers {
    lacework = {
      source = "lacework/lacework"
    }
  }
}

provider "lacework" {}

provider "aws" {
  region = "us-west-2"
}

module "lacework_ecr" {
  source  = "lacework/ecr/aws"
  version = "~> 0.1"
}
Validate the Integration
After Terraform finishes applying changes, you can use the Lacework CLI to validate the integration is working.
Open a Terminal and trigger an on-demand container vulnerability scan of one of your repositories that lives in the ECR registry you just integrated:
lacework vuln ctr scan YourAWSAccount.dkr.ecr.YourRegion.amazonaws.com YourRepository YourTagOrImageDigest --poll
To list all container registries configured in your account run lacework vuln ctr registries