Setup Lacework Authentication
Lacework supports a number of out-of-the-box integrations for SAML Identity Federation. Below we will review each of the supported integration:
- Google OAuth
- Google Workspace
- Okta
- Azure AD
- OneLogin
- Red Hat Keycloak
- AWS IAM Identity Center
Google OAuth SAML Integration 📎
To enable Google OAuth using the Lacework Console, navigate to Settings > Authentication and select Google OAuth.
If you want to change from one authentication method to another, you must first disable the currently selected method.
Google Workspace SAML Integration 📎
This document contains procedures to configure SAML SSO with Google Workspace and allow your team members to sign in to the Lacework Console with their Google credentials.
Adding/modifying a SAML app requires the super administrator role.
In your Google Workspace account, complete the following steps:
- Sign in to Google Workspace with super administrative privileges.
- From the Admin console home page, click Apps > Web and mobile apps.
- In the bottom right, click the (+) icon.
- Click Setup My Own Custom App.
- In the App Details window, add an application name and description.
- (Optional) Upload a PNG or GIF file to serve as an icon for Lacework. The icon image should be 256 pixels square. The Lacework logo at the end of this section meets Google Workspace sizing requirements.
- Click Continue. The Google Identity Provider details window opens and the SSO URL and Entity ID fields automatically populate.
- Get the setup information needed by Lacework using one of these methods:
- Copy the SSO URL and Entity ID and download the certificate
- Download the IdP metadata
- (Optional) In a separate browser tab or window, sign in to the Lacework Console and enter the information you copied or downloaded in Step 5 into the Lacework SAML configuration page (see SAML Configuration), then return to the Google Workspace Admin console.
- Click Continue.
- In the Service Provider Details window, complete the following fields:
- ACS URL: https://youraccount.lacework.net/sso/saml/login
Your exact assertion consumer service URL is displayed on the Lacework Console SAML configuration page. - Entity ID: https://lacework.net
- Name ID Format: Email
- ACS URL: https://youraccount.lacework.net/sso/saml/login
- Keep the defaults for all other fields.
- Click Continue.
- Click Finish. (Skip attribute mapping for now.)
- When the confirmation displays, click Finish.
- When the Lacework SAML app displays, click User access.
- Select On for everyone and click Save.
If you have not yet entered the Google IdP data into the Lacework Console SAML configuration page, do that now. See the Enable SAML in the Lacework Console section in SAML Configuration to complete setup.
To enable JIT user provisioning, see Configure SAML JIT.
You can use the following Lacework logo as part of the basic information for the custom Lacework app. To save the image to your computer, right-click it and click Save Image As....
![]()
Google Workspace SAML JIT Integration 📎
This document describes how to add JIT user provisioning capabilities to Google Workspace SAML authentication for Lacework.
Adding/modifying a SAML app requires the super administrator role.
The steps in the following sections assume you have already added Lacework as a service provider with Google Workspace SAML.
Some procedures contain additional configuration steps for Lacework organizations.
Add Attributes to the Lacework App in Google Workspace
These steps detail how to add custom attributes to the Lacework application.
- Sign in to Google Workspace with administrative privileges.
- From the Admin console home page, click Users.
- Click More > Manage custom attributes.
- Click Add Custom Attribute.
- Name the category, for example, Lacework Attributes.
- Under Custom fields, create the following custom attributes:
Name Info type Visibility Number of values First Name Text Visible to user and admin Single value Last Name Text Visible to user and admin Single value Company Name Text Visible to user and admin Single value Lacework Admin Role Accounts Text Visible to user and admin Single value Lacework User Role Accounts Text Visible to user and admin Single value Lacework Power User Role Accounts Text Visible to user and admin Single value Custom User Groups Text Visible to user and admin Single value
The following table lists which attributes are required:
| Attribute Configuration | Name |
|---|---|
| Required | First Name |
| Required | Last Name |
| Required | Company Name |
- If your Lacework account is enrolled in a Lacework organization, also add fields with the following names and settings:
Name Info type Visibility Number of values Lacework Organization Admin Role Accounts Yes or no Visible to user and admin Single value Lacework Organization User Role Accounts Yes or no Visible to user and admin Single value - Click Add.
Define Custom Lacework Attributes for a User
These steps detail how to define custom Lacework attributes for a user.
- Sign in to Google Workspace with super administrative privileges.
- From the Admin console home page, click Users.
- Click the user you want to define attributes for.
- Expand user information and locate the previously added custom Lacework attributes.
- Fill in the attributes. The following sections contain details about how to set Lacework role attributes.
- Click Save.
Set Attribute Mapping
These steps detail how to map Lacework attributes to user profile fields.
- Sign in to Google Workspace with super administrative privileges.
- From the Admin console home page, click Apps > SAML apps.
- Expand attribute mapping and add the following application attributes. Select the Lacework category and the matching user field for each. The attribute names must match the following text exactly.
- First Name
- Last Name
- Company Name
- Lacework Admin Role Accounts
- Lacework User Role Accounts
- Lacework Power User Role Accounts
- Custom User Groups
- If your Lacework account is enrolled in a Lacework organization, add the following attributes. Select the Lacework category and the matching user field for each.
- Lacework Organization Admin Role
- Lacework Organization User Role
- Click Save.
Lacework Admin Role Accounts Attribute
This section contains details about defining the Lacework Admin Role Accounts attribute.
Lacework Admin Role Accounts adds admin privileges to the existing accounts that you specify. You can specify a single account name:
foo
or multiple comma-separated account names:
foo,bar,baz
You can also specify a wildcard:
*
For example, your organization contains these accounts: foo1, foo2, bar1, bar2, baz. You specify this attribute as:
*2,baz
This adds admin privileges to foo2, bar2, and baz. But the individual does not have any privileges for foo1 and bar1. To add user privileges for those, you could specify the following value for the Lacework User Role Accounts attribute.
*1
If you specify an account for admin privileges, you do not need to specify it for user privileges in the Lacework User Role Accounts attribute. Any accounts that are also in Lacework User Role Accounts will be ignored and admin privileges will still be granted to them.
Lacework User Role Accounts Attribute
This section contains details about defining the Lacework User Role Accounts attribute.
Lacework User Role Accounts adds user privileges to the existing accounts that you specify. You can specify a single account name or multiple comma-separated account names. You can also specify a wildcard:
*
For example, your organization contains these accounts: foo1, foo2, bar1, bar2, baz.
You specify this attribute as:
b*
This adds user privileges to bar1, bar2, and baz. But the individual does not have any privileges for foo1 and foo2.
To add user privileges for foo1 as well, you could specify this attribute as:
foo1,b*
Another example with the same accounts would be to specify the attribute as:
*
And to specify Lacework Admin Role Accounts as:
bar*
This gives user privileges for all accounts and admin privileges to only bar1 and bar2.
If you specify an account for admin privileges and user privileges, admin privileges will be granted.
Lacework Power User Role Accounts Attribute
This section contains details about defining the Lacework Power User Role Accounts attribute.
Lacework Power User Role Accounts adds power user privileges to existing accounts that you specify. Power Users have similar access to Administrators but without access to Settings and Utilities. You can specify a single account name or multiple comma-separated account names. You can also specify a wildcard:
*
For example, your organization contains these accounts: foo1, foo2, bar1, bar2, baz.
You specify this attribute as:
b*
This adds power user privileges to bar1, bar2, and baz. But the individual does not have any privileges for foo1 and foo2.
To add user privileges for foo1 as well, you could specify this attribute as:
foo1,b*
Another example with the same accounts would be to specify the attribute as:
*
And to specify Lacework Admin Role Accounts as:
bar*
This gives power user privileges for all accounts and admin privileges to only bar1 and bar2.
If you specify an account for admin privileges and power user privileges, admin privileges will be granted.
Lacework Custom User Groups
Custom user groups allow you to fully customize a set of permissions that meet the specific requirements of your organization. Specify a string of comma-separated custom user group GUIDs (globally unique identifiers).
Lacework Organization Admin Role Attribute
This section contains details about defining the Lacework Organization Admin Role attribute.
Lacework Organization Admin Role provides admin privileges to organization-level settings and admin privileges to all accounts within the organization.
Select Yes to make the individual an organization admin. If the individual is an organization admin, you do not need to set any other Lacework attributes; any settings in those attributes will be ignored.
Select No or Not Applicable if the individual should not have admin privileges to organization-level settings or admin privileges to all accounts within the organization. If the individual is not an organization admin, you can still specify account-level admin and user privileges with the Lacework Admin Role Accounts and Lacework User Role Accounts attributes. You can also specify user privileges to organization-level settings with the Lacework Organization User Role attribute.
Lacework Organization User Role Attribute
This section contains details about defining the Lacework Organization User Role attribute.
Lacework Organization User Role provides user (view-only) privileges to organization-level settings and user privileges to all accounts within the organization.
Select Yes to make the individual an organization user. If the individual is an organization user, you can still give account-level admin privileges with the Lacework Admin Role Accounts attribute. Any settings in the Lacework User Role Accounts attribute will be ignored.
Select No or Not Applicable if the individual should not have any privileges to organization-level settings or user privileges to all accounts within the organization. If the individual is not an organization user, you can still specify account-level admin and user privileges with the Lacework Admin Role Accounts and Lacework User Role Accounts attributes.
Finish SAML JIT Configuration
- Ensure all attributes are set for a user.
- Ensure the Lacework application is turned on.
- Ensure you enable SAML in the Lacework Console and select the Just-in-Time User Provisioning option.
The user can now log in to Lacework through SAML.
When the user logs in, a profile (with the specified privileges) is added in only the accounts that are specified.
If the user has organization-level privileges, a profile (with the specified privileges) is added in each account that is part of the organization, accounts are not created.
Okta SAML Integration 📎
This document contains procedures to configure SAML SSO with Okta and allow it to facilitate employee access to your Lacework Console.
In your Okta account, complete the following steps:
- Sign in to Okta with administrative privileges.
- Go to Applications > Applications.
- Click Create App Integration.
- For the sign-in method, select SAML 2.0 and click Next.
- Enter a name for your application and click Next.
- Copy the Lacework service provider XML metadata into the provided fields.
- Single sign-on URL: https://youraccount.lacework.net/sso/saml/login
- Audience URI (SP Entity ID): https://lacework.net
- Name ID format: EmailAddress
- Application username: Email
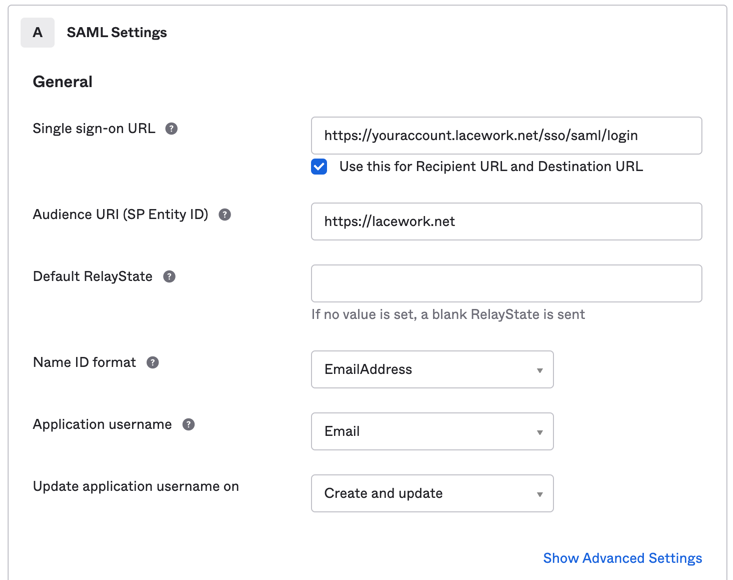
- Click Next.
- Select I’m an Okta customer adding an internal app and This is an internal app that we have created.
- Click Finish.
- From the Sign on Methods page, download and save the IdP metadata.
- Complete the setup in the Lacework Console. See Enable SAML in the Lacework Console.
To enable JIT user provisioning, see Configure SAML JIT with Okta.
The following Lacework logo meets Okta sizing requirements for the optional App logo under General Settings. To save the image to your computer, right-click it and click Save Image As....
![]()
Okta SAML JIT Integration 📎
This document describes how to add JIT user provisioning capabilities to Okta SAML authentication for Lacework.
The steps in the following sections assume you have already added Lacework as a service provider with Okta SAML.
Some procedures contain additional configuration steps for Lacework organizations.
Lacework Attributes You Can Configure
In the Attribute Statements (optional) section, add attribute statements with the following names and values (all name formats can remain unspecified).
| Attribute | Data Type | Description | Usage |
|---|---|---|---|
| First Name | string | Specify your first name. | user.firstName |
| Last Name | string | Specify your last name. | user.lastName |
| Company Name | string | Specify your company's name. | appuser.company |
| Lacework Admin Role Accounts | string | Add admin privileges to existing accounts that you specify. You can specify a single account name foo. or multiple comma-separated account names foo,bar,baz. You can also specify a wildcard *. | appuser.laceworkAdminRoleAccounts |
| Lacework User Role Accounts | string | Add user privileges to existing accounts that you specify. You can specify a single account name or multiple comma-separated account names. You can also specify a wildcard *. For example, your organization contains these accounts: foo1, foo2, bar1, bar2, baz. You specify this attribute as b*. This adds user privileges to bar1, bar2, and baz. But the person does not have any privileges for foo1 and foo2. | appuser.laceworkUserRoleAccounts |
| Lacework Power User Role Accounts | string | Add power user privileges to existing accounts that you specify. Power Users have similar access to Administrators but without access to Settings and Utilities. You can specify a single account name or multiple comma-separated account names. You can also specify a wildcard *. For example, your organization contains these accounts: foo1, foo2, bar1, bar2, baz. You specify this attribute as b*. This adds Power User privileges to bar1, bar2, and baz. But the person does not have any privileges for foo1 and foo2. | appuser.laceworkPowerUserRoleAccounts |
| Custom User Groups | string | Specify a string of comma-separated custom user group GUIDs (globally unique identifiers). You can use GUIDs to identify hardware, software, accounts, documents and other items. | appuser.customUserGroups |
| Lacework Organization Admin Role | string | Provide admin privileges to organization-level settings and admin privileges to all accounts within the organization. Select true to make the person an organization admin. Select false or undefined if the person should not have admin privileges to organization-level settings or admin privileges to all accounts within the organization. If the person is not an organization admin, you can still specify account-level admin and user privileges with the Lacework Admin Role Accounts and Lacework User Role Accounts attributes. You can also specify user privileges to organization-level settings with the Lacework Organization User Role attribute. | appuser.laceworkOrgAdminRole |
| Lacework Organization User Role | string | Provide user (view-only) privileges to organization-level settings and user privileges to all accounts in the organization. Select true to make the person an organization user. If the person is an organization user, you can still give account-level admin privileges with the Lacework Admin Role Accounts attribute. The system ignores any settings in the Lacework User Role Accounts attribute. Select false or undefined if the person should not have any privileges to organization-level settings or user privileges to all accounts in the organization. If the person is not an organization user, you can still specify account-level admin and user privileges with the Lacework Admin Role Accounts and Lacework User Role Accounts attributes. | appuser.laceworkOrgUserRole |
The values are examples. You can use values that adhere to your own standards or formats instead.
Attribute Configuration Requirements
The following table lists which attributes are required:
| Attribute Configuration | Name | Source Attribute |
|---|---|---|
| Required | First Name | user.firstName |
| Required | Last Name | user.lastName |
| Required | Company Name | appuser.company |
Configure the Lacework Application in Okta
These steps describe how to add attribute statements to the Lacework application.
Sign in to Okta with administrative privileges.
Click Admin.
Go to Applications > Applications and click the Lacework application.
Click the General tab and then Edit the SAML Settings section.
Click Next. You don't need to change General Settings.
In the Attribute Statements (Optional) section, add attribute statements with the following names and values (all name formats can remain unspecified).
Name Source attribute First Name user.firstName Last Name user.lastName Company Name appuser.company Lacework Admin Role Accounts appuser.laceworkAdminRoleAccounts Lacework User Role Accounts appuser.laceworkUserRoleAccounts Lacework Power User Role Accounts appuser.laceworkPowerUserRoleAccounts Custom User Groups appuser.customUserGroups
For information on Lacework attributes, see Lacework Attributes You Can Configure.
If your Lacework account is enrolled in a Lacework organization, add attribute statements with the following names and similar values:
Name Source attribute Lacework Organization Admin Role appuser.laceworkOrgAdminRole Lacework Organization User Role appuser.laceworkOrgUserRole Click Next.
Click Finish.
Add Custom Lacework Attributes to a Profile
This section details how to add custom Lacework attributes to the Okta profile and the Lacework application profile. Perform one of the following:
Add attributes to the Okta profile
or
Add attributes to the Lacework application profile if you have a specific profile attached to each application.
Add Attributes to the Okta Profile
These steps explain how to add custom Lacework attributes to the Okta profile.
For information on Lacework attributes, see Lacework Attributes you can Configure.
Go to Directory > Profile Editor.
For Okta, click Profile.
Click Add Attribute.
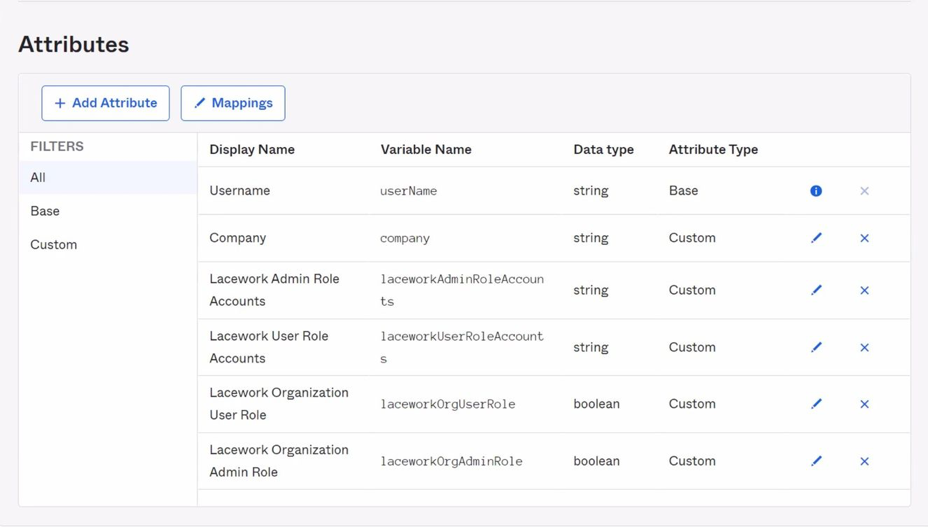
Add the following attributes:
Display Name Variable Name Data Type Company company string Lacework Admin Role Accounts laceworkAdminRoleAccounts string Lacework User Role Accounts laceworkUserRoleAccounts string If your Lacework account is enrolled in a Lacework organization, also add the following attributes:
Display Name Variable Name Data Type Lacework Organization Admin Role laceworkOrgAdminRole boolean Lacework Organization User Role laceworkOrgUserRole boolean In Filters, click Custom, and confirm that you added all attributes correctly.
The variable names must match the attribute statement values defined in the Lacework application. For example, if the attribute variable is laceworkAdminRoleAccounts, the corresponding attribute statement value must be user.laceworkAdminRoleAccounts.
Add Attributes to the Lacework Application Profile
These steps detail how to add custom Lacework attributes to the Lacework application profile.
For information on Lacework attributes, see Lacework Attributes you can Configure.
- Go to Directory > Profile Editor.
- For Lacework, click Profile.
- Click Add Attribute.
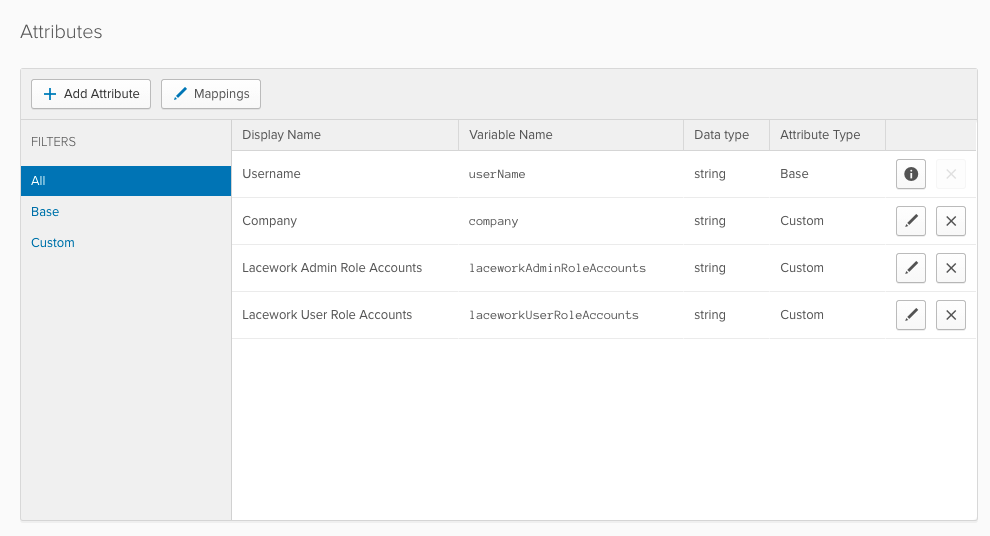
- Add the following attributes:
Display Name Variable Name Data Type Company company string Lacework Admin Role Accounts laceworkAdminRoleAccounts string Lacework User Role Accounts laceworkUserRoleAccounts string
- If your Lacework account is enrolled in a Lacework organization, also add the following attributes:
Display Name Variable Name Data Type Lacework Organization Admin Role laceworkOrgAdminRole boolean Lacework Organization User Role laceworkOrgUserRole boolean - In Filters, click Custom, and confirm you added all attributes correctly.
The variable names must match the attribute statement values defined in the Lacework application. For example, if the attribute variable islaceworkAdminRole, the corresponding attribute statement value must beappuser.laceworkAdminRoleAccounts.

Add a Person in Okta
These steps explain how to add a person in Okta with defined Lacework attributes.
Go to Directory > People.
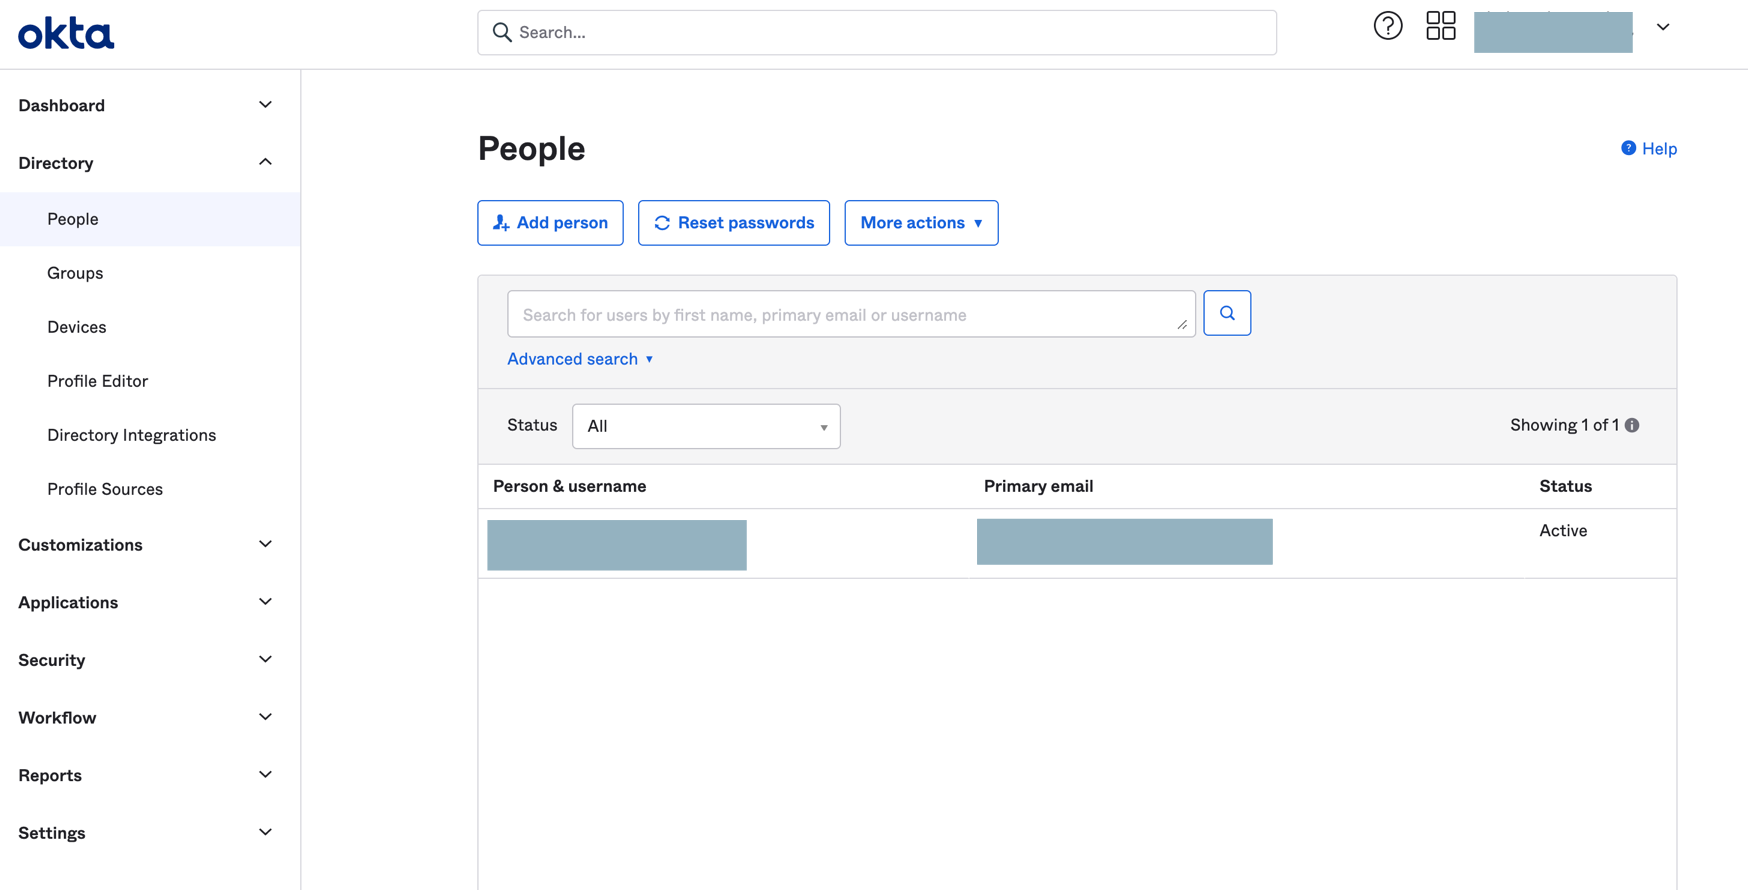
Click Add Person, complete the fields, and click Save.
Click the new person and click the Profile tab.
Click Edit.
Ensure that First Name, Last Name, and Company Name are completed.
Finish SAML JIT Configuration
- After specifying all attributes for a person, click Save.
- Ensure that the Lacework application is assigned to the person.
- Ensure that you enable SAML in the Lacework Console and select the Just-in-Time User Provisioning option.
The team member can now log in to Lacework through SAML.
When the member logs in, a profile (with the specified privileges) is added in only the accounts that are specified.
If the member has organization-level privileges, a profile (with the specified privileges) is added in each account that is part of the organization. Accounts are not created.
Azure AD SAML Integration 📎
This document contains procedures to configure SAML SSO with Microsoft Azure Active Directory (AD) and allow your team members to sign in to the Lacework Console with their Azure AD credentials.
- This configuration requires an Azure AD Premium account.
- This process requires you to create an enterprise application in Azure.
Set Authentication in the Lacework Console
Before creating the Lacework enterprise application in Azure, sign in to the Lacework Console and navigate to Settings > Authentication > SAML. If you have OAuth enabled, you must disable it before enabling SAML. Keep this window open.
Create the Lacework Application in Azure Active Directory
In a separate window, sign in to Azure AD. To create a Lacework application, follow these steps:
- Go to Azure Active Directory > Enterprise applications.
- Click New application.
- Click Create your own application.
This opens the Create your own application pane. - Enter a name for your new app.
Ensure Integrate any other application you don’t find in the gallery is selected. - Click Create.
When the application's Overview page displays, the application is created. - Click Users and groups.
- Click +Add user/group. Highlight your choice in the search bar, click Select, and click Assign.
Repeat as necessary to add users/groups. - Click Single sign-on.
- Select the SAML tile.
This opens the Set up Single Sign-On with SAML page. - In section 1, provide the two values listed below. You can copy both values from the Lacework Console authentication settings.
- Identifier (Entity ID): https://lacework.net
Copy from Service Provider Entity ID - Reply URL (Assertion Consumer Service URL): https://YourLacework.lacework.net/sso/saml/login
Copy from Assertion Consumer Service URL
- Identifier (Entity ID): https://lacework.net
- In section 2, ensure that you have the correct Unique User Identifier specified under Attributes and Claims. The default user identifer is preconfigured as
user.userprincipalname. However, depending on your organization, you can also use the email address as the Unique User Identifer by specifyinguser.mail. - In section 3, download and save the Federation Metadata XML file.
Complete Authentication Setup in the Lacework Console
Return to the open Lacework Console SAML configuration page and follow these steps:
- Select Upload identity provider data and click Next.
- Type a descriptive name for Identity Provider.
- In Upload Identity Provider Meta Data File click Choose File and select the previously saved Azure metadata file.
The fields should be populated and you should see confirmation that the metadata included a certificate. - Upload Your Certificate File is required to authenticate and save your settings. This can be downloaded from the "Single sign-on" inside Microsoft Azure.
- Click Save.
To enable JIT user provisioning, see Configure SAML JIT.
Test the Application
To test the application, return to Azure AD and do the following:
- Navigate to the Lacework application and click Single sign-on.
- Go to section 5 and click Test.
You can also test the application by logging in to the Lacework Console as the user associated with the application during setup.
Troubleshooting
Azure AD has a limitation that it cannot support multiple instances of the same SSO destination. If you have multiple organizations and therefore need to use Lacework SSO for more than one organization, edit the Entity ID to make it unique. For example: http://lacework.net/#1, http://lacework.net/#2
For more information, see: AWS Single-Account Access architecture.
Azure AD SAML JIT Integration 📎
This document describes how to add JIT user provisioning capabilities to Azure Active Directory (AD) SAML authentication for Lacework.
- This configuration requires an Azure AD Premium account.
- This process requires you to create an enterprise application in Azure.
Set Authentication in the Lacework Console
Before creating the Lacework enterprise application in Azure, sign in to the Lacework Console and navigate to Settings > Authentication > SAML. If you have OAuth enabled, you must disable it before enabling SAML. Keep this window open.
Ensure that you assign a company name for each user that you add to the SAML login.
Create the Lacework Application in Azure Active Directory
In a separate window, sign in to Azure AD. To create a Lacework application, follow these steps:
Navigate to Azure Active Directory > Enterprise applications and follow these steps:
Click New application.
Click Create your own application.
This opens the Create your own application pane.Enter a name for your new app.
Ensure Integrate any other application you don’t find in the gallery is selected.Click Create.
When the application's Overview page displays, the application is created.Click Users and groups.
Click +Add user/group. Highlight your choice in the search bar, click Select, and click Assign.
Repeat as necessary to add users/groups.Click Single sign-on.
Select the SAML tile.
This opens the Set up Single Sign-On with SAML page.In section 1, provide the two values listed below. You can copy both values from the Lacework Console authentication settings.
- Identifier (Entity ID): https://lacework.net
Copy from Service Provider Entity ID - Reply URL (Assertion Consumer Service URL): https://YourLacework.lacework.net/sso/saml/login
Copy from Assertion Consumer Service URL
- Identifier (Entity ID): https://lacework.net
- tip
This option defaults to using XMLSOAP. You must explicity provide the correct form for Name and Attribute for First Name, Last Name, and Company Name.
In section 2, add the following new claims with the indicated Name and Source attribute. For information on Lacework attributes, see Set Lacework Attributes.
Name Source attribute Example First Name user.givenname Last Name user.surname Company Name user.companyname Lacework Admin Role Accounts The Lacework account(s) the application will access with the admin role. account1oraccount1,account2or*.
Use a comma to separate multiple values. For information about using AD groups for Lacework access, see Create Groups in Azure Active Directory.Lacework User Role Accounts The Lacework account(s) the application will access with the user role. account1oraccount1,account2or*.
Use a comma to separate multiple values. For information about using AD groups for Lacework access, see Create Groups in Azure Active Directory.Lacework Power User Role Accounts The Lacework account(s) the application will access with the power user role. account1oraccount1,account2or*.
Use a comma to separate multiple values. For information about using AD groups for Lacework access, see Create Groups in Azure Active Directory.Custom User Groups Custom user groups allow you to fully customize a set of permissions that meet the specific requirements of your organization. Specify a string of comma-separated custom user group GUIDs (globally unique identifiers).
The following table lists which attributes are required:
| Attribute Configuration | Name |
|---|---|
| Required | First Name |
| Required | Last Name |
| Required | Company Name |
- If your Lacework account is enrolled in a Lacework organization, add attribute statements with the following names and example values:
- Lacework Organization Admin Role -
true - Lacework Organization User Role -
null(if you set Lacework Organization Admin Role totrue.)
- Lacework Organization Admin Role -
- In section 3, download and save the Federation Metadata XML file.
Create Groups in Azure Active Directory
(Optional) You can create groups in Azure AD and use them to assign different access to Lacework accounts. To create groups, follow these steps:
- Navigate to the Azure home page and click Groups.
- Click +New group.
- For Group type, select Security.
- Name the group.
For example, you can choose a name that describes the group's access to a Lacework account, such as Account1 Admin or Account1 User. - Select members for the group.
- Click Create.
- Create additional groups as needed.
Consider creating separate groups for admin and user access.
Grant Access to Lacework Account(s)
To grant certain team members access to login to Lacework, complete the following steps:
Navigate to the Lacework application in Azure.
Click Single sign-on.
In the Attributes and Claims section (panel 2), edit the following claims:
- Lacework Admin Role Accounts
- Lacework User Role Accounts
- Lacework Power User Role Accounts
- Custom User Groups
Add a claim condition with the following settings:
User type: Any
Scoped Groups: Select the groups that will use this claim. For example, the Lacework Admin Role Accounts claim should have groups set up for admins. The Lacework User Role Accounts claim should have groups set up for users.
Source: Attribute
Value: Enter the Lacework accounts that will use this claim.
Example 1: you have a number of users that only need access to one sub-account within Lacework. Enter the sub-account name in this value field.
Example 2: you have two accounts named Account1 and Account2. To use this claim for both accounts, enter
Account1, Account2, or enter*(wildcard character).
Finish Authentication Setup in the Lacework Console
Return to the open Lacework Console SAML configuration page and follow these steps:
- Select Upload identity provider data and click Next.
- Type a descriptive name for Identity Provider.
- In Upload Identity Provider Meta Data File click Choose File and select the previously saved Azure metadata file.
The fields should be populated and you should see confirmation that the metadata included a certificate. - Enable the Just-in-Time User Provisioning option.
- Click Save.
When a user logs in, a profile (with the specified privileges) is added in only the accounts that are specified.
If the user has organization-level privileges, a profile (with the specified privileges) is added in each account that is part of the organization, accounts are not created.
Test the Application
To test the application, return to Azure AD and do the following:
- Navigate to the Lacework application and click Single sign-on.
- Go to section 5 and click Test.
You can also test the application by logging in to the Lacework Console as the user associated with the application during setup.
OneLogin SAML Integration 📎
This document contains procedures to configure SAML SSO with OneLogin and allow it to facilitate employee access to your Lacework Console.
In your OneLogin account, complete the following steps:
- Sign in to OneLogin with super user privileges.
- Go to Applications > Applications.
- Click Add App and search for Lacework.
- Click the Lacework app.
- Provide a display name and description and click Save.
The app’s settings display in the right pane. - Click Configuration.
- Provide your Lacework account name and click Save. You can find your account name in the URL you use to access the Lacework Console. For example, if your Lacework URL is
mycompany.lacework.net, your account name ismycompany. - Go to More Actions > SAML Metadata.
This downloads the IdP metadata, which is required to complete the setup in the Lacework Console. - In a separate browser tab or window, sign in to the Lacework Console. On the Lacework SAML configuration page (see SAML Configuration), upload the IdP metadata returned from step 8.
To enable JIT user provisioning, see Configure SAML JIT.
OneLogin SAML JIT Integration 📎
This document describes how to add JIT user provisioning capabilities to OneLogin authentication for Lacework.
The steps in the following sections assume you have already added Lacework as a service provider with OneLogin SAML.
Some procedures contain additional configuration steps for Lacework organizations.
Set Attributes in the Lacework Application
These steps detail how to set attributes for the Lacework application.
Sign in to OneLogin with super user privileges.
From the Administration home page, go to Applications > Applications.
Click the Lacework application.
Click Parameters.
The displayed Lacework fields were added automatically.Set the default values for the following fields:
- Company Name - Company
- Title - Title
First Name, Last Name, and NameID already have default values. You do not need to set default values for the other fields right now.
Set Up Access to the Lacework Application
Multiple methods are available to set up access to the Lacework application in OneLogin. The following sections discuss some common methods.
Add Custom User Fields and Manually Set Values
These steps detail how to add custom user fields and then manually set their values so users can access the Lacework application.
Add Custom User Fields
Sign in to OneLogin with super user privileges.
From the Administration home page, go to Users > Custom User Fields.
Click New User Field.
Add the following fields with the indicated names and short names. Note that you can optionally use names of your own as long as they are identifiable/meaningful to you.
Name Shortname laceworkAdminRoleAccounts laceworkAdminRoleAccounts laceworkUserRoleAccounts laceworkUserRoleAccounts laceworkPowerUserRoleAccounts laceworkPowerUserRoleAccounts laceworkCustomUserGroups laceworkCustomUserGroups If your Lacework account is enrolled in a Lacework organization, also add the following fields:
Name Shortname laceworkOrgAdminRole laceworkOrgAdminRole laceworkOrgUserRole laceworkOrgUserRole
The following table lists which attributes are required:
| Attribute Configuration | Name |
|---|---|
| Required | First Name |
| Required | Last Name |
| Required | Company Name |
Manually Set Values for Custom Fields
From the Administration home page, go to Users > Users.
Select the user you want to assign Lacework access.
Fill in the custom fields (using the previous example names). The following sections contain details about how to complete the fields:
- laceworkAdminRoleAccounts - see Lacework Admin Role Accounts Attribute
- laceworkUserRoleAccounts - see Lacework User Role Accounts Attribute
- laceworkPowerUserRoleAccounts - see Lacework Power User Role Accounts Attribute
- laceworkCustomUserGroups - see Lacework Custom User Groups
If your Lacework account is enrolled in a Lacework organization, you could also complete the following fields:
- laceworkOrgAdminRole - true|false, see Lacework Organization Admin Role Attribute
- laceworkOrgUserRole - true|false, see Lacework Organization User Role Attribute
Click Save User.
Add Application Rules
These steps detail how to add roles and then add application rules to map to the roles so users can access the Lacework application.
Add Roles
Sign in to OneLogin with super user privileges.
From the Administration home page, go to Users > Roles.
Click New Role.
Fill in the role name, select the Lacework app, and click Save. For example, you could add the following roles:
- accountnameAdminRole - This provides admin access to a Lacework account.
- accountnameUserRole - This provides user access to a Lacework account.
- accountnamePowerUserRole - This provides power user access to a Lacework account.
- accountnameCustomUserGroups- This provides user custom access to a Lacework account.
If your Lacework account is enrolled in a Lacework organization, you could also add the following roles:
- OrgAdminRole - This provides admin access to organization-level settings.
- OrgUserRole - This provides user access to organization-level settings.
Create Application Rules
From the Administration home page, go to Applications > Applications.
Click the Lacework app and click Rules.
Click Add Rule.
Add the following rules (using the previous example names):
If your Lacework account is enrolled in a Lacework organization, skip to the next step.Name Conditions Actions Reset all Lacework attribute values none - Set Lacework Admin Role Accounts, -Macro-, leave field empty
- Set Lacework User Role Accounts, -Macro-, leave field empty
- Set Lacework Power User Role Accounts, -Macro-, leave field empty
- Set Lacework Custom User Groups, -Macro-, leave field empty
Lacework Admin Role Accounts Rule Roles include accountnameAdminRole Set Lacework Admin Role Accounts, -Macro-, _accountname_ Lacework User Role Accounts Rule Roles include accountnameUserRole Set Lacework User Role Account, -Macro-, _accountname_ Lacework Power User Role Accounts Rule Roles include accountnamePowerUserRole Set Lacework Power User Role Account, -Macro-, _accountname_ Lacework Custom User Groups Rule Roles include accountnameCustomUserGroups Set Lacework Custom User Groups, -Macro-, _accountname_ If your Lacework account is enrolled in a Lacework organization, add the following rules (using the previous example names):
Name Conditions Actions Reset all Lacework attribute values none - Set Lacework Admin Role Accounts, -Macro-, leave field empty
- Set Lacework User Role Accounts, -Macro-, leave field empty
- Set Lacework Power User Role Accounts, -Macro-, leave field empty
- Set Lacework Custom User Groups, -Macro-, leave field empty
Lacework Admin Role Accounts Rule Roles include accountnameAdminRole Set Lacework Admin Role Accounts, -Macro-, _accountname_ Lacework User Role Accounts Rule Roles include accountnameUserRole Set Lacework User Role Account, -Macro-, _accountname_ Lacework Power User Role Accounts Rule Roles include accountnameCustomUserGroups Set Lacework Power User Role Account, -Macro-, _accountname_ Lacework Custom User Groups Rule Roles include accountnameCustomUserGroups Set Lacework Custom User Groups, -Macro-, _accountname_ Lacework Organization Admin Role Accounts Rule Roles include OrgAdminRole Set Lacework Organization Admin Role Accounts, -Macro-, _accountname_ Lacework Organization Admin Role Accounts Rule Roles include OrgUserRole Set Lacework Organization Admin Role Accounts, -Macro-, _accountname_ Ensure the reset rule is the first rule in the list. Move it to the first position if it is not already. This reset rule clears user privileges for the Lacework app.
Assign Roles to Users
- From the Administration home page, go to Users > Roles.
- Click the role you want to assign to a user.
- Click Users.
- In Check existing or add new users to this role, add a user’s name, select the user, and click Check.
- Click Add To Role and then click Save.
Lacework Admin Role Accounts Attribute
This section contains details about defining the Lacework Admin Role Accounts attribute.
Lacework Admin Role Accounts adds admin privileges to the existing accounts that you specify. You can specify a single account name:
foo
or multiple comma-separated account names:
foo,bar,baz
You can also specify a wildcard:
*
For example, your organization contains these accounts: foo1, foo2, bar1, bar2, baz. You specify this attribute as:
*2,baz
This adds admin privileges to foo2, bar2, and baz. But the individual does not have any privileges for foo1 and bar1. To add user privileges for those, you could specify the following value for the Lacework User Role Accounts attribute.
*1
If you specify an account for admin privileges, you do not need to specify it for user privileges in the Lacework User Role Accounts attribute. Any accounts that are also in Lacework User Role Accounts will be ignored and admin privileges will still be granted to them.
Lacework User Role Accounts Attribute
This section contains details about defining the Lacework User Role Accounts attribute.
Lacework User Role Accounts adds user privileges to the existing accounts that you specify. You can specify a single account name or multiple comma-separated account names. You can also specify a wildcard:
*
For example, your organization contains these accounts: foo1, foo2, bar1, bar2, baz.
You specify this attribute as:
b*
This adds user privileges to bar1, bar2, and baz. But the individual does not have any privileges for foo1 and foo2.
To add user privileges for foo1 as well, you could specify this attribute as:
foo1,b*
Another example with the same accounts would be to specify the attribute as:
*
And to specify Lacework Admin Role Accounts as:
bar*
This gives user privileges for all accounts and admin privileges to only bar1 and bar2.
If you specify an account for admin privileges and user privileges, admin privileges will be granted.
Lacework Power User Role Accounts Attribute
This section contains details about defining the Lacework Power User Role Accounts attribute.
Lacework User Role Accounts adds power user privileges to existing accounts that you specify. Power Users have similar access to Administrators but without access to Settings and Utilities. You can specify a single account name or multiple comma-separated account names. You can also specify a wildcard:
*
For example, your organization contains these accounts: foo1, foo2, bar1, bar2, baz.
You specify this attribute as:
b*
This adds power user privileges to bar1, bar2, and baz. But the individual does not have any privileges for foo1 and foo2.
To add power user privileges for foo1 as well, you could specify this attribute as:
foo1,b*
Another example with the same accounts would be to specify the attribute as:
*
And to specify Lacework Admin Role Accounts as:
bar*
This gives power user privileges for all accounts and admin privileges to only bar1 and bar2.
If you specify an account for admin privileges and power user privileges, admin privileges will be granted.
Lacework Custom User Groups
Custom user groups allow you to fully customize a set of permissions that meet the specific requirements of your organization. Specify a string of comma-separated custom user group GUIDs (globally unique identifiers).
Lacework Organization Admin Role Attribute
This section contains details about defining the Lacework Organization Admin Role attribute.
Lacework Organization Admin Role provides admin privileges to organization-level settings and admin privileges to all accounts within the organization.
Add true to make the individual an organization admin. If the individual is an organization admin, you do not need to set any other Lacework attributes; any settings in those attributes will be ignored.
Add false or leave undefined if the individual should not have admin privileges to organization-level settings or admin privileges to all accounts within the organization. If the individual is not an organization admin, you can still specify account-level admin and user privileges with the Lacework Admin Role Accounts and Lacework User Role Accounts attributes. You can also specify user privileges to organization-level settings with the Lacework Organization User Role attribute.
Lacework Organization User Role Attribute
This section contains details about defining the Lacework Organization User Role attribute.
Lacework Organization User Role provides user (view-only) privileges to organization-level settings and user privileges to all accounts within the organization.
Add true to make the individual an organization user. If the individual is an organization user, you can still give account-level admin privileges with the Lacework Admin Role Accounts attribute. Any settings in the Lacework User Role Accounts attribute will be ignored.
Add false or leave undefined if the individual should not have any privileges to organization-level settings or user privileges to all accounts within the organization. If the individual is not an organization user, you can still specify account-level admin and user privileges with the Lacework Admin Role Accounts and Lacework User Role Accounts attributes.
Finish SAML JIT Configuration
- Ensure all attributes are set for a user.
- Ensure the Lacework application is turned on.
- Ensure you enable SAML in the Lacework Console and select the Just-in-Time User Provisioning option.
The user can now log in to Lacework through SAML.
When the user logs in, a profile (with the specified privileges) is added in only the accounts that are specified.
If the user has organization-level privileges, a profile (with the specified privileges) is added in each account that is part of the organization, accounts are not created.
Red Hat KeyCloak SAML Integration 📎
This document contains procedures to configure SAML SSO with Red Hat Keycloak and allow it to facilitate employee access to your Lacework Console.
This configuration requires an admin rights for your realm, and admin rights in your Lacework account or organization.
Create the Lacework Client in Keycloak
In your Keycloak account, complete the following steps:
Sign in to Keycloak with administrative privileges.
Go to the Keycloak administration console and select your realm.
Go to Clients and click on create (top left).
In the new Client wizard, add the following settings:
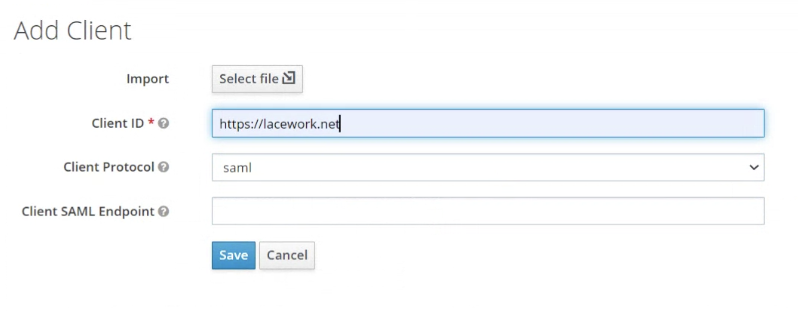
- Client ID :
https://lacework.net - Client Protocol :
saml - Click Save.
- Client ID :
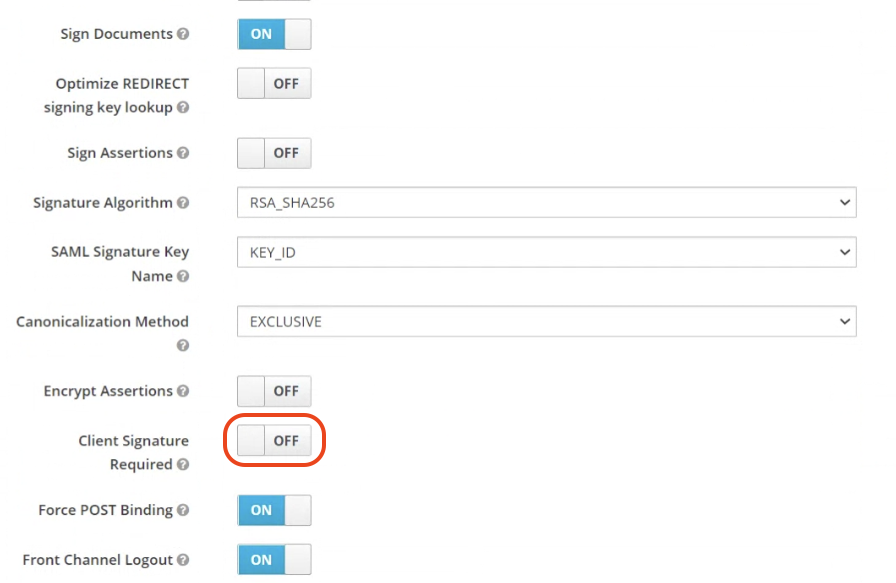
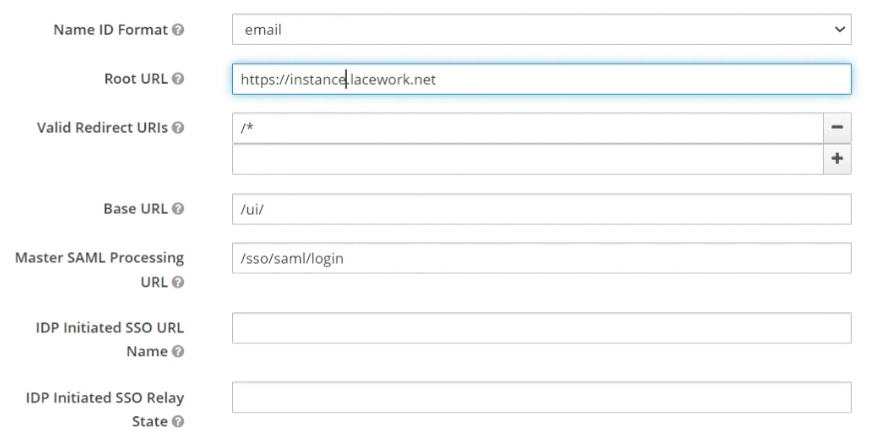
Go to the newly created Client and apply the following settings:
Client Signature Required : OFF
Name ID Format :
emailRoot URL : Your Tenant Name in the form https://tenant.lacework.net
Valid Redirect URIs :
/*Base URL :
/ui/Master SAML Processing URL :
/sso/saml/login
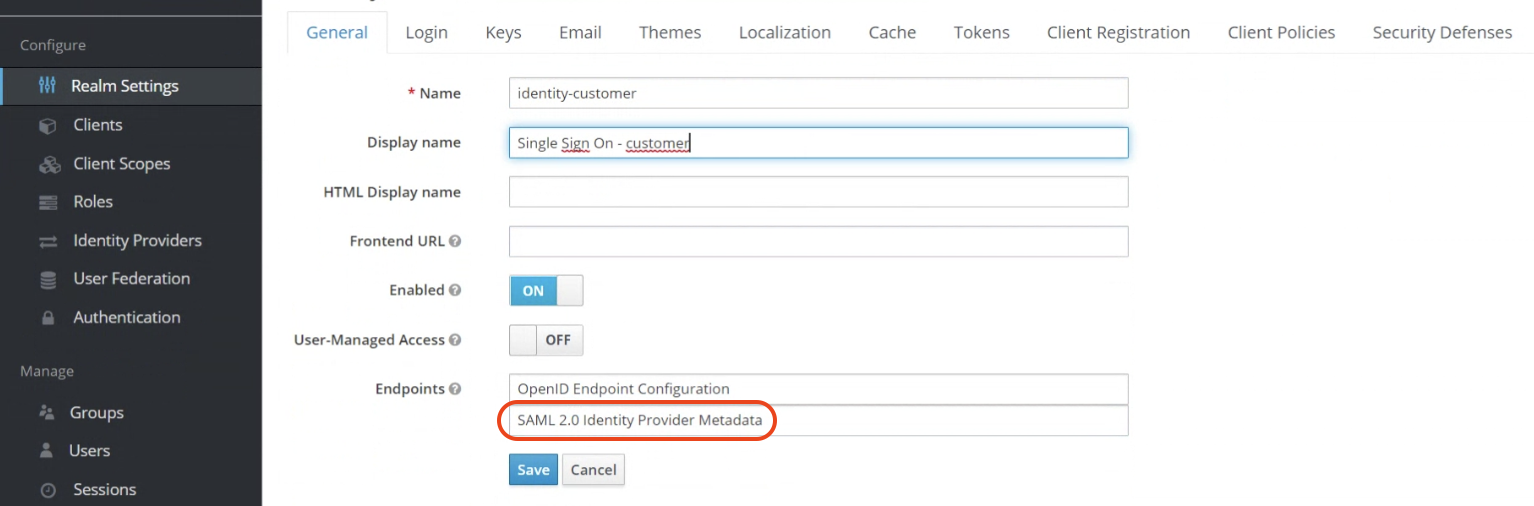
Go to your realm settings in General and download the Keycloak Identity Provider Metadata for SAML 2.0.
Enable SAML in the Lacework Console
Sign in to the Lacework Console with an admin account and navigate to Settings > Authentication > SAML.
- Select Upload identity provider data and click Next.
- Type a descriptive name for Identity Provider.
- In Upload Identity Provider Meta Data File, click Choose File and select the previously saved Keycloak metadata file.
The fields should be populated and you should see confirmation that the metadata included a certificate. - Click Save.
AWS Identity Center SAML Integration 📎
This document contains procedures to configure SAML SSO with AWS and allow it to facilitate employee access to your Lacework Console.
Prerequisite
To use Identity Center enabled applications, you must first enable IAM Identity Center to allow them access. For more information, see Identity Center enabled applications.
Create the Lacework application in the IAM Identity Center
Complete the following steps to add and configure the Lacework application:
- Log in to the IAM Identity Center console with a role that can create IAM Identity Center resources.
- Click Applications > Add application.
- Under Applications, search for an application, and select the application from the list. Click Next.
- Under Configure application, the Display name and Description pre-populates with the application you chose. You can edit these.
- Under IAM Identity Center metadata, download a copy of the IdP metadata, which is required to complete the setup in the Lacework Console.
- Under Application properties, enter
https://<tenant-name>lacework.netas the application start URL. - Under Application metadata, enter the following values:
- Application ACS URL:
https://<tenant-name>.lacework.net/sso/saml/login - Application SAML Audience:
https://lacework.net
- Application ACS URL:
- Click Submit.
- Go to the Attribute mappings tab and update the attribute mappings with your user email. The only user attribute required is the user email (first row). The additional attributes are not required unless JIT user provisioning is enabled.
Enable SAML in the Lacework Console
In a separate browser tab or window, sign in to the Lacework Console. On the Lacework SAML configuration page (see SAML Configuration), upload the IdP metadata returned from step 5.