Setup Lacework Alerts
Lacework supports a number of out-of-the-box integrations for SAML Identity Federation. Below we will review each of the supported integration:
- Slack
- Jira
- ServiceNow
- OpsGenie
- PagerDuty
- New Relic
- Other
Slack Alerts 📎
Use the Slack integration to send notifications to Slack channels or users when an alert is triggered. A Slack notification includes the following information:
- Lacework Account Name
- Alert Type
- Start Time
- Alert Category
- Severity Level
- Event Details
- Link to the alert on Lacework Console
Create an Incoming Webhook
- Navigate to the Incoming WebHooks page in your Slack App Directory.
- Click Add Configuration.
- Choose the channel or create a new channel where your incoming webhook will post messages.
- Click Add Incoming WebHooks Integration.
- You can optionally customize your app by adding a descriptive label, name, or icon.
- Click Save Settings.
For more information about using Slack incoming webhooks, refer to the Slack document library.
Create a Slack Alert Channel from the Lacework Console
Navigate to Slack
- Log in to the Lacework Console as a Lacework user with administrative privileges.
- Go to Settings > Notifications > Alert channels.
- Click + Add new.
- Select Slack.
- Click Next.
- Follow the steps in the next section.
Create a Slack Alert Channel
Ensure you have created your Lacework-dedicated incoming webhook as described in Create an Incoming Webhook. Then complete the following steps:
- Name the channel.
- Add the URL of your Slack incoming webhook.
- Click Save.
- Click Alert rules and configure your required alert routing details/options by leveraging the alert channel you created.
You should now begin to receive Lacework alert notifications in your chosen Slack channel.
Create a Lacework Slack Alert Channel Using Terraform
For organizations using Terraform to manage their environments, Lacework maintains the Terraform provider for Lacework, which enables configuration of Lacework alert channels using automation.
If you are new to the Lacework Terraform Provider, or Lacework Terraform Modules, read the Terraform for Lacework Overview to learn the basics on how to configure the provider, and more.
For a complete list of custom Terraform resources to manage alert channels in Lacework, see Managing Alert Channels with Terraform.
# Configure Slack Alert Channel in Lacework
resource "lacework_alert_channel_slack" "ops_critical" {
  name      = "OPS Critical Alerts"
  slack_url = "https://hooks.slack.com/services/ABCD/12345/abcd1234"
}
Additional information on the lacework_alert_channel_slack resource can be found on the Terraform Registry.
Jira Alerts 📎
Integrate Lacework with Jira and receive alert notifications in your Jira account. With this integration, you can automate the process of generating Jira tickets with your existing security workflow.
The Jira integration sends findings from the Alerts page to Jira. Jira issues are created based on the findings.
A Jira issue includes the following information:
- Alert ID
- Alert Type
- Alert Category
- Severity Level
- Start Time
- Link to the alert on Lacework Console
- Lacework Account Name
This integration supports Jira Cloud and Jira Server versions and is qualified with the most recent GA versions of Jira.
Unidirectional Integration
A unidirectional integration with Jira allows you to programmatically generate a corresponding Jira issue for an alert. When the alert status is updated, the Jira status is updated.
To complete the integration, see Alert Rules and Alert Channels.
Bidirectional Integration
A bidirectional integration with Jira allows you to programmatically generate a corresponding Jira issue for an alert. When the alert status is updated, the Jira status is updated, and vice-versa.
When you change the Jira status from Closed to Open, the alert remains as Closed.
When multiple bidirectional channels are associated with an alert, each channel generates a separate Jira issue. To enable the bidirectional functionality, select a primary channel among those by clicking Select as primary.
To complete the integration, see Alert Rules and Alert Channels
When the alert rule associated with an alert is disabled or deleted, you can still change the alert status by changing the corresponding Jira status.
Verify Prerequisites
Before creating the Jira alert channel in the Lacework Console, verify the following prerequisites:
- Provide a Jira user name and an API access token that is used to create new Jira issues. For management and security purposes, Lacework recommends creating a dedicated Lacework Jira user with appropriate permissions. For more information, refer to the Jira REST API Reference.
- The Jira user must have sufficient privileges to create new Jira issues in the specified Jira project.
- This Jira issue type must exist in the specified Jira project prior to creating the Lacework Jira alert channel as described in the procedure below. When Lacework creates new Jira issues, it creates new issues based on the specified Jira issue type.
- Allowlist the Lacework outbound IPs to allow Lacework to communicate with the Jira server. See Lacework Outbound IPs.
Create a Jira Alert Channel from the Lacework Console
Navigate to Jira
- Log in to the Lacework Console as a Lacework user with administrative privileges.
- Go to Settings > Notifications > Alert channels.
- Click + Add new.
- Select Jira.
- Click Next.
- Follow the steps in the next section.
Create a Jira Alert Channel
Ensure you have configured the Jira prerequisites as described in Verify Prerequisites. Then complete the following steps:
Select a Jira Type:
- JIRA Cloud - Select this option if your Jira instance is hosted by Atlassian in their cloud.
- JIRA Server - Select this option if you host your Jira instance on your hardware or in a hosting service like AWS.
In the Name field, enter a name for the channel that is visible in the Lacework Console.
From the Configuration drop-down, select the integration type such as Unidirectional or Bidirectional. Note that once you have configured the alert channel to be bidirectional, it cannot be changed to unidirectional.
From the Group Issues by drop-down, select one of the options:
- Events - Select this option if you want a single Jira open issue to be created when events of the same type but from different resources are detected by Lacework. For example, if three different S3 resources are generating the same compliance event, only one Jira open issue is created.
- Resources - Select this option if you want multiple Jira open issues to be created when multiple resources are generating the same compliance event. For example, if three different S3 resources are generating the same compliance event, three Jira open issues are created.
In the Jira URL field, enter the URL of your Jira implementation without https protocol ("https://"), for example:
mycompany.atlassian.netormycompany.jira.com.In the Jira Project Key field, enter the project key for the Jira project where the new Jira issues should be created. Note that the specified Jira Issue type must exist in the specified Jira project prior to creating the Lacework Jira channel.
In the Issue Type field, enter the Jira Issue type (such as a Bug) to create when a new Jira issue is created.
In the Username field, enter the Jira user name with a domain (for example:
user@mycompany.com). Lacework recommends a dedicated Jira user. See above for more information.If integrating to a Jira cloud, in the API Token field, enter the Jira API Token. For more information, see https://confluence.atlassian.com/cloud/api-tokens-938839638.html.
If integrating to a Jira server, in the Password field enter the password to the Jira user specified in a previous step.
Optional—In the Custom field mapping field, click Upload a JSON file to select a custom template file to populate values from a custom template JSON file. For more information, see the next section.
Click Save.
Copy the URL displayed in the Webhook for Jira dialog to your clipboard.
Create a Jira webhook using the copied URL, see Webhooks for Jira Server and Webhooks for Jira Cloud.
note- The integration will not work until a Jira webhook is correctly set up.
- After the Lacework-to-Jira connection is successfully established, Lacework generates a test Jira ticket with the title Event: 0 {timestamp}> Test Event.
Click Alert rules and configure your required alert routing details/options by leveraging the alert channel you created.
Complete the Integration Test
The integration test is intended to verify that the communication between Lacework and Jira operates as expected. The integration test requires the following:
- A correctly configured Jira alert channel.
- An alert rule that utilizes the above Jira alert channel. For additional details, see Alert Rules.
- An active alert that is triggered by the above alert rule.
To complete the integration test, follow the steps below:
- Log in to the Lacework Console as a Lacework user with administrative privileges.
- Go to the Alerts page, then select an active alert triggered by the above alert rule and Jira alert channel. Active alerts have an Open status.
- Change the alert status to either In progress or Closed.
After the integration is successfully set up and tested, Lacework will start generating events that meet the specified severity levels, and issuing new Jira issues. Suppose there is a large volume of events that exceed the ability of Jira REST API to create new Jira issues. In that case, priority is given to those events with the highest severity.
Lacework only supports converting a unidirectional alert channel to be bidirectional -- not converting a bidirectional channel to be unidirectional.
Populate Values in New Jira Issues from a Custom Template
If you want the Jira integration to populate fields in the new Jira issues with values from a custom template JSON file, you must create a custom template JSON file with the populated values and then specify that file when creating the Lacework Jira alert channel in the Lacework Console.
In the following custom template example, use the name field to specify the Jira status corresponding with the open alert (e.g., Backlog), and which Jira status corresponding with the closed alert (e.g., Done). Use the primary field to confirm which status Lacework will use when opening or closing a Jira issue for that alert.
{
    "lacework": {
        "status": {
            "Open": [
                {
                    "name": "Backlog",
                    "primary": true
                },
                {
                    "name": "Selected for Development"
                }
            ],
            "Closed": [
                {
                    "name": "Done",
                    "primary": true
                }
            ]
        }
    }
}
Additionally, if you want the new Jira issues created by the Lacework Jira alert channel to have a specific label and have the priority id of 1, specify the following in your custom template JSON file.
{
    "fields": {
        "labels": [
            "myLabel"
        ],
        "priority":
        {
            "id": "1"
        }
    }
}
You can also include data from Lacework by using the following variables:
| Field Name | Description |
|---|---|
| alert_source | The integration that serves as the origin of the data. For instance, the "Agent" source pertains to alerts that originate from data collected by Lacework agents. |
| alert_category | The alert category this alert is classified as. See Alert Categories for more information. |
| alert_subcategory | The alert subcategory this alert is classified as. See Alert Subcategories for more information. |
| event_title | The title of the Lacework event. |
| event_link | The link to the event in the Lacework Console. |
| lacework_account | The Lacework application where the event occurred. The myLacework part of the Lacework application URL: myLacework.lacework.net. |
| event_summary | A summary of the event including a description of why the event occurred. |
| event_timestamp | The timestamp of when the event occurred. |
| event_type | The type (or category) of the event. |
| event_id | The Lacework ID for the event. |
| event_severity | The severity of the event between numbers 1 and 5. The number 1 is the highest severity and 5 is the lowest severity. |
| event_severity_str | A variable that represents the severity of the event: Critical, High, Medium, Low, or Info. |
Add the variables to the summary field as in the following example:
{
    "fields": {
        "summary": "$event_id: $event_title - $event_summary - from Lacework alerts"
    }
}
Jira allows up to 255 characters for the summary. Any characters over 255 are truncated.
When creating the Jira alert channel, you must select the custom template file from the Custom Template File field.
For more examples of specifying Jira fields, see the Field input formats section in the Using the REST APIs in the Atlassian documentation. Use the 2.0 version of the Jira REST APIs.
Any fields specified in the custom template JSON file, must already exist in the specified Jira project.
Specifying a value for a Jira field in the custom template JSON file overrides the value populated by the Jira alert channel for the following fields:
- Summary
- Issue Type
- Project
- Priority
For the Description field, the value specified in the custom template JSON is prepended to the value provided by the Jira alert channel.
If a custom template was used for an alert channel, you can download it by clicking Download template_name template. The download link is available on the Configure Channel page when editing an alert channel and on the Alert Routing page when clicking the existing Jira alert channel's link.
Create a Custom Template with Dynamic Variables
You can leverage the $event_severity_str variable to create a mapping to specific fields dynamically. This solution eliminates manual ticket triage by allowing the alert to flow directly to the responsible team's Jira queue.
The following custom template assigns the $event_severity_str variable to the customfield_10242 custom field. If the custom field exists in the custom_field_mappings object, then the value of the variable is used to find the mapping for the field.
{
  "fields": {
    "customfield_10242": "$event_severity_str"
  },
  "lacework": {
    "custom_field_mappings": {
      "customfield_10242": {
        "Critical": {
          "id": "10478"
        },
        "High": {
          "id": "10477"
        },
        "Medium": {
          "id": "10476"
        },
        "Low": {
          "id": "10475"
        },
        "Info": {
          "id": "10475"
        }
      }
    }
  }
}
Assuming the $event_severity_str variable evaluates to Critical, the result from this custom template will look like the following:
{
  "fields": {
    "customfield_10242": {
      "id": "10478"
    }
  }
}
Map Lacework Severities to Jira Priorities
By default, the following Lacework alert severities are mapped to the following default Jira priorities.
| Lacework Severity | (Jira Priority ID) Jira Priority |
|---|---|
| Critical | (1) Highest |
| High | (2) High |
| Medium | (3) Medium |
| Low | (4) Low |
| Info | (5) Lowest |
You can override these default settings by specifying a mapping in a custom template as shown in the example JSON below. In this example, the following mapping occurs:
- critical and high severity Lacework alerts maps to Jira issues with a priority of (2)
- medium and low severity Lacework alerts maps to Jira issues with a priority of (3)
- info Lacework alerts maps to Jira issues with a priority of (4)
{
  "lacework": {
    "severity": {
      "Critical": {
        "id": "2"
      },
      "High": {
        "id": "2"
      },
      "Medium": {
        "id": "3"
      },
      "Low": {
        "id": "3"
      },
      "Info": {
        "id": "4"
      }
    }
  }
}
Pulling Custom Priority IDs from Jira
When you add or delete priorities in Jira, the severity IDs will be different than the Jira defaults of 1 - 5. If your priorities are not the standard ones provided by Jira (Highest, High, Medium, Low, Lowest) you must use the IDs for those severities. You can find them by using the Jira API, or by accessing the web browser using the same Jira URL as above: https://JIRA_URL/rest/api/2/priority.
Create a Lacework Jira Cloud/Server Alert Channel Using Terraform
For organizations using Terraform to manage their environments, Lacework maintains the Terraform provider for Lacework, which enables configuration of Lacework alert channels using automation.
If you are new to the Lacework Terraform Provider, or Lacework Terraform Modules, read the Terraform for Lacework Overview to learn the basics on how to configure the provider and more.
For a complete list of custom Terraform resources to manage alert channels in Lacework, see Managing Alert Channels with Terraform.
# Jira Cloud

resource "lacework_alert_channel_jira_cloud" "example" {
  name        = "My Jira Cloud Alert Channel Example"
  jira_url    = "mycompany.atlassian.net"
  issue_type  = "Bug"
  project_key = "EXAMPLE"
  username    = "my@username.com"
  api_token   = "abcd1234"
}
# Jira Server

resource "lacework_alert_channel_jira_server" "example" {
  name        = "My Jira Server Alert Channel Example"
  jira_url    = "mycompany.atlassian.net"
  issue_type  = "Bug"
  project_key = "EXAMPLE"
  username    = "my@username.com"
  password    = "abcd1234"
}
Additional information on the lacework_alert_channel_jira_cloud resource can be found on the Terraform Registry.
Additional information on the lacework_alert_channel_jira_server resource can be found on the Terraform Registry.
Rotate a Webhook's Secret from the Lacework Console
Lacework recommends rotating your webhook's secret regularly to avoid compromises. When you rotate the secret, the Console blocks the old secret and generates a new one.
- Log in to the Lacework Console as a Lacework user with administrative privileges.
- Go to Settings > Notifications > Alert channels.
- From the list of alert channels, click on the channel that needs a new webhook's secret.
- Click the ellipsis menu located next to the current webhook, then select Generate new webhook.
- Copy the new webhook URL to your clipboard.
- Create a Jira webhook using the copied URL, see Webhooks for Jira Server and Webhooks for Jira Cloud.
- Click Delete to remove the old webhook URL from the alert channel.
Troubleshooting
Jira Integration Status Displays as Pending
If your Jira integration status is displaying as Pending within the Lacework Console, check Alert Channel Warnings for troubleshooting suggestions.
The status will also display as Pending if the integration is inactive for 3 days or more. In this case, inactivity means that the Jira webhook has not been used within the aforementioned time.
To check when the webhook was last used, go to Settings > Alert channels in the Lacework Console, and click the row for your integration. The Bidrectional Webhook field displays when the webhook was Last used.
Using the integration in any way (as long as it triggers the Jira webhook) will put the integration status back into Success.
ServiceNow Alerts 📎
You can configure Lacework to forward alerts to ServiceNow using the ServiceNow REST API.
Prerequisites
Lacework requires a ServiceNow user name with either a web_service_admin, rest_api_explorer, or admin role. Traditionally, ServiceNow also recommends adding either the itil or itil_admin role(s) to assist with incident creation. For management and security purposes, Lacework recommends creating a dedicated Lacework-ServiceNow user. For more information, refer to ServiceNow documentation for REST API Reference.
Create a ServiceNow Alert Channel from the Lacework Console
Go to ServiceNow
- Log in to the Lacework Console as a Lacework user with administrative privileges.
- Go to Settings > Notifications > Alert channels.
- Click + Add new.
- Select ServiceNow.
- Click Next.
- Follow the steps in the next section.
Create a ServiceNow Alert Channel
Ensure you have created a ServiceNow user and password as described in Prerequisites. Then complete the following steps:
- In the Name field, enter a name for the channel and click Next.
- From the Group Issues by drop-down, select one of the options:
- Events - Select this option if you want a single ServiceNow incident to be created when compliance events of the same type but from different resources are detected by Lacework. For example, if three different S3 resources are generating the same compliance event, only one ServiceNow incident is created.
- Resources - Select this option if you want multiple ServiceNow incident to be created when multiple resources are generating the same compliance event. For example, if three different S3 resources are generating the same compliance event, the ServiceNow incidents are created.
- In the User Name field, enter your ServiceNow user name.
- In the Password field, enter the password for the specified user name.
- In the Instance URL field, enter your ServiceNow instance URL.
- Optional—In the Custom Template File field, click Choose File to select a custom template file to populate values from a custom template JSON file. For more information, see the next section.
- Click Save.
- Click Alert rules and configure your required alert routing details/options by leveraging the alert channel you created.
You should now start to receive Lacework alerts in the ServiceNow security incident response system.
Populate Values in New ServiceNow Incidents from a Custom Template
If you want the ServiceNow alert channel to populate fields in the new ServiceNow incidents with values from a custom template JSON file:
- Ensure that you are logged into ServiceNow.
- Create a custom template JSON file with the populated values.
- Specify the file when creating the ServiceNow alert channel in the Lacework Console.
For example, if you want the new ServiceNow incidents created by the Lacework ServiceNow alert channel to preface the description with a string and set approval to Approved, specify the following in your custom template JSON file. For the description property, the value specified in the custom template JSON is prepended to the value provided by the ServiceNow alert channel.
    {
      "description" : "Generated by Lacework:",
      "approval" : "Approved"
    }
When creating the ServiceNow alert channel in the Lacework Console, you must also select the custom template file from the Custom Template File field.
For the field properties to specify in the JSON file, see the properties listed in the response of the POST /now/table/{tableName} ServiceNow REST API documentation.
Do not set the properties that start with the sys_ string.
Create a Lacework ServiceNow Alert Channel Using Terraform
For organizations using Terraform to manage their environments, Lacework maintains the Terraform provider for Lacework, which enables automated configuration of Lacework alert channels.
If you are new to the Lacework Terraform Provider, or Lacework Terraform Modules, read through the Terraform for Lacework Overview to learn the basics on how to configure the provider, and more.
For a complete list of custom Terraform resources to manage alert channels in Lacework, see Managing Alert Channels with Terraform.
You can configure Lacework to forward alerts to ServiceNow using the ServiceNow REST API. Lacework requires a ServiceNow user name with either a web_service_admin, rest_api_explorer, or admin role.
For management and security purposes, Lacework recommends creating a dedicated Lacework-ServiceNow user. For more information, refer to the ServiceNow documentation for REST API Reference.
# Configure ServiceNow Alert Channel in Lacework
resource "lacework_alert_channel_service_now" "example" {
  name         = "ServiceNow Channel Alert Example"
  instance_url = "snow-lacework.com"
  username     = "snow-user"
  password     = "snow-pass"
}
For more information on the lacework_alert_channel_service_now resource, see Terraform Registry.
OpsGenie Alerts 📎
The instructions and screenshots included in this document reflect the setup flow for the Standard and Enterprise version of OpsGenie. If you have a Free or Essentials version, the setup flow and your options to customize the integration might be different. Visit Atlassian Support for more details.
To create an Opsgenie alert channel that parses Lacework alert data, follow the steps in the sections below.
Create an Advanced Integration in Opsgenie
Log in to Opsgenie and create an advanced integration from the list of integrations (use "GitHub" for example). Ensure that there is only one Create Alert action, and that it is the only action. You can add more actions later, but they are not necessary to work with Lacework’s data.
In the Name field, enter
Lacework.Ensure the Enabled checkbox is checked.
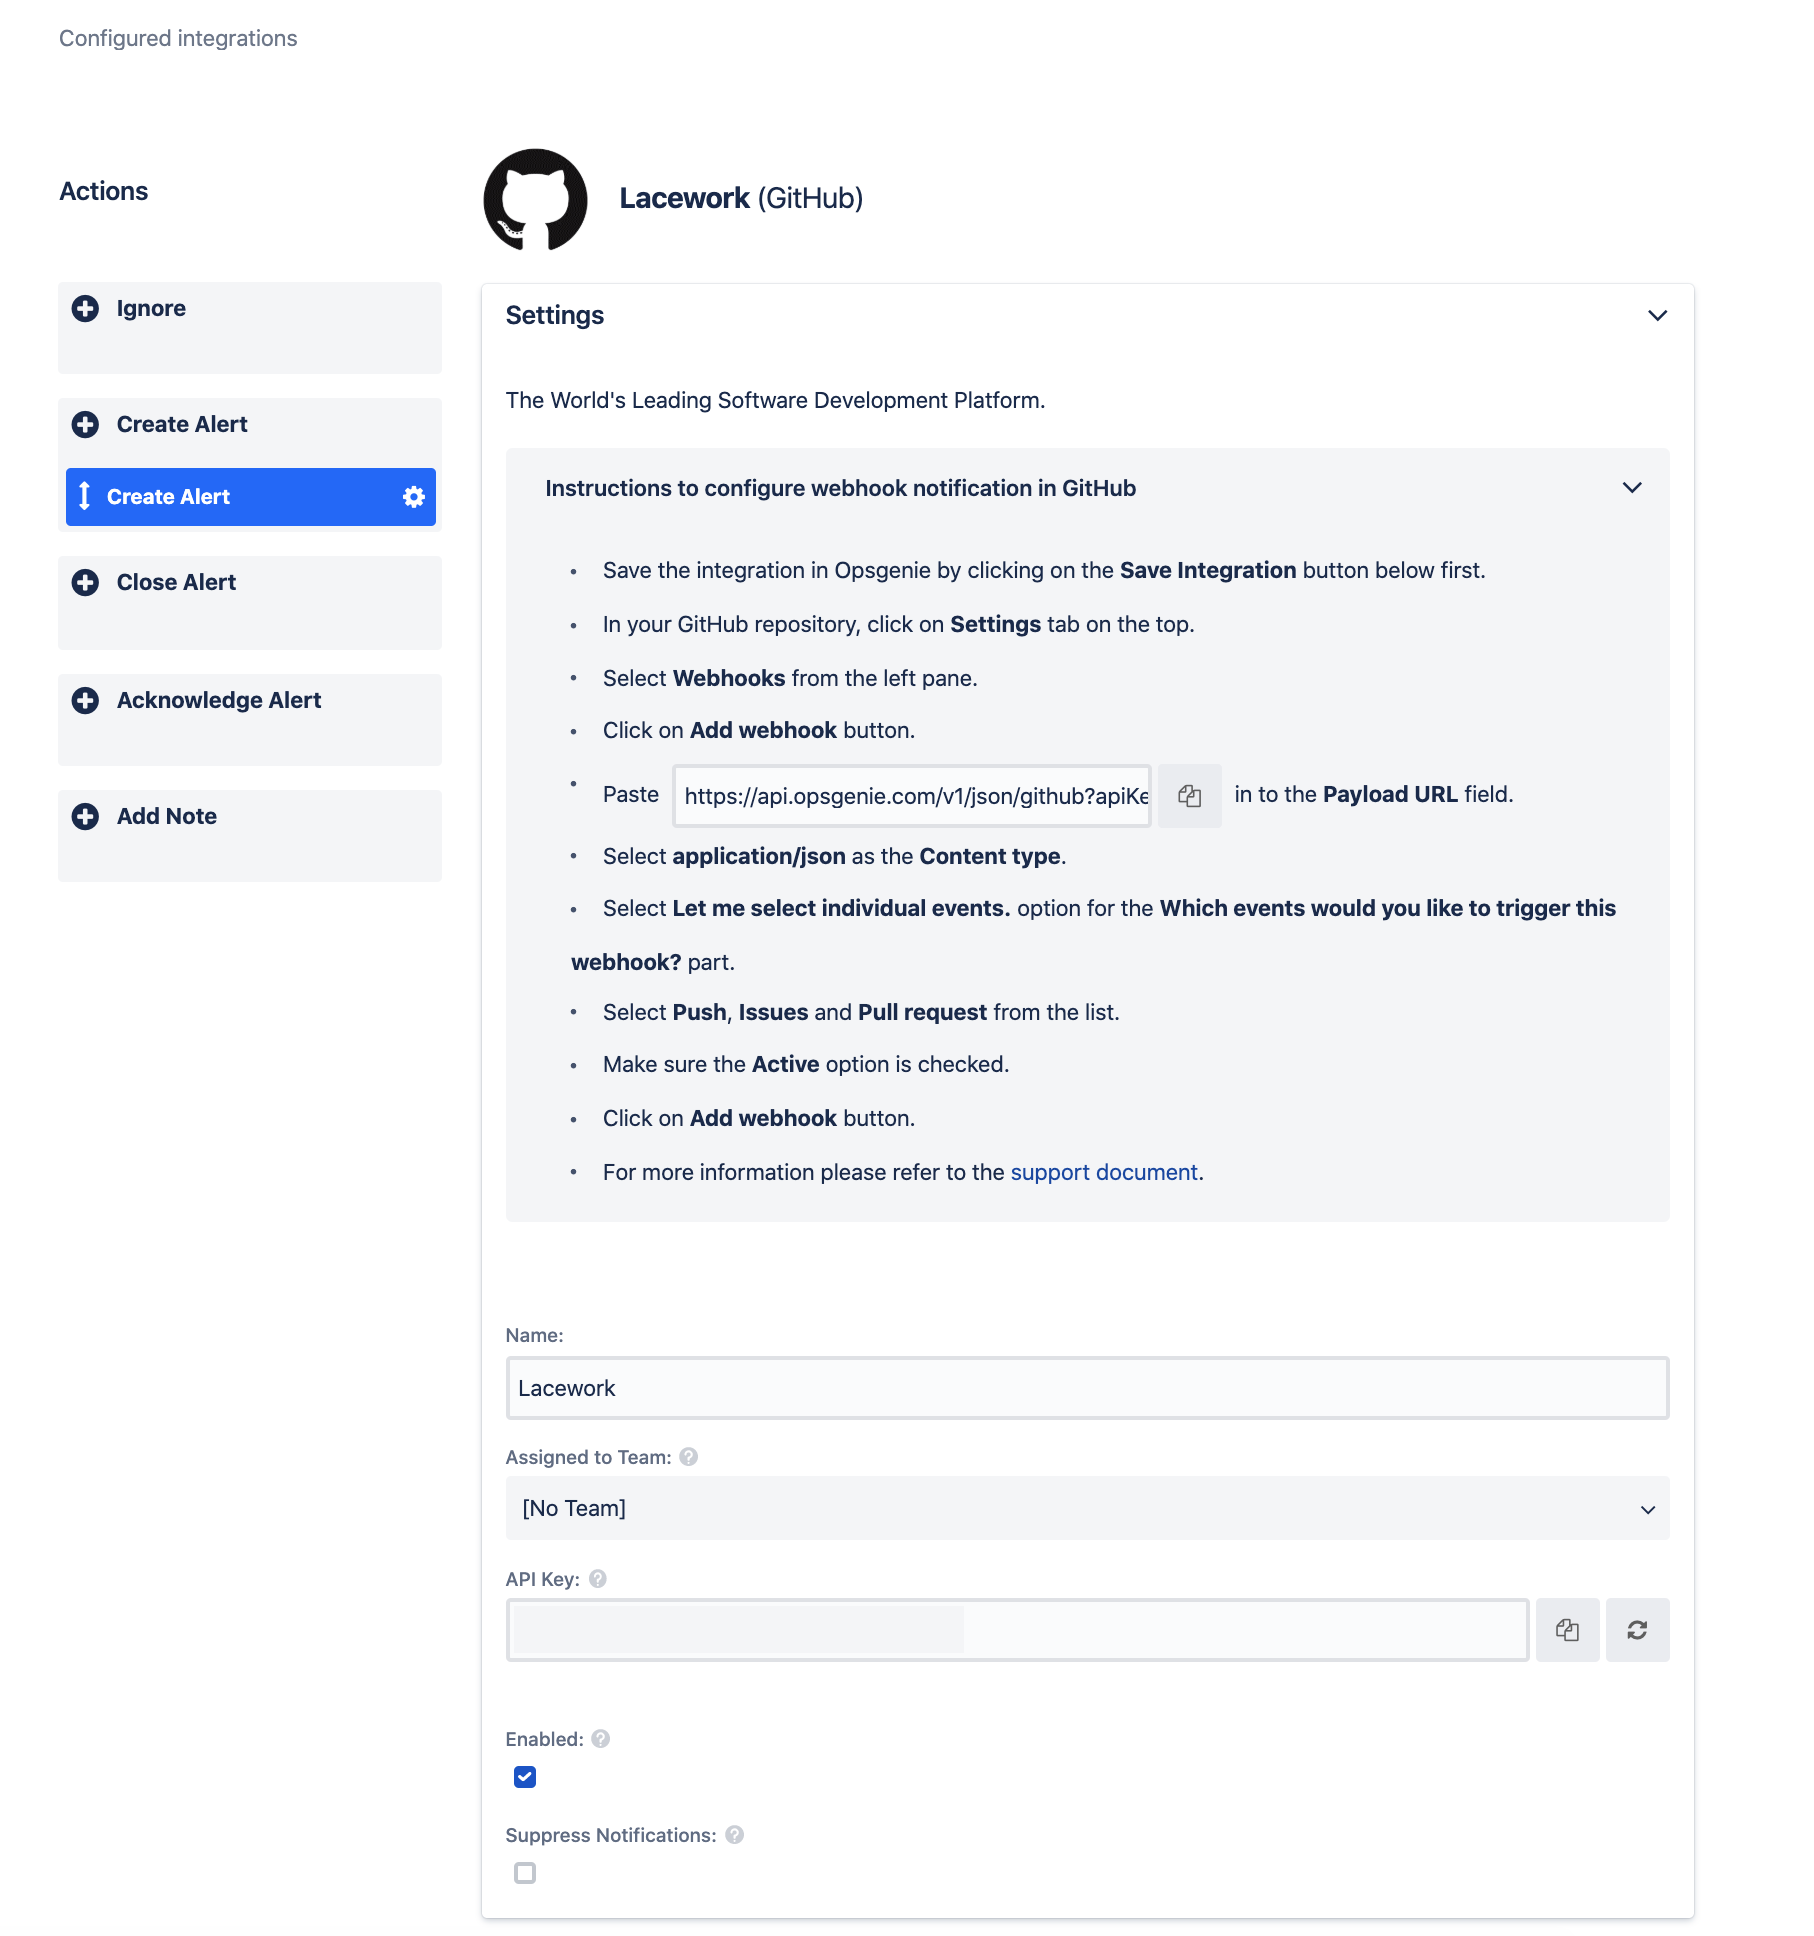
In the Filter drop-down, set Match all alerts.

In the Message field, enter the following text:
[Lacework] {{_payload.event_title}}In the Alias field, enter the following text:
{{id}}In the Priority field, select Custom Value to Opsgenie Priority.
In the Mapped Priority Value field, enter the following text:
P{{_payload.event_severity}}In the Source field, enter the following text:
{{_payload.event_source}}In the Description field, enter the following text:
Event Id: {{_payload.event_id}}Event Description: {{_payload.event_description}}Event Time: {{_payload.event_timestamp}}Event Type: {{_payload.event_type}}Event Link: {{_payload.event_link}}Lacework Account: {{_payload.lacework_account}}In the User field, enter
Lacework.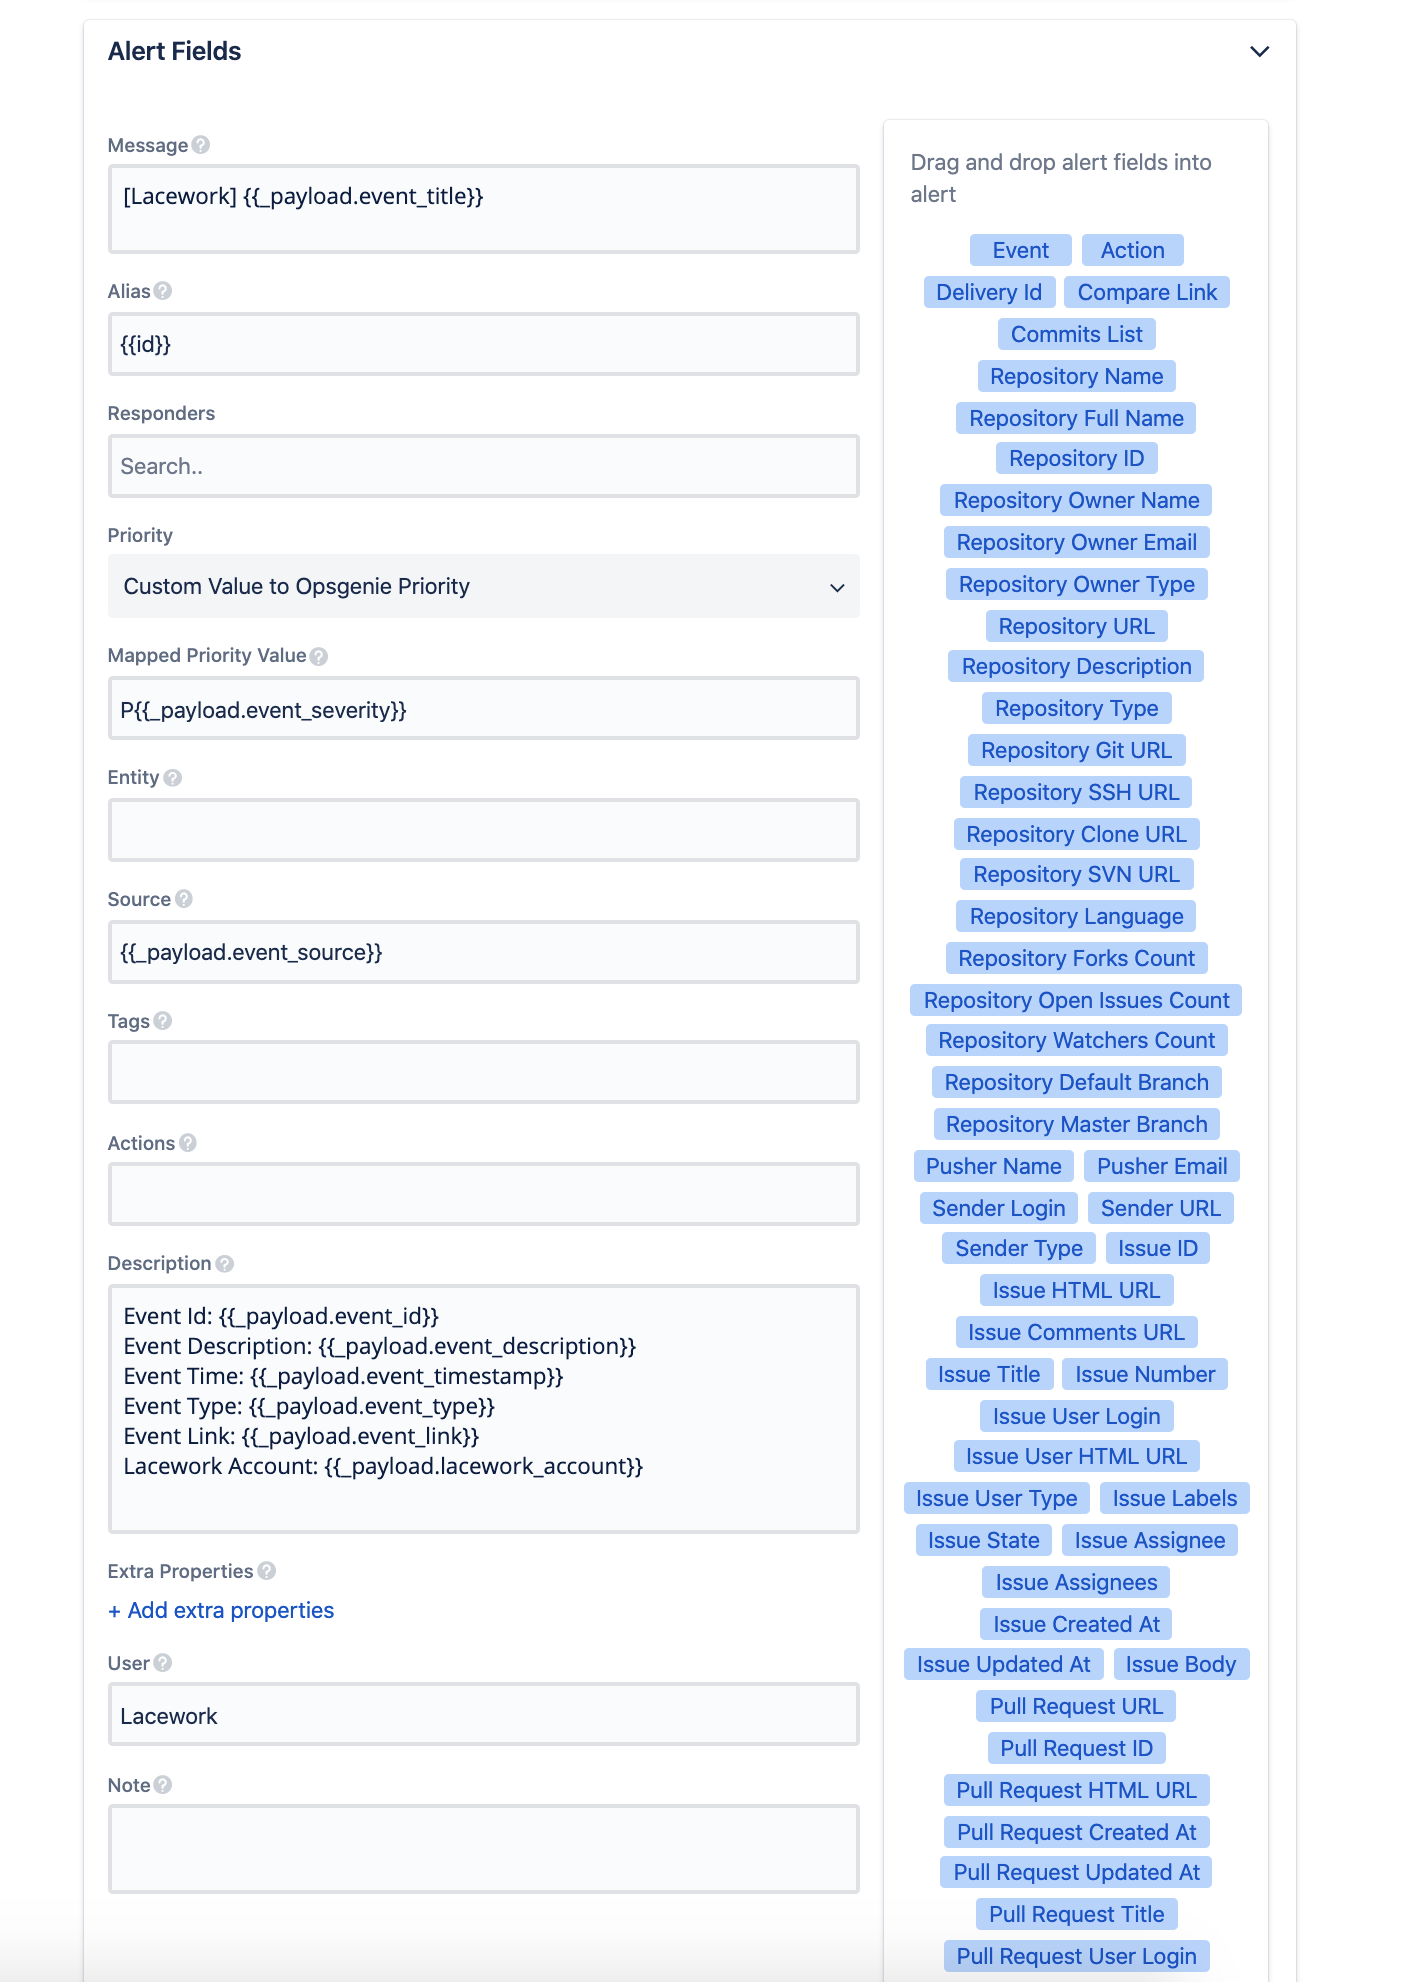
Click Save Integration.
Create the Webhook Alert Channel in Lacework
Follow the Lacework Webhook Alert Channel steps to create a custom webhook, inputting the Advanced Integration Opsgenie link as the Webhook URL.

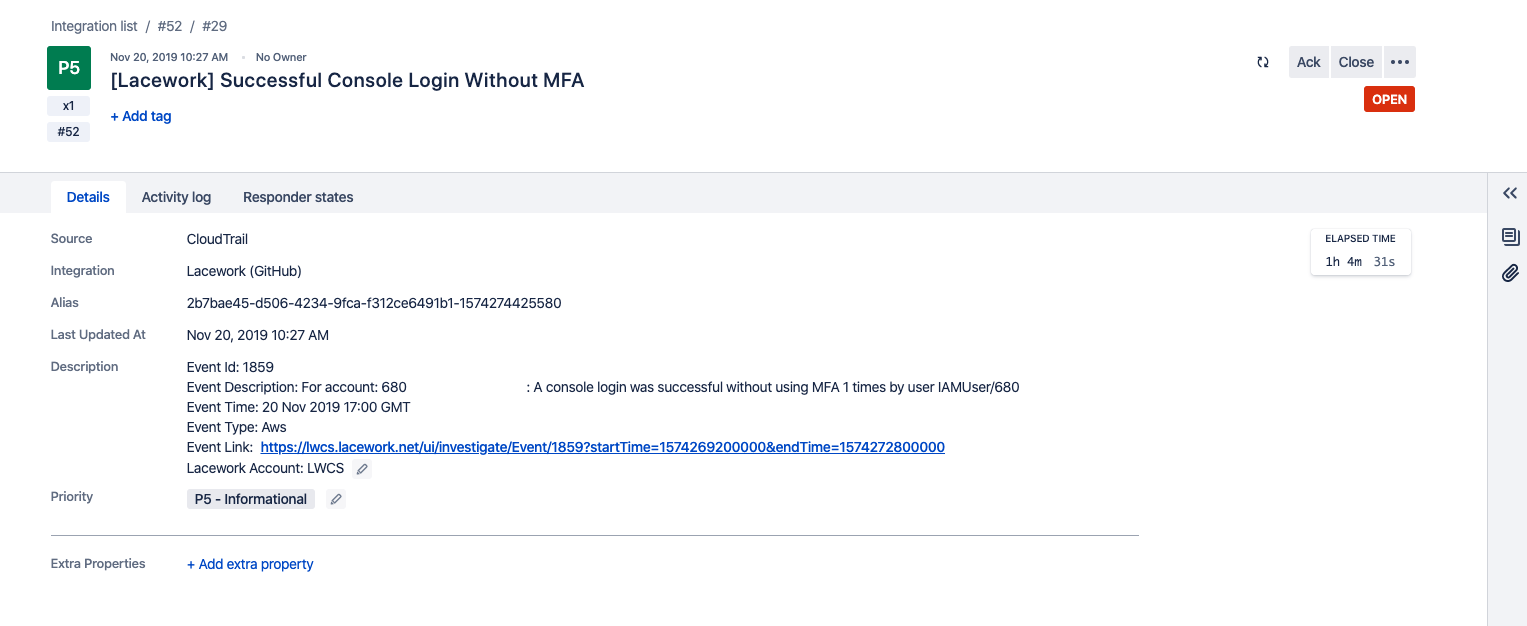
Example Lacework Alert in Opsgenie
PagerDuty Alerts 📎
PagerDuty + Lacework Integration Benefits
- Extend Lacework Events to route to the correct people, at the correct time that fits your existing business processes using PagerDuty triage, escalations, and workflows.
- One-way event notification forwards from Lacework to PagerDuty.
- Lacework Alert Routing and Alert Rules settings allow you to configure which events and severities to receive and which resource groups and event categories you want events for. They grant complete control of the alert channels forwarded to PagerDuty.
How it Works
Lacework events that arise from anomaly detection, compliance, vulnerabilities, or configured rule definitions send an event to a service in PagerDuty. Events from Lacework can either trigger a new incident on the corresponding PagerDuty service or be grouped as alerts into an existing incident. For additional information about incidents and alerts, see https://support.pagerduty.com/docs/incidents and https://support.pagerduty.com/docs/alerts.
Requirements
- PagerDuty integrations require an Admin base role for account authorization. If you do not have this role, contact an Admin or Account Owner within your organization to configure the integration.
- Lacework requires an integration key, and alerts and incidents must be enabled. Integration keys are generated by creating a new service or by creating a new integration for an existing service.
Set Up PagerDuty
Follow these steps to integrate with a PagerDuty service:
- Navigate to Services > Service Directory.
- Add an integration to a service through one of the following methods:
- Add your integration to an existing service—In the Configuring Services and Integrations documentation, follow the procedure outlined in the Edit Existing Service Settings section.
- Create a new service for your integration—In the Configuring Services and Integrations documentation, follow the procedure outlined in the Create a New Service section.
- Expand the Lacework integration's settings.
- Edit the Integration Name so it uses the format
monitoring-tool-service-name(e.g., Lacework-Cloud-Security) and click Save. - When you expand the integration's settings, you can also view the Integration Key. Save this key in a safe location because it will be used when you configure the integration with Lacework in the next section.
Create a PagerDuty Alert Channel from the Lacework Console
Navigate to PagerDuty
- Log in to the Lacework Console as a Lacework user with administrative privileges.
- Go to Settings > Notifications > Alert channels.
- Click + Add new.
- Select PagerDuty.
- Click Next.
- Follow the steps in the next section.
Create a PagerDuty Alert Channel
Ensure you have set up your PagerDuty integration key as described in Set Up PagerDuty. Then complete the following steps:
- Name the channel (e.g., PagerDuty-something).
- Add your integration key.
- Click Save.
- Locate the new PagerDuty alert channel.
Notice that the status check reads “Integration Check Pending.” - Click Test Integration and it will indicate “success.”
From the PagerDuty console, confirm that an incident was triggered with the subject “This is a test Message.” - When complete, click Alert rules and configure your required alert routing details/options by leveraging the alert channel you created.
Disable the PagerDuty Alert Channel
Follow these steps to disable the PagerDuty alert channel in the Lacework Console.
- Log in to the Lacework Console as a Lacework user with administrative privileges.
- Go to Settings > Notifications > Alert Channels.
- Locate the desired PagerDuty alert channel.
- In the Status column, click the green Enabled status to change it to Disabled.
Uninstall the PagerDuty Alert Channel
Follow these steps to uninstall the PagerDuty alert channel from the Lacework Console.
- Log in to the Lacework Console with a Lacework user that has administrative privileges.
- Navigate to Settings > Notifications > Alert Channels.
- Select the desired PagerDuty alert channel checkbox and click Delete (trash icon).
Create a Lacework PagerDuty Alert Channel Using Terraform
For organizations using Terraform to manage their environments, Lacework maintains the Terraform provider for Lacework, which enables configuration of Lacework alert channels using automation.
If you are new to the Lacework Terraform Provider, or Lacework Terraform Modules, read the Terraform for Lacework Overview to learn the basics on how to configure the provider and more.
For a complete list of custom Terraform resources to manage alert channels in Lacework, see Managing Alert Channels with Terraform.
# Configure PagerDuty Alert Channel in Lacework

resource "lacework_alert_channel_pagerduty" "critical" {
  name            = "Forward Critical Alerts"
  integration_key = "1234abc8901abc567abc123abc78e012"
}
Additional information on the lacework_alert_channel_pagerduty resource can be found on the Terraform Registry.
New Relic Alerts 📎
You can configure a Lacework alert channel to forward alerts to New Relic using the Insights API. To configure Lacework to forward events, you need your New Relic account ID and insert key.
To help ensure security, New Relic recommends using different Insert keys for different applications or different data sources. Lacework concurs with this approach.
Add an Insert Key
- Go to insights.newrelic.com > Manage data > API keys.
- From API key management, select the symbol next to the insert keys heading.
- Enter a short description about the key.
- Select Save your notes.
For more information about sending custom data to Insights, refer to New Relic documentation: Insert custom events via the Insights API.
Create a New Relic Alert Channel from the Lacework Console
Navigate to New Relic
- Log in to the Lacework Console as a Lacework user with administrative privileges.
- Go to Settings > Notifications > Alert channels.
- Click + Add new.
- Select New Relic.
- Click Next.
- Follow the steps in the next section.
Create a New Relic Alert Channel
Ensure you have created your account ID and an insert key as described in Add an Insert Key.
- Name the alert channel.
- Add your New Relic Insert key.
- Add your New Relic account ID.
- Click Save.
- Click Alert rules and configure your required alert routing details/options by leveraging the alert channel you created.
You should now start to receive Lacework alert notifications in Insights.
Create a Lacework New Relic Insights Alert Channel Using Terraform
For organizations using Terraform to manage their environments, Lacework maintains the Terraform provider for Lacework, which enables configuration of Lacework alert channels using automation.
If you are new to the Lacework Terraform Provider, or Lacework Terraform Modules, read the Terraform for Lacework Overview to learn the basics on how to configure the provider, and more.
For a complete list of custom Terraform resources to manage alert channels in Lacework, see Managing Alert Channels with Terraform.
# Configure New Relic Alert Channel in Lacework
resource "lacework_alert_channel_newrelic" "example" {
  name       = "My New Relic Channel Alert Example"
  account_id = 2338053
  insert_key = "x-xx-xxxxxxxxxxxxxxxxxx"
}
Additional information on the lacework_alert_channel_newrelic resource can be found on the Terraform Registry.