Google Cloud
| Use Cases | Lacework Feature(s) | Data Source |
|---|---|---|
| Cloud Security Posture Management (CSPM) | Compliance Dashboard and Reports Attack Path Analysis and Exposure Polygraph | Google Cloud Configuration |
| User Entity Behaviour Analytics (UEBA) | Cloud Anomaly Detection Cloud Drift Detection Cloud Audit Polygraph | Google Cloud Audit Logs |
| Vulnerability Management | Vulnerability Management Dashboard | GCR GAR Agentless Workload Scanning |
| User Entity Behaviour Analytics (UEBA) | Kubernetes Audit Log Dashboard Kubernetes Anomaly Detection Kubernetes Audit Log Polygraph | GKE Audit |
- Cloud Audit and Configuration
- Agentless Workload Scanning
- GKE Audit
- GCR
- GAR
| Use Cases | Lacework Feature(s) | Data Source |
|---|---|---|
| Cloud Security Posture Management (CSPM) Cloud Infrastructure Entitilement Management (CIEM) | Compliance Dashboard and Reports Cloud Infrastructure Entitilement Management Dashboard Attack Path Analysis and Exposure Polygraph | Google Cloud Configuration |
| User Entity Behaviour Analytics (UEBA) | Cloud Anomaly Detection Cloud Drift Detection Cloud Audit Polygraph | Google Cloud Audit Logs |
- Guided Configuration
- Lacework CLI
- Terraform
Cloud Audit and Configuration 📎
This topic describes how to use guided configuration to integrate Google Cloud Platform (GCP) with Lacework. Guided configuration is a wizard-like interface that takes your inputs and generates a CLI bundle script that downloads and sets up all necessary Lacework CLI and Terraform components to create the GCP integration. You can run the CLI bundle script in Google Cloud Shell or on any host supported by Terraform.
Requirements
The final step of guided configuration is to run the generated CLI bundle script from either Google Cloud Shell or any Terraform-supported host. Ensure your environment meets the corresponding requirements.
From GCP Cloud Shell
Google Cloud Shell inherits the permissions of the user running Cloud Shell. Before beginning, determine whether the integration between GCP and Lacework will be at the organization level or the project level, and then ensure the user account running Google Cloud Shell has the following permissions:
- Organization Level Integrations
roles/owner- For an organization level integration, Lacework recommends that you create a new project specifically for the Lacework resources. The user account used to run Google Cloud Shell must haveOwnerpermissions for that project.roles/resourcemanager.organizationAdminroles/iam.organizationRoleAdminroles/logging.configWriter
- Project Level Integrations
roles/owner- For a project level integration, Lacework recommends that you use the project being integrated to provision the required resources. The user account used to run Google Cloud Shell must haveOwnerpermissions for every project being integrated into Lacework.
From Any Terraform-Supported Host
- Google Cloud Console - Administrator access to Google Cloud Console to create projects, service accounts, grant access, and provision resources.
- Google Cloud CLI - To configure resources in GCP. Ensure that you have project owner (for project level integration) or organization administrator (for organization level integration) access on GCP.
- Linux Tools - The following Linux tools must be installed and present on PATH: curl, Git, and unzip.
- Lacework Administrator - A Lacework account with administrator privileges.
Navigate to Guided Configuration
Follow these steps to integrate using guided configuration.
- Log in to the Lacework Console.
- Go to Settings > Integrations > Cloud accounts.
- Click + Add New.
- Click Google Cloud Platform and select Guided configuration.
- Click Next.
- Select an integration type and follow the steps for the corresponding integration type.
- Click Generate CLI Bundle to generate a CLI bundle based on the information entered. You can copy and paste the script to run the CLI bundle into Google Cloud Shell or in a terminal on any Terraform-supported host to create the integration. For more information, see Generate CLI Bundle.
Create an Audit Log (PubSub)+Configuration Integration
If you want to migrate an existing Storage-based audit log integration to a Pub/Sub-based audit log integration, see the following topics:
- Log in to the Lacework Console.
- Go to Settings > Integrations > Cloud Accounts.
- Select the row for the Storage-based audit log integration you set up for the organization. A Storage-based audit log integration has the provider as
GCPand type asAudit Log (Storage) The Cloud Account page displays the integration details.
 - Click the Delete icon
 to delete the integration.
Basic configuration
Answer the questions about how to configure the integration.
- Do you want to enable GCP Configuration integration?
A Configuration integration analyzes your GCP environment's configuration compliance and reports alerts for anomalous behavior. - Do you want to enable GCP Audit Log (PubSub) integration?
An Audit Log integration analyzes audit log activity and reports alerts for anomalous behavior. - What is the project ID to provision Lacework resources? - Specify the ID of the project to use to provision Lacework resources. Ensure that you have enabled billing for the project.
- Enable organization level integration? - Select to configure an integration at the organization level.
What is the GCP organization ID? - Specify the ID of the organization to integrate. To obtain the organization ID, use the Google Cloud Shellgcloud projects get-ancestors projectIdcommand. - Select an API key.
- Select an existing Lacework API key from the list.
- If no API keys exist, click Create New Key, enter a name and description, and click Save. Then select the key to use in the integration.
Advanced Configuration
For optional advanced configuration, click Advanced configuration (optional) and click Configure for the options you want to configure. The following options are available.
Configuration integration name
- Configuration integration name - A unique name for the configuration integration.
Audit Log integration name
- Audit Log integration name - A unique name for the audit log integration.
Configure Lacework integration with an existing service account
Service account name - Name of the existing service account to use in the integration.
Private key (base64 encoded) - Provide the private key for the service account. To obtain the private key, do the following:
Install the
jqutility from https://stedolan.github.io/jq/.Open a terminal window and go the directory where you downloaded the JSON file containing the service account key.
Enter the following command, where YourFileName.json is the name of the JSON file.
cat YourFileName.json | jq -r '.private_key'Copy all the text displayed in the output including the BEGIN and END lines.
-----BEGIN PRIVATE KEY-----
YourKeyInfo
-----END PRIVATE KEY-----
Paste the text into the Private key (base64 encoded) field in the Lacework Console.
Configure log sink options
- Existing log sink name - Name of the existing log sink to use for the integration.
Create an Audit Log (Storage)+Configuration Integration
Starting from September 25, 2023, you cannot create a new Storage-based audit log integration. Lacework recommends that you do the following:
- Create Pub/Sub-based audit log integrations going forward.
- Migrate your existing Storage-based audit log integration to a Pub/Sub-based audit log integration. For more information, see the following topics:
Basic configuration
Answer the questions about how to configure the integration.
- Do you want to enable GCP Configuration integration?
A Configuration integration analyzes your GCP environment's configuration compliance and reports alerts for anomalous behavior. - Do you want to enable GCP Audit Log (Storage) integration?
An Audit Log integration analyzes audit log activity and reports alerts for anomalous behavior. - What is the project ID to provision Lacework resources? - Specify the ID of the project to use to provision Lacework resources. Ensure that you have enabled billing for the project.
- Enable organization level integration? - Select to configure an integration at the organization level.
What is the GCP organization ID? - Specify the ID of the organization to integrate. To obtain the organization ID, use the Google Cloud Shellgcloud projects get-ancestors projectIdcommand. - Select an API key.
- Select an existing Lacework API key from the list.
- If no API keys exist, click Create New Key, enter a name and description, and click Save. Then select the key to use in the integration.
Advanced Configuration
For optional advanced configuration, click Advanced configuration (optional) and click Configure for the options you want to configure. The following options are available.
Set Configuration integration name
- Configuration integration name - A unique name for the configuration integration.
Set Audit Log integration name
- Audit Log integration name - A unique name for the audit log integration.
Configure Lacework integration with an existing service account
Service account name - Name of the existing service account to use in the integration.
Private key (base64 encoded) - Provide the private key for the service account. To obtain the private key, do the following:
Install the
jqutility from https://stedolan.github.io/jq/.Open a terminal window and go the directory where you downloaded the JSON file containing the service account key.
Enter the following command, where YourFileName.json is the name of the JSON file.
cat YourFileName.json | jq -r '.private_key'Copy all the text displayed in the output including the BEGIN and END lines.
-----BEGIN PRIVATE KEY-----
YourKeyInfo
-----END PRIVATE KEY-----
Paste the text into the Private key (base64 encoded) field in the Lacework Console.
Configure additional bucket options
- Use existing bucket? - Select to use an existing Cloud Storage bucket and enter the name of the bucket.
- Bucket name - Name of the bucket you want to create.
- Bucket region - Region where you want to create the new bucket. Valid values for multi-regions are
EU,US, orASIA. Alternatively, you can set a single region or dual-regions using the naming convention described in the GCP bucket locations documentation. The default region isUS. - Enable force destroy? - Select to enable force destroy.
- Disable uniform bucket level access? - Select to disable uniform bucket-level access on the audit log bucket. Default behavior enables uniform bucket-level access.
- Number of days to keep audit logs - Number of days to keep audit logs in the bucket before deleting. Leave empty to keep indefinitely (default).
Configure log sink options
- Existing log sink name - Name of the existing log sink to use for the integration.
Create a GKE Audit Log Integration
Answer the questions about how to configure the integration.
Basic Configuration
- What is the Project ID to provision Lacework resources?
Specify the ID of the project to use to provision Lacework resources. - Do you want to enable organization level integration?
Select to configure an organization level integration. What is the GCP organization ID?
Specify the ID of the GCP organization. - Select an API key.
- Select an existing API key from the list.
- If no API keys exist, click Create New Key, provide a name and description, and click Save. Then select the key to use in the integration.
Advanced Configuration
For optional advanced configuration, click Advanced configuration (optional) and click Configure for the options you want to configure. The following options are available.
Configure sink options
- Existing sink name - Name of the existing log sink to use for the integration.
Configure Lacework integration with an existing service account
Service account name - Name of the existing service account to use in the integration.
Private Key (base64 encoded) - Provide the private key for the service account. To obtain the private key, do the following:
Install the
jqutility from https://stedolan.github.io/jq/.Open a terminal window and go the directory where you downloaded the JSON file containing the service account key.
Enter the following command, where YourFileName.json is the name of the JSON file.
cat YourFileName.json | jq -r '.private_key'Copy all the text displayed in the output including the BEGIN and END lines.
-----BEGIN PRIVATE KEY-----
YourKeyInfo
-----END PRIVATE KEY-----
Paste the text into the Private Key (base64 encoded) field in the Lacework Console.
Generate CLI Bundle
After providing basic configuration information and any desired advanced configuration information, generate the CLI bundle.
- Click Generate CLI bundle. This generates a CLI bundle based on the information entered. You can copy and paste the script to run the CLI bundle into Google Cloud Shell or in a terminal on any Terraform-supported host to create the integration.
- Ensure your environment meets the requirements for run the CLI bundle.
- Click Copy download bundle command to clipboard.
- As either a project owner (for project level integration) or organization administrator (for organization level integration), go to Google Cloud Shell or a terminal on any Terraform-supported host.
- Paste the command and press enter.
This downloads the Lacework CLI, sets up the CLI with your configuration, calls the CLI non-interactively, and applies Terraform to automatically provision the resources required for the integration in GCP. When the command finishes, the new integration appears in the Cloud accounts page after a screen refresh.
Google Apps Script Projects are hidden by default. Contact Lacework Support if you want to enable visibility of these projects.
Cloud Audit and Configuration 📎
lacework generate cloud-account gcp
Generate and/or execute Terraform code for GCP integration
Synopsis
Use this command to generate Terraform code for deploying Lacework into an GCP environment.
By default, this command interactively prompts for the required information to setup the new cloud account. In interactive mode, this command will:
- Prompt for the required information to setup the integration
- Generate new Terraform code using the inputs
- Optionally, run the generated Terraform code:
- If Terraform is already installed, the version is verified as compatible for use
- If Terraform is not installed, or the version installed is not compatible, a new version will be installed into a temporary location
- Once Terraform is detected or installed, Terraform plan will be executed
- The command will prompt with the outcome of the plan and allow to view more details or continue with Terraform apply
- If confirmed, Terraform apply will be run, completing the setup of the cloud account
This command can also be run in noninteractive mode. See help output for more details on the parameter value(s) required for Terraform code generation.
lacework generate cloud-account gcp [flags]
Options
      --apply                                         run terraform apply without executing plan or prompting
      --audit_log                                     enable audit log integration
      --audit_log_integration_name string             specify a custom audit log integration name
      --bucket_lifecycle_rule_age int                 specify the lifecycle rule age (default -1)
      --bucket_region string                          specify bucket region
      --configuration                                 enable configuration integration
      --configuration_integration_name string         specify a custom configuration integration name
      --custom_bucket_name string                     override prefix based storage bucket name generation with a custom name
      --custom_filter string                          Audit Log filter which supersedes all other filter options when defined
      --enable_ubla                                   enable universal bucket level access(ubla) (default true)
      --existing_bucket_name string                   specify existing bucket name
      --existing_service_account_name string          specify existing service account name
      --existing_service_account_private_key string   specify existing service account private key (base64 encoded)
      --existing_sink_name string                     specify existing sink name
  -e, --folders_to_exclude stringArray                List of root folders to exclude for an organization-level integration
  -i, --folders_to_include stringArray                list of root folders to include for an organization-level integration
      --google_workspace_filter                       filter out Google Workspace login logs from GCP Audit Log sinks (default true)
  -h, --help                                          help for gcp
      --include_root_projects                         Disables logic that includes root-level projects if excluding folders (default true)
      --k8s_filter                                    filter out GKE logs from GCP Audit Log sinks (default true)
      --organization_id string                        specify the organization id (only set if organization_integration is set)
      --organization_integration                      enable organization integration
      --output string                                 location to write generated content (default is ~/lacework/gcp)
      --prefix string                                 prefix that will be used at the beginning of every generated resource
      --project_id string                             specify the project id to be used to provision lacework resources (required)
      --projects strings                              list of project IDs to integrate with (project-level integrations)
      --service_account_credentials string            specify service account credentials JSON file path (leave blank to make use of google credential ENV vars)
      --use_pub_sub                                   use pub/sub for the audit log data rather than bucket
      --wait_time string                              amount of time to wait before the next resource is provisioned
Options inherited from parent commands
  -a, --account string      account subdomain of URL (i.e. <ACCOUNT>.lacework.net)
  -k, --api_key string      access key id
  -s, --api_secret string   secret access key
      --api_token string    access token (replaces the use of api_key and api_secret)
      --debug               turn on debug logging
      --json                switch commands output from human-readable to json format
      --nocache             turn off caching
      --nocolor             turn off colors
      --noninteractive      turn off interactive mode (disable spinners, prompts, etc.)
      --organization        access organization level data sets (org admins only)
  -p, --profile string      switch between profiles configured at ~/.lacework.toml
      --subaccount string   sub-account name inside your organization (org admins only)
SEE ALSO
- lacework generate cloud-account - Generate cloud integration IaC
Cloud Audit and Configuration 📎
Starting from September 25, 2023, you cannot create a new Storage-based audit log integration. Lacework recommends that you do the following:
- Create Pub/Sub-based audit log integrations going forward.
- Migrate your existing Storage-based audit log integration to a Pub/Sub-based audit log integration. For more information, see the following topics:
To integrate with GCP, Lacework recommends using Guided Configuration, a wizard-like interface that takes your inputs and generates a script that downloads and sets up all necessary Lacework CLI and Terraform components to create the integration non-interactively.
To use guided configuration:
- In the Lacework Console go to Settings > Integrations > Cloud accounts.
- Click + Add New.
- Click Google Cloud Platform and select Guided configuration.
Alternatively, follow the steps in this topic for the following methods:
- Use the Lacework CLI to generate and run Terraform code.
- Create the
main.tffile manually and run Terraform from any supported host. This may be required for complex integration scenarios.
Overview
Lacework integrates with Google Cloud Platform (GCP) to analyze Cloud Audit Logs and assess cloud resource configurations at the organization level or at the project level. The Lacework platform ingests configuration and audit log information from GCP and reports alerts for anomalous behavior.
- Organization level integrations cover all the existing projects in the organization. After you create the integration, any new projects you create are automatically included in the integration and any projects you delete are automatically excluded.
- Project level integrations cover only a specific project. You must set up a new integration, if required, for any new project you create.
This topic describes how you can set up an organization level or project level Configuration and Storage-based audit log integration by running Lacework Terraform modules on any host supported by Terraform. Lacework recommends this method if you plan to continue using Terraform to manage the integrations or store the state of the configuration in a source control management tool such as Git.
Lacework also supports running Terraform from Google Cloud Shell, which is more suitable for one off integrations where you do not plan to continue using Terraform to manage the integrations. For more information see Storage-based Integration From Google Cloud Shell.
If you are new to the Lacework Terraform Provider or Lacework Terraform Modules, read Terraform for Lacework Overview to learn the basics on how to configure the provider.
GCP Resources
To integrate at the organization or project level, Lacework requires the following resources to be provisioned in GCP. You must create the project and service account in GCP. The Lacework Terraform modules automatically provision the log routing sink, Cloud Storage bucket, and Pub/Sub topic with the required permissions in GCP.
- Google Cloud Project - A project that contains the resources required for the integration with billing enabled.
- For an organization level integration, Lacework recommends that you create a new project specifically for the Lacework resources.
- For a project level integration, you can provision the required Lacework resources within the project being integrated.
- Google Storage Bucket - A Cloud Storage bucket for Stack Driver logs
- Google Pub/Sub Topic - For Cloud Audit Logs events
- Google Logging Sink - To route Cloud Audit Logs to a Cloud Storage bucket
- Service Account for Lacework - To provide Lacework read-only access to GCP with the following roles:
- Audit Log
- Organization level integration
roles/resourcemanager.organizationViewer
- Project level integration
roles/storage.objectViewer
- Organization level integration
- Configuration
roles/iam.securityReviewerroles/browserroles/cloudasset.viewer- Organization level integration
roles/lwOrgComplianceRolecustom IAM role containing the following permissions ("bigquery.datasets.get", "compute.projects.get", "pubsub.topics.get", "storage.buckets.get", "compute.sslPolicies.get")
- Project level integration
roles/lwComplianceRolecustom IAM role containing the following permissions ("bigquery.datasets.get", "compute.projects.get", "pubsub.topics.get", "storage.buckets.get", "compute.sslPolicies.get")
- Audit Log
For organization level integrations, follow the steps in Integrate GCP at the organization Level.
For project level integrations, follow the steps in Integrate GCP at the project level.
If you are setting up new Google audit logging (instead of leveraging existing Google audit logging), Lacework recommends that you set a retention policy with a minimum of 7 days.
Prerequisites
- Google Cloud Console - Administrator access to Google Cloud Console to create projects, service accounts, grant access, and provision resources.
- Google Cloud CLI - To configure resources in GCP.
- Lacework Console - Org admin or Account admin access to the Lacework Console is required to create API keys and configure integrations with Lacework.
- Lacework CLI - To generate and execute the Terraform code for the integration.
- Terraform - Lacework Terraform projects support Terraform versions
~> 0.14,~> 0.15,~> 1.0, and~> 1.1.
Terraform Module Dependencies
Lacework Terraform modules for GCP have the following dependencies that will be installed when running terraform init:
For more information on these dependencies, visit Lacework on the Terraform Registry.
Integrate GCP at the Organization Level
This section describes how to integrate GCP and Lacework for analysis of Cloud Audit Logs and configuration assessment at the organization level.
Create a GCP Project
When you create an integration at the GCP organization level, Lacework recommends having a dedicated project to provision the required resources for the integration between GCP and Lacework. Create the GCP project before running Terraform.
- Log in to Google Cloud Console.
- Click the navigation menu and go to IAM & Admin > Create a Project.
- Enter the project name, select a billing account, and select the organization you are integrating.
- Click Create to create the new project.
Create a Service Account for Terraform
To integrate GCP and Lacework at the organization level, Terraform needs a service account with the following permissions. If you already have a service account configured with these permissions, along with a configured key, skip to the next section.
roles/ownerroles/resourcemanager.organizationAdminroles/iam.organizationRoleAdminroles/logging.configWriter
Do the following to create a service account within the project created for Lacework and give the account Owner permissions to the project.
- In the Google Cloud Console, select the project you created for Lacework resources.
- Click the navigation menu and go to IAM & Admin > Service Accounts.
- Click Create Service Account.
- Enter the service account name (for example,
terraform-provisioning), add a description, and click Create and Continue. - In the Grant this service account access to project section, give the service account Owner permissions to the project, and click Continue.
- Click Done to create the service account.
Add Service Account to GCP Organization
You must add the service account to the GCP organization being integrated with Lacework, and add the required organization level permissions to the service account for Terraform to be able to configure the organization being integrated.
- In the Google Cloud Console, select the organization you are integrating with Lacework.
- Click the navigation menu and go to IAM & Admin > IAM.
- Click the + Grant Access button.
- In the Add principals section, search for the service account and select it.
- In the Assign roles section, add the following roles for the service account:
- Organization Administrator
- Organization Role Administrator
- Logs Configuration Writer
- Click Save.
Create Service Account Key
To run Terraform locally, you must create and download a key for the service account created in the previous step. This section describes how to create a service account key and download it to your local system as a JSON file.
- In the Google Cloud Console, select the project you created for Lacework resources.
- Click the navigation menu and go to IAM & Admin > Service Accounts.
- Click the Actions menu next to the service account and select Manage keys.
- Click Add Key > Create new key.
- Select JSON as the key type.
- Click Create to download the key.
Configure the Lacework CLI
Ensure you have the Lacework CLI installed and configured to the Lacework account you plan to integrate.
Run the Lacework CLI
Run the lacework generate cloud-account gcp Lacework CLI command to generate and execute the Terraform code for the integration.
lacework generate cloud-account gcp  \
  --configuration --audit_log        \
  --organization_integration         \
  --organization_id OrganizationId   \
  --project_id ProjectId             \
  --noninteractive
The Terraform files are created in the
~/lacework/gcpdirectory.Navigate to the
~/lacework/gcpdirectory.Run
terraform planand review the changes that will be applied.Once satisfied with the changes that will be applied, run
terraform applyto execute Terraform.
If you are creating the main.tf file manually, you can use Terraform inputs to customize Lacework Terraform modules. See the documentation on the Terraform Registry for the complete list of inputs for each module.
Validate the Configuration
To confirm that the cloud account integrations are working, use the Lacework CLI or log in to the Lacework Console.
- To validate using the CLI, run the
lacework cloud-account listcommand. You should see two integration types:GcpCfgfor the Configuration integration, andGcpAtSesfor the Audit Log integration. - To validate using the Lacework Console, go to Settings > Integrations > Cloud Accounts. You should see two integration types:
Configurationfor the Configuration integration, andAudit Log (Storage)for the Audit Log integration.
Google Apps Script Projects are hidden by default. Contact Lacework Support if you want to enable visibility of these projects.
Integrate GCP at the Project Level
This section describes how to integrate GCP and Lacework for analysis of Cloud Audit Logs and configuration assessment at the project level.
In this method Terraform provisions all the required resources in the project being integrated into Lacework.
Create a Service Account for Terraform
To integrate GCP and Lacework at the project level, Terraform needs a service account with the following permission for the project being integrated. If you already have a service account configured with this permission, along with a configured key, skip to the next section.
roles/owner
The following steps create a service account with the required permissions.
- Log in to the Google Cloud Console.
- Select the project being integrated with Lacework.
- Click the navigation menu and go to IAM & Admin > Service Accounts.
- Click Create Service Account.
- Enter the service account name (for example,
terraform-provisioning), add a description, and click Create and Continue. - In the Grant this service account access to project section, give the service account Owner permissions to the project, and click Continue.
- Click Done to create the service account.
Create Service Account Key
To run Terraform locally, you must create and download a key for the service account created in the previous step. This section describes how to create a service account key and download it to your local system as a JSON file.
- In the Google Cloud Console, select the project created for Lacework resources.
- Click the navigation menu and go to IAM & Admin > Service Accounts.
- Click the Actions menu next to the service account and select Manage keys.
- Click Add Key > Create new key.
- Select JSON as the key type.
- Click Create to download the key.
Configure the Lacework CLI
Ensure you have the Lacework CLI installed and configured to the Lacework account you plan to integrate.
Run the Lacework CLI
Run the lacework generate cloud-account gcp Lacework CLI command to generate and execute the Terraform code for the integration.
lacework generate cloud-account gcp  \
  --configuration --audit_log        \
  --project_id ProjectId             \
  --noninteractive
The Terraform files are created in the
~/lacework/gcpdirectory.Navigate to the
~/lacework/gcpdirectory.Run
terraform planand review the changes that will be applied.Once satisfied with the changes that will be applied, run
terraform applyto execute Terraform.
If you are creating the main.tf file manually, you can use Terraform inputs to customize Lacework Terraform modules. See the documentation on the Terraform Registry for the complete list of inputs for each module.
Validate the Configuration
To confirm that the cloud account integrations are working, use the Lacework CLI or log in to the Lacework Console.
- To validate using the CLI, run the
lacework cloud-account listcommand. You should see two integration types:GcpCfgfor the Configuration integration, andGcpAtSesfor the Audit Log integration. - To validate using the Lacework Console, go to Settings > Integrations > Cloud Accounts. You should see two integration types:
Configurationfor the Configuration integration, andAudit Log (Storage)for the Audit Log integration.
Google Apps Script Projects are hidden by default. Contact Lacework Support if you want to enable visibility of these projects.
Integrate Multiple Projects with Terraform
To integrate multiple GCP projects with Lacework individually:
Run the following lacework generate cloud-account gcp Lacework CLI command:
lacework generate cloud-account gcp  \
  --configuration --audit_log        \
  --project_id ProjectId             \
  --projects ProjectId1,ProjectId2   \
  --noninteractive
The Terraform files are created in the
~/lacework/gcpdirectory.Navigate to the
~/lacework/gcpdirectory.Run
terraform planand review the changes that will be applied.Once satisfied with the changes that will be applied, run
terraform applyto execute Terraform.
If you are creating the main.tf file manually, you can use Terraform inputs to customize Lacework Terraform modules. See the documentation on the Terraform Registry for the complete list of inputs for each module.
Troubleshooting
How do I fix this issue: Error: no project value set?
If you see the following error:
Error: no project value set. project_id must be set at the resource level, or a default project value must be specified on the provider
Add a project to the Google provider. See Google provider documentation for details.
| Use Cases | Lacework Feature(s) | Data Source |
|---|---|---|
| Vulnerability Management | Vulnerability Management Dashboard | Agentless Workload Scanning |
- Terraform
Project Integration
Agentless Workload Scanning 📎
Overview
This article describes how to integrate your Google Cloud project with Lacework's Agentless Workload Scanning.
Google Cloud Project Integration
Choose which type of Google Cloud Agentless Workload Scanning integration that you want to perform:
See Lacework Terraform Module for Agentless Workload Scanning on Google Cloud for all available Terraform integration options and additional deployment examples.
Option 1: Project Integration - Single Region
In this example, we add Terraform modules to one Google Cloud region:
- Global resources are deployed to the default Google provider region.
- Service Accounts/Permissions
- Object Storage Bucket
- Secret Manager Secret
- Regional resources are deployed to the default Google provider region.
- Cloud Run Job
- Cloud Scheduler Job
Use the example below for your
versions.tffile:terraform {
required_version = ">= 0.12.31"
required_providers {
lacework = {
source = "lacework/lacework"
version = "~> 1.3"
}
}
}Use the example below for your
main.tffile:# Set your Lacework profile here. With the Lacework CLI, use
# `lacework configure list` to get a list of available profiles.
provider "lacework" {
profile = "lw_agentless"
}
provider "google" {
# Set the project name for where the scanning resources are hosted.
project = "agentless-lw-scanner"
}
module "lacework_gcp_agentless_scanning_project_single_region" {
source = "lacework/agentless-scanning/gcp"
version = "~> 0.1"
# Provide a list of Google Cloud projects that you want to monitor here.
project_filter_list = [
"monitored-project-1",
"monitored-project-2"
]
global = true
regional = true
lacework_integration_name = "agentless_from_terraform"
}If you are executing Terraform outside the Google Cloud Console, use the following gcloud commands prior to running Terraform:
gcloud auth logingcloud auth application-default logingcloud config set project <scanning_project>- Replace
<scanning-project>with the project that will host the scanning resources (agentless-lw-scannerin this example).
- Replace
Run
terraform initto initialize the working directory (containing the Terraform files).Run
terraform planand review the changes that will be applied.Once satisfied with the changes that will be applied, run
terraform applyto execute Terraform.
Option 2: Project Integration - Multi Region
In this example, we add Terraform modules to two Google Cloud regions:
- Global resources are deployed to
us-east1.- Service Accounts/Permissions
- Object Storage Bucket
- Secret Manager Secret
- Regional resources are deployed to
us-east1andus-central1.- Cloud Run Job
- Cloud Scheduler Job
Use the example below for your
versions.tffile:terraform {
required_version = ">= 0.12.31"
required_providers {
lacework = {
source = "lacework/lacework"
version = "~> 1.3"
}
}
}Use the example below for your
main.tffile:# Set your Lacework profile here. With the Lacework CLI, use
# `lacework configure list` to get a list of available profiles.
provider "lacework" {
profile = "lw_agentless"
}
provider "google" {
alias = "use1"
region = "us-east1"
# Set the project name for where the scanning resources are hosted.
# This must be assigned to the `global` region.
project = "agentless-lw-scanner"
}
provider "google" {
alias = "usc1"
region = "us-central1"
# Set your default project ID for this region. This isn't required for
# the Agentless integration, but is required by the Google Provider.
# https://registry.terraform.io/providers/hashicorp/google/latest/docs/guides/getting_started#configuring-the-provider
project = "default-project-id"
}
module "lacework_gcp_agentless_scanning_project_multi_region_use1" {
source = "lacework/agentless-scanning/gcp"
version = "~> 0.1"
providers = {
google = google.use1
}
# Provide a list of Google Cloud projects that you want to monitor here.
project_filter_list = [
"monitored-project-1",
"monitored-project-2"
]
global = true
regional = true
lacework_integration_name = "agentless_from_terraform"
}
module "lacework_gcp_agentless_scanning_project_multi_region_usc1" {
source = "lacework/agentless-scanning/gcp"
version = "~> 0.1"
providers = {
google = google.usc1
}
regional = true
global_module_reference = module.lacework_gcp_agentless_scanning_project_multi_region_use1
}If you are executing Terraform outside the Google Cloud Console, use the following gcloud commands prior to running Terraform:
gcloud auth logingcloud auth application-default logingcloud config set project <scanning_project>- Replace
<scanning-project>with the project that will host the scanning resources (agentless-lw-scannerin this example).
- Replace
Run
terraform initto initialize the working directory (containing the Terraform files).Run
terraform planand review the changes that will be applied.Once satisfied with the changes that will be applied, run
terraform applyto execute Terraform.
Verify your Agentless Workload Scanning Integration
In the Lacework console, the status of the integration at Settings > Integrations > Cloud accounts will display as Success if all resources are installed correctly. If the periodic scanning encounters an error, the status will display the error details.
Remove an Agentless Workload Scanning Integration
Start in the Lacework console.
- In Settings > Integrations > Cloud accounts, find the integration that you would like to remove.
- Toggle the integration State to disabled, or Delete the integration using the actions menu on the right.
Using Terraform, run terraform destroy for the Agentless module.
How to Add or Remove Google Cloud Projects
Add or Remove Google Cloud Projects using the Lacework Console
Using the Lacework Console to add or remove projects is not possible for a Google Cloud project integration.
See the Terraform method instead.
Add or Remove Google Cloud Projects using Terraform
If you want to add or remove projects from your integration, you will need to update your main.tf file and rerun Terraform.
Add or remove the Google Cloud projects from the
project_filter_listin yourmain.tffile:Example for adding projectsproject_filter_list = [
"monitored-project-1",
"monitored-project-2",
"additional-project-1",
"additional-project-2"
]If you are executing Terraform outside the Google Cloud Console, use the following gcloud commands prior to running Terraform:
gcloud auth logingcloud auth application-default logingcloud config set project <scanning_project>- Replace
<scanning-project>with the project that hosts the scanning resources.
- Replace
Run
terraform initto initialize the working directory (containing the Terraform files).Run
terraform planand review the changes that will be applied.Once satisfied with the changes that will be applied, run
terraform applyto execute Terraform.
Next Steps
- View scanning results in the Lacework Console.
- Read FAQs on Agentless Workload Scanning.
OrganizationIntegration
Agentless Workload Scanning for Google Cloud Organization 📎
Overview
This article describes how to integrate your Google Cloud organization with Lacework's Agentless Workload Scanning.
Google Cloud Organization Integration
Choose which type of Google Cloud Agentless Workload Scanning integration that you want to perform:
See Lacework Terraform Module for Agentless Workload Scanning on Google Cloud for all available Terraform integration options and additional deployment examples.
Option 1: Organization Integration - Single Region
In this example, we add Terraform modules to one Google Cloud region:
- Global resources are deployed to
us-east1.- Service Accounts/Permissions
- Object Storage Bucket
- Secret Manager Secret
- Regional resources are deployed to
us-east1.- Cloud Run Job
- Cloud Scheduler Job
Use the example below for your
versions.tffile:terraform {
required_version = ">= 0.12.31"
required_providers {
lacework = {
source = "lacework/lacework"
version = "~> 1.3"
}
}
}Use the example below for your
main.tffile:# Set your Lacework profile here. With the Lacework CLI, use
# `lacework configure list` to get a list of available profiles.
provider "lacework" {
profile = "lw_agentless"
}
provider "google" {
alias = "use1"
region = "us-east1"
# Set the project name for where the scanning resources are hosted.
project = "agentless-lw-scanner"
}
module "lacework_gcp_agentless_scanning_org_single_region" {
source = "lacework/agentless-scanning/gcp"
version = "~> 0.1"
providers = {
google = google.use1
}
# Provide a list of Google Cloud projects and/or folders that you want to monitor here.
# If the project_filter_list is omitted, all projects and folders in the organization are scanned.
#project_filter_list = [
# "monitored-project-1",
# "monitored-project-2",
# "folder/monitored-folder-1",
# "folder/monitored-folder-2
#]
integration_type = "ORGANIZATION"
organization_id = "123456789012"
global = true
regional = true
lacework_integration_name = "agentless_from_terraform"
}If you are executing Terraform outside the Google Cloud Console, use the following gcloud commands prior to running Terraform:
gcloud auth logingcloud auth application-default logingcloud config set project <scanning_project>- Replace
<scanning-project>with the project that will host the scanning resources (agentless-lw-scannerin this example).
- Replace
Run
terraform initto initialize the working directory (containing the Terraform files).Run
terraform planand review the changes that will be applied.Once satisfied with the changes that will be applied, run
terraform applyto execute Terraform.
Option 2: Organization Integration - Multi Region
In this example, we add Terraform modules to two Google Cloud regions:
- Global resources are deployed to
us-east1.- Service Accounts/Permissions
- Object Storage Bucket
- Secret Manager Secret
- Regional resources are deployed to
us-east1andus-central1.- Cloud Run Job
- Cloud Scheduler Job
Use the example below for your
versions.tffile:terraform {
required_version = ">= 0.12.31"
required_providers {
lacework = {
source = "lacework/lacework"
version = "~> 1.3"
}
}
}Use the example below for your
main.tffile:# Set your Lacework profile here. With the Lacework CLI, use
# `lacework configure list` to get a list of available profiles.
provider "lacework" {
profile = "lw_agentless"
}
provider "google" {
alias = "use1"
region = "us-east1"
# Set the project name for where the scanning resources are hosted.
# This must be assigned to the `global` region.
project = "agentless-lw-scanner"
}
provider "google" {
alias = "usc1"
region = "us-central1"
# Set your default project ID for this region. This isn't required for
# the Agentless integration, but is required by the Google Provider.
# https://registry.terraform.io/providers/hashicorp/google/latest/docs/guides/getting_started#configuring-the-provider
project = "default-project-id"
}
module "lacework_gcp_agentless_scanning_org_multi_region" {
source = "lacework/agentless-scanning/gcp"
version = "~> 0.1"
providers = {
google = google.use1
}
# Provide a list of Google Cloud projects and/or folders that you want to monitor here.
# If the project_filter_list is omitted, all projects and folders in the organization are scanned.
#project_filter_list = [
# "monitored-project-1",
# "monitored-project-2",
# "folder/monitored-folder-1",
# "folder/monitored-folder-2
#]
integration_type = "ORGANIZATION"
organization_id = "123456789012"
global = true
regional = true
lacework_integration_name = "agentless_from_terraform"
}
module "lacework_gcp_agentless_scanning_org_multi_region_usc1" {
source = "lacework/agentless-scanning/gcp"
version = "~> 0.1"
providers = {
google = google.usc1
}
regional = true
global_module_reference = module.lacework_gcp_agentless_scanning_org_multi_region
}If you are executing Terraform outside the Google Cloud Console, use the following gcloud commands prior to running Terraform:
gcloud auth logingcloud auth application-default logingcloud config set project <scanning_project>- Replace
<scanning-project>with the project that will host the scanning resources (agentless-lw-scannerin this example).
- Replace
Run
terraform initto initialize the working directory (containing the Terraform files).Run
terraform planand review the changes that will be applied.Once satisfied with the changes that will be applied, run
terraform applyto execute Terraform.
Verify your Agentless Workload Scanning Integration
In the Lacework console, the status of the integration at Settings > Integrations > Cloud accounts will display as Success if all resources are installed correctly. If the periodic scanning encounters an error, the status will display the error details.
Remove an Agentless Workload Scanning Integration
Start in the Lacework console.
- In Settings > Integrations > Cloud accounts, find the integration that you would like to remove.
- Toggle the integration State to disabled, or Delete the integration using the actions menu on the right.
Using Terraform, run terraform destroy for the Agentless module.
How to Add or Remove Google Cloud Projects or Folders
Follow the steps below if you want to add or remove projects or folders from your integration.
Add or Remove Google Cloud Projects or Folders using the Lacework Console
Go to Settings > Integrations: Cloud accounts.
Find your Agentless integration and click Edit in the additional options.
Find the Limit Projects field and add your additional projects/folders (comma-delimited).
- If this field is currently blank, then all new and current projects within the organization are scanned automatically.
- If adding folders, the folder name must be prefixed with "folder/".
For example:folder/myscannedfolder1,folder/myscannedfolder2
Click Save.
Add or Remove Google Cloud Projects or Folders using Terraform
If you want to add or remove projects or folders from your integration, you will need to update your main.tf file and rerun Terraform.
Add the Google Cloud projects/folders to the
project_filter_listin yourmain.tffile:Exampleproject_filter_list = [
"monitored-project",
"folder/monitored-folder",
"additional-project",
"folder/additional-folder"
]noteIf this field is commented out or omitted, then all new and current projects within the organization are scanned automatically.
If you are executing Terraform outside the Google Cloud Console, use the following gcloud commands prior to running Terraform:
gcloud auth logingcloud auth application-default logingcloud config set project <scanning_project>- Replace
<scanning-project>with the project that hosts the scanning resources.
- Replace
Run
terraform initto initialize the working directory (containing the Terraform files).Run
terraform planand review the changes that will be applied.Once satisfied with the changes that will be applied, run
terraform applyto execute Terraform.
Next Steps
- View scanning results in the Lacework Console.
- Read FAQs on Agentless Workload Scanning.
- Lacework CLI
- Terraform
| Use Cases | Lacework Feature(s) | Data Source |
|---|---|---|
| User Entity Behaviour Analytics (UEBA) | Kubernetes Audit Log Dashboard Kubernetes Anomaly Detection Kubernetes Audit Log Polygraph | GKE Audit |
GKE Audit setup using Lacework CLI 📎
lacework generate k8s gke
Generate and/or execute Terraform code for GKE integration
Synopsis
Use this command to generate Terraform code for deploying Lacework into a GKE environment.
By default, this command interactively prompts for the required information to setup the new cloud account. In interactive mode, this command will:
- Prompt for the required information to setup the integration
- Generate new Terraform code using the inputs
- Optionally, run the generated Terraform code:
- If Terraform is already installed, the version is verified as compatible for use
- If Terraform is not installed, or the version installed is not compatible, a new version will be installed into a temporary location
- Once Terraform is detected or installed, Terraform plan will be executed
- The command will prompt with the outcome of the plan and allow to view more details or continue with Terraform apply
- If confirmed, Terraform apply will be run, completing the setup of the cloud account
This command can also be run in noninteractive mode. See help output for more details on the parameter value(s) required for Terraform code generation.
lacework generate k8s gke [flags]
Options
      --apply                                         run terraform apply without executing plan or prompting
      --existing_service_account_name string          specify existing service account name
      --existing_service_account_private_key string   specify existing service account private key (base64 encoded)
      --existing_sink_name string                     specify existing sink name
  -h, --help                                          help for gke
      --integration_name string                       specify a custom integration name
      --organization_id string                        specify the organization id (only set if organization_integration is set)
      --organization_integration                      enable organization integration
      --output string                                 location to write generated content (default is ~/lacework/gcp)
      --prefix string                                 prefix that will be used at the beginning of every generated resource
      --project_id string                             specify the project id to be used to provision lacework resources (required)
      --service_account_credentials string            specify service account credentials JSON file path (leave blank to make use of google credential ENV vars)
      --wait_time string                              amount of time to wait before the next resource is provisioned
Options inherited from parent commands
  -a, --account string      account subdomain of URL (i.e. <ACCOUNT>.lacework.net)
  -k, --api_key string      access key id
  -s, --api_secret string   secret access key
      --api_token string    access token (replaces the use of api_key and api_secret)
      --debug               turn on debug logging
      --json                switch commands output from human-readable to json format
      --nocache             turn off caching
      --nocolor             turn off colors
      --noninteractive      turn off interactive mode (disable spinners, prompts, etc.)
      --organization        access organization level data sets (org admins only)
  -p, --profile string      switch between profiles configured at ~/.lacework.toml
      --subaccount string   sub-account name inside your organization (org admins only)
SEE ALSO
- lacework generate k8s - Generate Kubernetes integration IaC
GKE Audit setup using Terraform 📎
To integrate with GKE, Lacework recommends using guided configuration. The guided interface takes your input and generates a script that downloads and sets up all necessary Lacework CLI and Terraform components to create the integration non-interactively.
To use guided configuration:
- In the Lacework Console go to Settings > Integrations > Cloud accounts.
- Click + Add New.
- Click Google Cloud Platform and select Guided configuration.
Alternatively, follow the steps in this topic to use the Lacework CLI to generate Terraform code. Or you can create the main.tf file manually and run Terraform from Google Cloud Shell.
Overview
Lacework integrates with GKE Audit Logs in an event-based streaming pull mode for monitoring GKE admin read, data read, and data write events. This topic describes how to integrate with GKE by running Lacework Terraform modules from Google Cloud Shell.
If you are new to the Lacework Terraform provider, or Lacework Terraform modules, read Terraform for Lacework Overview to learn the basics on how to configure the provider and more.
Resources
Organization level integrations cover all existing projects in the organization, and automatically add any new projects added after the initial integration.
Project level integrations cover only specific projects and any new projects must be added as required.
To integrate at the organization or project level, Lacework requires the following resources be provisioned in Google Cloud:
- Google Cloud Project - A project to contain the required cloud resources with billing enabled. When integrating at the organization level, Lacework recommends that you create a project specifically for Lacework resources. When integrating at the project level, all required resources for Lacework may be provisioned within the project being integrated.
- Google Pub/Sub Topic - Topic for GKE Audit Logs events
- Google Pub/Sub Subscription - Subscription for Lacework to pull the GKE Audit Log events from
- Google Logging Sink - To export Cloud Audit Logs to the Pub/Sub topic
- Service Account for Lacework - A service account will be created to provide Lacework read-only access to Google Cloud Platform with the following roles:
- Project/Organization Level Integration
roles/pubsub.publisherroles/pubsub.subscriberroles/monitoring.viewer
- Project/Organization Level Integration
For organization level integrations, follow the steps in Integrate GKE Audit Logs at the Organization Level.
For project level integrations, follow the steps in Integrate GKE Audit Logs at the Project Level.
Requirements
Google Cloud Shell inherits the permissions of the user running Cloud Shell. Before beginning, determine whether the integration between Google Cloud and Lacework will be at the organization level or the project level, and then ensure the user account running Google Cloud Shell has the following permissions:
- Organization level integrations
roles/owner- For an organization level integration, Lacework recommends that you create a new project specifically for the Lacework resources. The user account used to run Google Cloud Shell must haveOwnerpermissions for that project.roles/resourcemanager.organizationAdminroles/iam.organizationRoleAdmin
- Project level integrations
roles/owner- For a project level integration, Lacework recommends that you use the project being integrated to provision the required resources. The user account used to run Google Cloud Shell must haveOwnerpermissions for every project being integrated into Lacework.
In addition to Google Cloud permissions, the Terraform provider for Lacework must be configured to authenticate with the Lacework API using a Lacework API key and secret access key. For more information on configuring the Terraform Provider for Lacework, visit Terraform for Lacework Overview.
Module Inputs Reference
For an up-to-date guide on all available configuration inputs, refer to the Terraform Registry documentation:
Module Dependencies
Lacework Terraform modules for GCP have the following dependencies that will be installed when running terraform init:
For detailed information on these dependencies, visit Lacework on the Terraform Registry.
Google Cloud Shell Configuration
Google Cloud Shell is an embedded terminal/command-line interface that you can use within the Google Console. Google Cloud Shell comes with tools pre-installed like the Google Cloud SDK, gcloud command-line tool, and Terraform pre-installed to manage and automate your projects and resources in your environment.
Lacework provides a robust command-line interface that generates Terraform code, installs the Terraform CLI (if not already installed), and can run Terraform inside Cloud Shell.
Ingested Logs
Lacework ingests Admin Activity logs and Data Access logs. Admin Activity logs are enabled by GCP by default. You may have to enable Data Access logs at an additional cost from GCP to access the following event groups:
- ADMIN_READ: access to Kubernetes metadata and configuration
- DATA_READ: access to Kubernetes resources
- DATA_WRITE: creation and changes to Kubernetes resources
- In the Google Cloud console, go to IAM & Admin > Audit Logs.
- In the Data Access audit logs configuration table next to Filter, start typing Kubernetes and select Kubernetes Engine API.
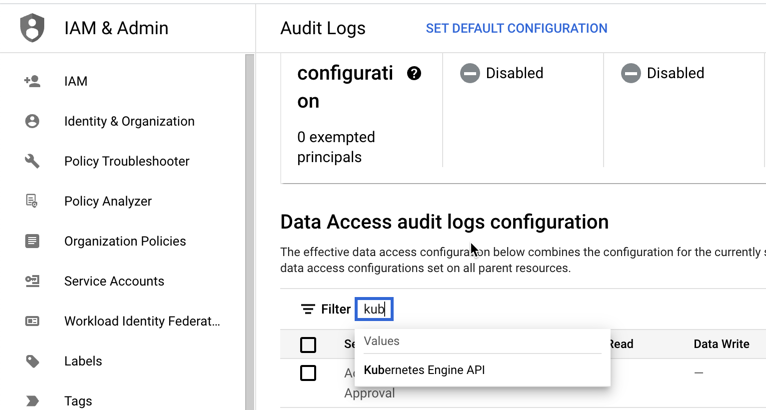
- With Kubernetes Engine API selected, select the logs and click Save.
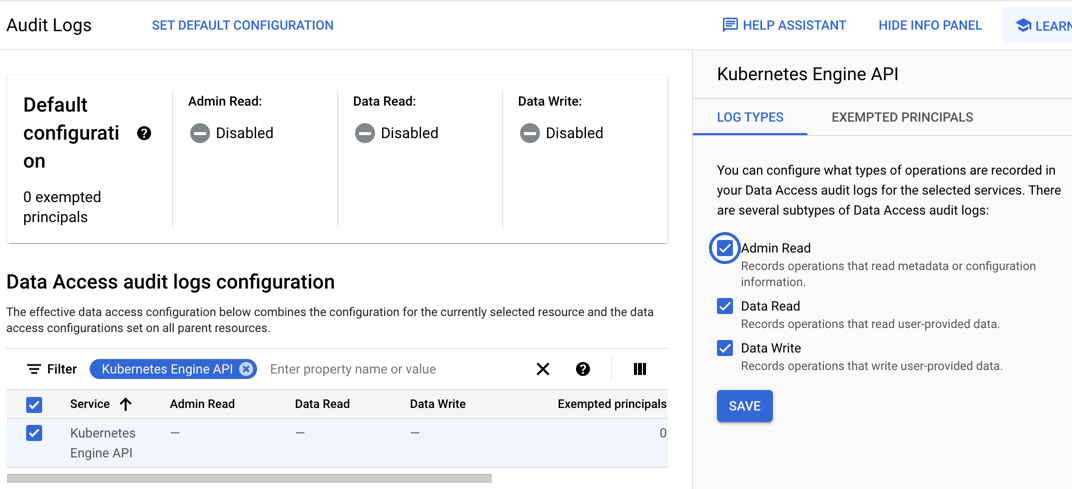
See the following Google Cloud documentation about Configure Data Access audit logs for additional details.
Launch Google Cloud Shell within Google Console
To open Google Cloud Shell, click the Cloud Shell icon in the header bar of the Google Console, and it will launch the Cloud Shell in a pane at the bottom of the browser.
Install the Lacework CLI in Google Cloud Shell
The Terraform provider for Lacework leverages the configuration from the Lacework CLI to authenticate with the Lacework API and configure accounts. Run the following commands to install the Lacework CLI:
mkdir -p "$HOME"/bin
curl https://raw.githubusercontent.com/lacework/go-sdk/main/cli/install.sh | bash -s -- -d "$HOME"/bin
When the script completes, type exit followed by enter to exit your shell. After the shell exits, open Cloud Shell again and the Lacework CLI will be ready for use.
Create Lacework API Key
The Lacework CLI requires an API key and secret to authenticate with Lacework. Lacework API keys can be created by Lacework account administrators via the Lacework Console. For more information, go to API Access Keys.
- Log in to the Lacework Console.
- Click Settings > Configuration > API keys.
- Click + Add New.
- Enter a name for the key and an optional description.
- Click Save.
- Click the ... icon and then Download to save the API key file locally.
The contents of your API key contain a keyId secret, subAccount, and account:
{
  "keyId": "ACCOUNT_ABCEF01234559B9B07114E834D8570F567C824039756E03",
  "secret": "_abc1234e243a645bcf173ef55b837c19",
  "subAccount": "myaccount",
  "account": "myaccount.lacework.net"
}
Configure the Lacework CLI
Google Cloud Shell lets you drag-and-drop the generated KEY.json to upload it automatically.
To configure the CLI with the API key downloaded from the previous step, use the lacework configure command in Cloud Shell and provide the following:
account: Account subdomain of URL (i.e.YourAccount.lacework.net)api_key: API Access Keyapi_secret: API Access Secret
Run the command:
user@cloudshell:~ $ lacework configure -j CUSTOMER_EED10DA9136E9F763477FF5933464DD0C3DADF2CDDEFABC.json
▸ Account: your_account_name
▸ Access Key ID: CUSTOMER_EED10DA9136E9F763477FF5933464DD0C3DADF2CDDEFABC
▸ Secret Access Key: (*****************************26a0)

You are all set!
For more information, see Lacework CLI documentation.
Deployment Scenarios
- Integrate GKE Audit Logs at the organization level - This deployment scenario configures a new Lacework GKE Audit Log integration for the entire organization.
- Integrate GKE Audit Logs at the project level - This deployment scenario configures a new Lacework GKE Audit Log integration at the single project level.
Integrate GKE Audit Logs at the Organization Level
The following section covers integrating Google Cloud and Lacework for analysis of GKE Audit Logs at the organization level.
Create a GCP Project Using the GCP Console
When creating an integration at the GCP organization level, Lacework recommends having a dedicated project to provision the required resources for the integration between Google Cloud and Lacework. Create the GCP project before running Terraform.
- Log in to the Google Cloud Console.
- Select the project drop-down and click New Project.
- Give the project a Project Name, select a Billing Account, select the Organization you are integrating.
- Click Create to create the new project.
Configure Project Owner Permissions to User Account
These next steps configure role/owner permission on the GCP project for the user running Google Cloud Shell.
- In the Google Cloud Console, select the project created for Lacework resources.
- Click the navigation menu and select IAM & Admin > IAM.
- Filter the list and find the user account that will be used to run Google Cloud Shell.
- Click Edit Member and then apply
role/owner. - Click Save.
Run the Lacework CLI in Cloud Shell
Inside Google Cloud Shell, run the following Lacework CLI command:
lacework generate k8s gke           \
  --organization_integration        \
  --organization_id OrganizationId  \
  --project_id ProjectId            \
  --noninteractive
The Terraform files are created in the
~/lacework/gkedirectory.Navigate to the
~/lacework/gkedirectory.Run
terraform planand review the changes that will be applied.Once satisfied with the changes that will be applied, run
terraform applyto execute Terraform.
For details about the lacework generate k8s gke command, see the CLI documentation.
If creating the main.tf file manually, you can use Terraform inputs to customize Lacework Terraform modules. See the documentation on the Terraform Registry for the complete list of inputs for each module.
Validate the Configuration
To confirm that the cloud account integrations are working, use the Lacework CLI or log in to the Lacework Console.
To validate the integration using the CLI, run the lacework cloud-account list command. GKE integrations are listed as GcpGkeAudit.
To validate the integration using the Lacework Console, log in to your account and go to Settings > Integrations > Cloud Accounts
Integrate GKE Audit Logs at the Project Level
The following section covers integrating Google Cloud and Lacework for analysis of GKE Audit Logs at the project level.
Configure Project Owner Permissions for User Account
These next steps configure role/owner permission on the GCP project for the user running Google Cloud Shell.
- Log in to the Google Cloud Console.
- Select the project being integrated to Lacework from the project selector at the top of the console.
- Click the navigation menu and select IAM & Admin > IAM.
- Filter the list and find the user account that will be used to run Google Cloud Shell.
- Click Edit Member and then apply
role/owner. - Click Save.
Run the Lacework CLI in Cloud Shell
Inside Google Cloud Shell, run the following Lacework CLI command:
lacework generate k8s gke  \
  --project_id ProjectId   \
  --noninteractive
The Terraform files are created in the
~/lacework/gkedirectory.Navigate to the
~/lacework/gkedirectory.Run
terraform planand review the changes that will be applied.Once satisfied with the changes that will be applied, run
terraform applyto execute Terraform.
If creating the main.tf file manually, you can use Terraform inputs to customize Lacework Terraform modules. See the documentation on the Terraform Registry for the complete list of inputs for each module.
Validate the Configuration
To confirm that the cloud account integrations are working, use the Lacework CLI or log in to the Lacework Console.
To validate the integration using the CLI, run the lacework cloud-account list command. GKE integrations are listed as GcpGkeAudit.
To validate the integration using the Lacework Console, log in to your account and go to Settings > Integrations > Cloud Accounts
Exclusion Filters
If you choose to manually create the main.tf file, you can use the Lacework GKE audit log module to define exclusion filters to reduce logs. For details about how to use exclusion filters, see exclusion_filters.
terraform {
  required_providers {
    lacework = {
      source = "lacework/lacework"
    }
  }
}
provider "google" {}
provider "lacework" {}
module "gcp_organization_level_gke_audit_log" {
  source            = "lacework/gke-audit-log/gcp"
  version           = "~> 0.1"
  integration_type  = "ORGANIZATION"
  project_id        = "example-project-123"
  organization_id   = "my-organization-id"
  exclusion_filters = list(object({
    filter      = string
    name        = string
    description = string
  }))
}
| Use Cases | Lacework Feature(s) | Data Source |
|---|---|---|
| Vulnerability Management | Vulnerability Management Dashboard | GCR |
- Lacework Console
- Terraform
GCR setup using the Lacework Console 📎
Navigate to GCR Integration
- Log in to the Lacework Console with an account with admin permissions.
- Navigate to Settings > Integrations > Container registries.
- Click + Add New.
- Click Google Container Registry (GCR).
- Click Next.
- Follow the steps in the next section.
Integrate with GCR
GCR integrations can be done at the organization, folder, project, or bucket level.
To integrate GCR with Lacework, follow these steps:
- Configure the registry and complete any optional settings.
- Click Save. The integration status displays Integration Successful only after its first completed assessment.
- Verify that assessments have started by viewing the table in Vulnerabilities > Containers.
After an image is assessed, Lacework reports its results in the table. Select Last 24 hours above the table to view the assessment results.
Configure Registry
| Setting Name | Description |
|---|---|
| Name | Specify a unique name for the container registry in the Lacework Console. |
| Upload GCP Credentials | Upload a JSON-formatted Service Account Key to use for the integration; this auto-populates the Private Key ID, Client Email, and Private Key fields. |
| Client ID | Specify a Client ID for the service account that has been granted access to the organization, folder, or project that contains the registry (or registries). If integrating at the organization, folder, or project level, assign the storage.objectViewer role to the service account for the organization/folders/projects that contain the buckets used by the registry hosts.Note: Granting this role provides read access to all storage buckets within the organization, folder(s), or project(s). If integrating at the bucket level, assign the storage.objectViewer role to the service account for the bucket called artifacts.PROJECT-ID.appspot.com where PROJECT-ID is the project that hosts the registry (or registries).Additionally, the following APIs or services must be enabled (for any level of integration): - Cloud Resource Manager API - Google Container Registry API - Billing |
| Private Key ID | Specify the private key ID for the service account that has granted storage.objectViewer role for access to the Google project that contains the Google Container Registry (GCR). |
| Client Email | Specify the client email associated with the service account that has granted the storage.objectViewer role for access to the Google project that contains the Google Container Registry (GCR). |
| Private Key | Specify the private key for the specified private key ID. See Private Key Format below for guidance on formatting your key. |
| Registry Domain | From the drop-down, select one of the supported GCP regions: 1) gcr.io 2) us.gcr.io 3) eu.gcr.io 4) asia.gcr.io For more information, see Container Registry Pushing and pulling images. Note: Do not prefix the URL with https://. |
You cannot copy the private key from an editor because of an issue copying the new line characters. You must copy a raw version of the key using the jq utility as described in the next steps:
1. To view the private key raw text, enter the following command, where YourFileName.json is the name of the file downloaded when you created the GCP Service Account:text<br/>cat YourFileName.json | jq -r '.private_key'<br/>
1. Copy all text displayed in the output including the BEGIN and END lines.
Optional Settings
| Setting Name | Description |
|---|---|
| Limit Image Tags | If you do not want to assess all images in this registry, specify text from an image tag so that only images with matching tag text will be assessed. To change which images you want to assess, update this field so the change is captured during the next polling period. You can input multiple tags. If you specify tag and label limits, they function as an AND. Single wildcards are also supported and can be used to match multiple image tags (for example: abc* or *xyz). |
| Limit Image Labels | If you do not want to assess all images in this registry, specify key pairs so that only images with matching label key pairs will be assessed. To change which images you want to assess, update this field so the change is captured during the next polling period. Supported field input: key:value. If you specify tag and label limits, they function as an AND. |
| Limit Repositories | If you do not want to discover/assess all repositories in this registry, specify a comma-separated list of repositories to discover/assess (without spaces recommended). To change which repositories you want to assess, update this field so the change is captured during the next polling period. |
| Images per Repo | Select the maximum number of newest container images to discover/assess per repository. NOTE: Do not include the registry in the repository name(s). |
| Non-OS Package Support | This feature is enabled by default. Select No if you want to disable scanning of language libraries. |
| [END]:# |
GCR setup using Terraform 📎
Create a GCR Integration Using Terraform
For organizations using Terraform to manage their environments, Lacework maintains the Lacework Terraform Provider that enables integrating supported container registries with Lacework using automation.
If you are new to the Lacework Terraform Provider, or Lacework Terraform Modules, read the Terraform for Lacework Overview to learn the basics on how to configure the provider and more.
terraform {
  required_providers {
    lacework = {
      source  = "lacework/lacework"
    }
  }
}

provider "lacework" {}

provider "google" {}

module "lacework_gcr" {
  source  = "lacework/gcr/gcp"
  version = "~> 2.0"

  # Supported domains are gcr.io, us.gcr.io, eu.gcr.io, or asia.gcr.io
  registry_domain = "us.gcr.io"

  # Optionally, a project ID can be specified with the input 'project_id'
}
Additional information on the lacework/gcr/gcp module can be found on the Terraform Registry.
Validate the Integration
After Terraform finishes applying changes, you can use the Lacework CLI to validate the integration is working.
Open a Terminal and trigger an on-demand container vulnerability scan of one of your repositories that lives in the GCR registry you just integrated:
lacework vuln ctr scan YourGoogleRegistryDomain YourRepository YourTagOrImageDigest --poll
To list all container registries configured in your account run lacework vuln ctr registries
| Use Cases | Lacework Feature(s) | Data Source |
|---|---|---|
| Vulnerability Management | Vulnerability Management Dashboard | GAR |
- Lacework Console
- Terraform
GAR setup using the Lacework Console 📎
Navigate to GAR Integration
- Log in to the Lacework Console with an account with admin permissions.
- Navigate to Settings > Integrations > Container registries.
- Click + Add New.
- Click Google Artifact Registry (GAR).
- Click Next.
- Follow the steps in the next section.
Integrate with GAR
GAR integrations can be done at the organization, folder, project, or repository level.
Each integration will only support one region.
To integrate GAR with Lacework, follow these steps:
- Configure the registry and complete any optional settings.
- Click Save. The integration status displays Integration Successful only after its first assessment completes.
- Verify that assessments have started by viewing the table in Vulnerabilities > Containers.
After an image is assessed, Lacework reports its results in the table. Select Last 24 hours above the table to view the assessment results.
Configure Registry
| Setting Name | Description |
|---|---|
| Name | Specify a unique name for the container registry in the Lacework Console. |
| Upload GCP Credentials | Upload a JSON-formatted Service Account Key to use for the integration; this auto-populates the Private Key ID, Client Email, and Private Key fields. |
| Client ID | Specify a Client ID for the service account that has been granted access to the organization, folder, or project that contains the registry (or registries). If integrating at the organization level, assign the roles/artifactregistry.reader and roles/storage.objectViewer roles to the service account for the organization that contains the registries.If integrating at the folder level, assign the roles/artifactregistry.reader and roles/storage.objectViewer roles to the service account for the folder that contains the registries.If integrating at the project level, assign the roles/artifactregistry.reader and roles/storage.objectViewer roles to the service account for the project that contains the registry (or registries).If integrating at the repository level, assign the roles/artifactregistry.reader role to the service account for the repository that resides within the registry. Also, assign the roles/storage.objectViewer role to the service account for the project where the repository is located. |
| Private Key ID | Specify the private key ID for the private key that should be used to authenticate the service account that was specified in the Client ID setting. |
| Client Email | Specify the client email associated with the service account that was specified in the Client ID setting. |
| Private Key | Specify the private key that should be used to authenticate the service account that was specified in the Client ID setting IMPORTANT: You cannot just copy the private key from the editor because of an issue copying the new line characters. You must copy a raw version of the key using the “jq” utility as described in the next steps: 1) To view the private key raw text, enter the following command, where YourFileName.json is the name of the file downloaded when you created the GCP Service Account:cat YourFileName.json | jq -r '.private_key'2) Copy all text displayed in the output including the BEGIN and END lines. |
| Registry Domain | From the drop-down, select one of the supported GCP regions. For details, see Repository and Image Names IMPORTANT: Do not prefix the URL with https://. |
Optional Settings
| Setting Name | Description |
|---|---|
| Limit Image Tags | If you do not want to assess all images in this registry, specify text from an image tag so that only images with matching tag text will be assessed. To change which images you want to assess, update this field so the change is captured during the next polling period. You can input multiple tags. If you specify tag and label limits, they function as an AND. Single wildcards are also supported and can be used to match multiple image tags (for example: abc* or *xyz). |
| Limit Image Labels | If you do not want to assess all images in this registry, specify key pairs so that only images with matching label key pairs will be assessed. To change which images you want to assess, update this field so the change is captured during the next polling period. Supported field input: key:value. If you specify tag and label limits, they function as an AND. |
| Limit Repositories | If you do not want to discover/assess all repositories in this registry, specify a comma-separated list of repositories to discover/assess (without spaces recommended). To change which repositories you want to assess, update this field so the change is captured during the next polling period. |
| Images per Repo | Select the maximum number of newest container images to discover/assess per repository. NOTE: Do not include the registry in the repository name(s). |
| Non-OS Package Support | This feature is enabled by default. Select No if you want to disable scanning of language libraries. |
| [END]:# |
GAR setup using Terraform 📎
Integrate with Google Artifact Registry Using Terraform
The following example creates a new least-privilege service account to access the Google Artifact Registry of the project configured by automation and integrates it with Lacework.
terraform {
  required_providers {
    lacework = {
      source = "lacework/lacework"
    }
  }
}

provider "lacework" {}

provider "google" {}

module "lacework_gar" {
  source    = "lacework/gar/gcp"
  version   = "~> 0.1"
}
For more information about the Lacework Google Artifact Registry module, see the lacework gar module on the Terraform Registry.
See also the lacework_integration_gar